Thursday 30 November 2017

What are sitelinks and how can I get them?

Back in 2015, we published an article entitled ‘How do I get sitelinks to appear in my site’s search results?’ which looked at how to get the hallowed set of additional links which can appear beneath your website’s SERP listing, known as ‘sitelinks’.

At the time of publication, this was all up-to-the-minute, cutting-edge information. However, since then, Google has made a change to the way that Search Console handles sitelinks, making our invaluable words of wisdom sadly outdated.

As a result, we’ve written up this refreshed and revised guide containing everything you need to know about sitelinks and how you can give yourself the best chance of getting them.

What are sitelinks?

As I hinted at in the introduction just now, sitelinks are additional links which appear beneath the main URL for a brand or publisher when you search for it on Google. They deep link to other pages within your site, and are designed by Google to “help users navigate your site”.

N.B.: These are not to be confused with sitelink extensions in Google AdWords, which are very similar but appear in AdWords ads. AdWords users have full control over whether these links appear and what they contain, unlike organic links – as we’ll cover in just a moment.

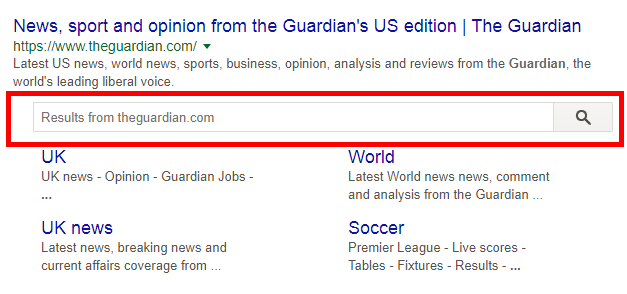
In some cases, sitelinks will also appear with a handy searchbox which lets the user search within your site directly from the SERP.

Here’s what the sitelinks for Search Engine Watch look like:

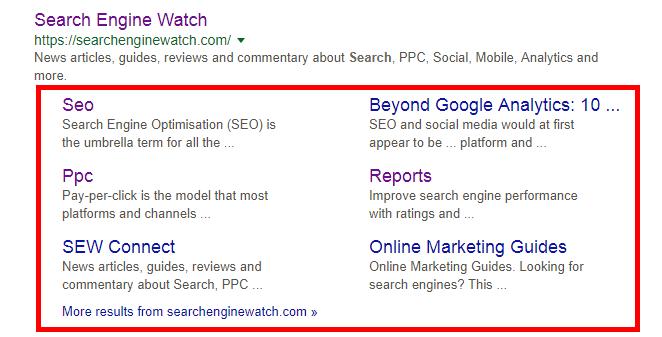
Sadly, no searchbox as of yet.

Right away you can see that these are a mixture of category pages, static pages within our site, and the odd article.

A couple of these are links we would choose to feature – the SEO and PPC categories are key sections of our site – but others are decidedly not: Online Marketing Guides, for example, is a static page from nearly two years ago which links to articles on search engines of different kinds.

The reason for this is that Google pulls in sitelinks automatically, rather than letting the publisher choose what they want to feature.

Sitelinks can be a little bit of a double-edged sword in this regard: even if you can get Google to display them, they might not necessarily be the links you would have chosen to display.

But having sitelinks appear under your search result is still a positive thing overall. Here’s why:

They give your brand more SERP real estate

You can get up to six sitelinks for your SERP listing, plus a searchbox if you can wrangle one. On desktop, this means that four or five times as much SERP space is given over to your listing, while on mobile, a sitelinked listing can take up the entire screen.

This has the benefit of further pushing down any irrelevant or unwanted results, news articles or social mentions for your site – as well as any competitor results that might appear – and makes users more likely to click on your website rather than another result about you.

Based on the statistic that the first three results in search account for nearly 55% of all clicks, Blogging Wizard calculated that having sitelinks could boost click-through rate for the top result by around 20%.

They give the user more options for navigating your site

Users searching for your site on Google might not necessarily want to land on your homepage. Sitelinks on the SERP provide them with a direct link to other parts of your site which might be more relevant to them, or encourage them to explore sections that they might not have known about.

If your SERP result has a quick search bar, they can use it to navigate directly to the page they’re looking for, saving them a step in the user journey.

They direct traffic to other (possibly under-served) areas of your site

Hopefully your website is laid out in a way that allows users to easily find the content or pages that you want to promote. But even then, they are unlikely to be as visible or straightforward to click through to as a link on the SERP.

Sitelinks have the benefit of distributing organic search traffic that would normally be concentrated on your homepage across other areas of your site. However, one side effect of this that is that these pages will effectively become landing pages for your site, and so you should bear in mind that a lot of people might be forming their first impression of your site from these pages.

True, anyone can click a link to a part of your site other than the homepage and land on your site that way, but these links are present on Google, and you can guarantee that a certain percentage of users are clicking them to get to your site. So make sure they look their best!

What Google changed about sitelinks

Up until October 2016, Google had one feature which allowed site owners a small modicum of control over which pages could be displayed as sitelinks for their website.

Google Search Console previously had an option to ‘demote’ sitelinks, in which site owners could specify any URL they particularly didn’t want to appear as a sitelink. Google said that while it couldn’t guarantee the page would never appear, it would “get the hint”.

But late last year, Google Webmasters made the announcement that, “after some discussion & analysis”, they would be removing the Demote Sitelinks setting in Search Console. They elaborated,

“Over the years, our algorithms have gotten much better at finding, creating, and showing relevant sitelinks, and so we feel it’s time to simplify things.”

In other words – we believe we have the ability to display the most relevant sitelinks for the user, without your input!

Google did also offer some insight into how site owners can influence the sitelinks that appear for their website, saying:

“We only show sitelinks for results when we think they’ll be useful to the user. If the structure of your site doesn’t allow our algorithms to find good sitelinks, or we don’t think that the sitelinks for your site are relevant for the user’s query, we won’t show them. […] Sitelinks have evolved into being based on traditional web ranking, so the way to influence them is the same as other web pages.”

They followed this up with a few best practice tips to help improve the quality of sitelinks for your website.

So, I know you’re dying for me to get to the good bit already: What can you do to make sitelinks, and more importantly the right sitelinks, appear for your website?

How can I get sitelinks for my website?

Overall, the best practice advice for how to get sitelinks to appear for your website boils down to having a high-quality site which Google can crawl easily. Google itself mentions in the excerpt above that the “structure of your site” needs to allow its algorithms to find good sitelinks, or it won’t display them.

Luckily, the steps you can take to improve your chances of getting sitelinks are all things that will improve your overall SEO, and make your website easier to navigate for visitors. You may find that you’re already doing several of them.

Rank #1 for your brand name in search results

This one might seem like a no-brainer to some, but the most basic prerequisite for getting sitelinks is that you be the top ranked search result when someone searches for your brand or website name. Google doesn’t award sitelinks to the second, third, fourth or other lower-down SERP rankings.

For example, if I search for Wired magazine from the UK, the UK publication – wired.co.uk – is the one that ranks top for its brand name and gets sitelinks, while its US site, wired.com, ranks lower down.

If you’re struggling to rank #1 for your brand name among other websites with a similar or the same name, a rebrand to a more unique name or URL might give you a better chance of getting to the top.

Build and submit an XML sitemap

A sitemap is a lot like what it sounds like: a ‘map’ of your website which lists every page on the site, which can be designed for users or for search engines, in both cases to help them navigate the site.

In this case, we’re talking about a file hosted on your website’s server which tells search engines about the organization of your site’s content, and allow search spiders to more intelligently crawl your site.

Google Search Console Help Center has a set of instructions that you can follow on how to build and submit a sitemap. If you have a WordPress site, though, you can sit back and relax as a sitemap is already automatically generated and submitted to search engines for you.

Other steps that you can take that will allow search engines to crawl your site more quickly and accurately:

  • Make sure that your site’s structure and hierarchy are as clear and logical as possible, with your homepage as the “root” page (the starting point). For example, if you’re an online retailer selling clothing, the navigation for your site might be formatted like this:

Home > Clothing > Women’s Clothing > Accessories > Handbags

If you have any legacy structures within your site that make navigation obscure or overly complicated, now might be the time to overhaul them.

  • Use internal links with clear and informative anchor text.
  • Make sure that the pages on your site are well-linked to each other, particularly the ones you want to appear as sitelinks – Google takes the number of internal/external links into account when judging the importance of pages for sitelinks.
  • Use Fetch as Google to test whether Google can crawl and index important pages within your site.
  • Make sure that your website’s main menu only features the most important categories.
  • Use relevant and accurate meta descriptions, title tags and alt text throughout your site.
  • Avoid thin, insubstantial content, duplicate content and of course spammy-looking keyword stuffing techniques.
  • Try to improve your site speed and page load times, and make sure that your site is mobile-optimized to maximize your chances of getting sitelinks on mobile.

Whew! That was a lot of points, but as I say, the steps you can take to have the best chance of getting sitelinks are mostly just good overall SEO practices, and you should be doing most of them anyway.

Bear in mind that there’s no still guarantee sitelinks will appear after you do this, but you’ll be in a much better position to get them.

How can I get a searchbox to appear with my sitelinks?

All of this advice so far has dealt purely with how to get sitelinks to appear for your website, but as I’ve mentioned, some lucky websites are also awarded with a handy searchbox which allows users to search your site directly from the SERP.

Is there anything you can do to influence whether or not this searchbox appears for your site? To an extent, yes.

While whether or not you get a sitebox at all is still at the mercy of Google, once you have one, it’s possible to configure it to use your site’s internal search engine to search your site (instead of Google, which is the default). Google Developers has a Sitelinks Searchbox page which details how you can use structured data markup to implement a searchbox that uses your website’s own search engine.

The jury’s out on whether implementing this will increase your likelihood of getting a searchbox to begin with (if you’ve got any data on this either way, it’d be interesting to know!).

But if for some reason you want to make sure that your brand’s search result doesn’t come with a searchbox attached, there’s a way to prevent that. Simply add the following meta tag to your site’s homepage:

<meta name="google" content="nositelinkssearchbox" />

So there you have it: everything you need to know about how to maximize your chances of getting sitelinks. In short, have a quality website, follow SEO best practices, and lay out the welcome mat for search spiders.


source https://searchenginewatch.com/2017/11/30/what-are-sitelinks-and-how-can-i-get-them/

How to Appear in Google Answer Boxes with Your WordPress Site

Do you want your articles to appear in Google answer boxes? Answer boxes are Google’s push to answer questions directly on the search results page. In this article, we will explain how to appear in Google Answer Boxes for WordPress users.

How to appear in Google Answer Boxes for WordPress users

What is a Google Answer Box?

Google Answer box is part of Google’s Knowledge graph. It is an algorithm that tries to answer user’s questions right on the search page.

A search term displaying Google Answer Box

It uses carousels, side boxes, lists, tables, and answer boxes to display the most relevant information at the top. This information is gathered from various sources and the algorithm decides which results should be displayed inside an answer box.

According to research conducted by Advanced Web Ranking, Answer boxes secure almost 32.3% CTR. This makes them immensely important for your WordPress SEO strategy.

How Google Displays Information in The Answer Box?

The purpose of Answer Boxes is to offer instant gratification to the users. This works particularly well when users are looking for factual information like public figures, distances, conversion rates, scores, and similar information.

Instant answer in Google Search result using Knowledge Graph

In such cases, if users got the exact information they needed, then they can move on and search for something else. For many queries it can just display a sidebox from the web’s most reliable knowledge sources like Wikipedia.

In a way, it might sound like Google is trying to keep all the traffic for itself. However, not all users are looking for information that Google’s knowledge graph can answer with accuracy.

If user’s keywords require an opinionated, well thought, or research based answer, then Google relies on other web sources.

Google Answer box displaying other web sources

If you are among the top 10 results for a keyword, then you are already closer to appear in Google Answer Box.

How to Make Your Pages Appear in Google Answer Box?

Google Answer Box results change quite often, and you can easily appear as the best answer by simply improving your content.

Let’s explore a number of content optimization steps that you can take to appear in the answer box.

Add Short and Helpful Answers in Your Content

The purpose of Answer Boxes is to provide quick answers. Make sure that your article answers the question as early in the article as possible.

You also need to make your answer short, concise, and easy to understand.

Provide short and helpful answers in your article

It also helps to include your keywords in the form of a question followed by the short answer.

After that, feel free to add as much detail to your answer as you want. Adding more information will allow you to use the keyword throughout the article, and you can even use the same article to answer other questions your users may have about the same topic.

Answer other questions about the same topic

Optimize Your Page’s Meta Description

Meta description is a brief description explaining what your page is about. It is added in the <head> section of your site’s HTML.

You can add meta description for your articles by using a WordPress SEO plugin like Yoast SEO or All in One SEO plugin.

Optimize meta description for answer box

Make sure that your meta description includes your target keyword. It also needs to explain what questions or topics this particular page will be answering.

For example, our article about WordPress SEO tools and plugins uses this meta description:

“Are you looking for best WordPress SEO plugin and tools to boost your SEO? Check out our list of 9 best WordPress SEO Plugins and Tools.”

Here is how it appears in the answer box.

Meta description optimization effect on Google Answer Box

Utilize Lists, Tables, Table of Contents

Users love properly formatted content because it helps them quickly get the information they need. That’s why websites like list25 are so popular. They publish informative content in a viral listicle format that is easier to consume and share.

Google understands that and tends to highlight the websites that use formatting to make content consumption easier for users.

Tables in Google Answer Box

This includes:

  • Pages that use tables to list items.
  • How to articles that use step by step instructions.
  • Top lists that simply just list items.
  • Lenghty articles that utilize table of contents
  • and more.

This does not mean that you must always use one of these formats to write your articles. However, if using formatting can help your users get to the information quickly, then use it.

Lists in Google Answer Box

Optimize Content with Data Driven Decisions

Data is the most important thing you need for an effective content strategy. This is where Google Analytics comes in. It helps you understand your audience and plan accordingly.

You will need MonsterInsights to properly track user engagement in WordPress. It is the best Google Analytics plugin in the market, and it will help you learn where your users are coming from, and what they do while they are on your site.

These stats provide you a clear picture of what’s already working on your website. You can then expand on it and make informed decisions for better SEO.

Follow SEO Best Practices

Apart from answering the user questions, you also need to make sure that Google can find your page and understand it just as easily.

This means you still need to optimize your posts for SEO just like you would normally do.

  • Include your keywords in SEO title, description, and keywords.
  • Add your focus keyword in content and sub-headings in your article.
  • Properly utilize categories and tags.
  • Make sure there is enough content to cover the topic.
  • Make internal linking a habit and link to your other posts and pages
  • Add title and alt tags to your images.

Are Google Answer Boxes Worth The Effort?

Yes, absolutely. As we mentioned earlier the click-through rate for results in the answer box is way higher. Depending on the topic and your content, it could go as high as 51.2%.

However, we do not recommend you overthink it. The purpose of Answer boxes is to help users find information quickly. If you focus on answering questions through helpful and informative content, then search results will start picking it up.

Google’s search features are always changing. There are no shortcuts that will help you win forever. Building your website as an authority / reliable source of useful information will help you win in the long run.

We hope this article helped you learn how to appear in Google Answer Boxes. You may also want to see our list of the must-have WordPress plugins that will help you take your website to the next level.

If you liked this article, then please subscribe to our YouTube Channel for WordPress video tutorials. You can also find us on Twitter and Facebook.

The post How to Appear in Google Answer Boxes with Your WordPress Site appeared first on WPBeginner.


source http://www.wpbeginner.com/beginners-guide/how-to-appear-in-google-answer-boxes-with-your-wordpress-site/

Quick interview with Ben Gillbanks (Pro Theme Design)


Hi could you tell us a little about yourself and background? Hi! I am a wannabe game developer who fell into web design. I studied digital art at university, specialising in game art, but the course was broad and covered web design (and sound design, special effects, all sorts). After graduating I got a job at Miniclip.com as a game artist, but the company was small, and when they found out I knew more about web design than they did I moved over to doing more of that. Eventually I was promoted to director of web development. In 2005 I started using WordPress, in 2007 I partnered with Darren Hoyt to create a premium theme shop; ProThemeDesign.com. In 2015 I left Miniclip to set out on my own, working exclusively with WordPress.
When did you first stumble upon WordPress?
In 2005 I wanted a better way to manage the content on my website. Previously I had made my own, poorly coded, content management system but it didn’t have any dynamic features. This was around the time when all the cool kids had a web dev blog so I thought I would try out the most popular software. I downloaded loads of them, and WordPress was the only one I could get running without jumping through hoops. I got
Source: https://managewp.org/articles/16727/quick-interview-with-ben-gillbanks-pro-theme-design


source https://williechiu40.wordpress.com/2017/11/30/quick-interview-with-ben-gillbanks-pro-theme-design/

16 Lessons Learned Bootstrapping Kinsta


We’ve been asked a lot by our clients over the years why Kinsta was born, how we started it, and how we got to the level at which we are now. Each company and startup has its own unique story, and personally, I love to read them because I always find a few hidden gems, tips, and how-tos we can use and apply to our own business. This article is about the lessons we learned during our bootstrapping journey, and how we turned our startup into a 7-figure business. Some of our decisions turned out to be great, while others cost us a lot of money and time. But I want to show you that it’s possible to build a profitable SaaS business even if you don’t have any connections, resources, or money.
For those of you who have successfully bootstrapped a business from the ground up, some parts of this post will sound familiar and you’ll probably relate to what I’m talking about. For those of you who are just looking to start your first business, I’m going to try and show you the pros and cons of bootstrapping, what it looks like, and what worked for us. Hopefully, you’ll find something that is applicable to your business.
It’s possible to build a profitable
Source: https://managewp.org/articles/16726/16-lessons-learned-bootstrapping-kinsta


source https://williechiu40.wordpress.com/2017/11/30/16-lessons-learned-bootstrapping-kinsta/

The Best Way to Migrate your blog – Use the Free Migrate Guru plugin


There are many reasons why you may end up cloning a WordPress site. You could move from local server to generation server or the other way around; you may set up a testing domain or organizing server on the web. Perhaps you’re moving your site to an alternate hosting provider, or need a duplicate for a comparative study. Maybe you just like having a backup. Regardless, it’s key that the content compares precisely to the original site. All things considered, what is the point of tinkering around with your variants if they do not correspond to your live site? Nothing! Obviously, you can clone your WordPress site manually. As a rule, this more often than not includes the several processes like the following:
Duplicating your records and database
Transferring them to the new domain
Refreshing the database references
Altering wp-config to fit the new site condition
Let’s be realistic — duplicating a WordPress site on your own is a huge headache. On the off chance that you were looking for alternatives, today is your day of reckoning!
Say hello to Migrate Guru!
As WordPress plugin, Migrate Guru can help you cut down the number of tasks to be performed when you want
Source: https://managewp.org/articles/16725/the-best-way-to-migrate-your-blog-use-the-free-migrate-guru-plugin


source https://williechiu40.wordpress.com/2017/11/30/the-best-way-to-migrate-your-blog-use-the-free-migrate-guru-plugin/

Gutenberg, Telemetry, Calypso, and More With Matt Mullenweg


In this episode, John James Jacoby and I are joined by Matt Mullenweg, co-creator of the WordPress project and CEO of Automattic. We discussed a wide range of topics including, his role on the board of directors at GitLab, Telemetry or data-usage gathering in WordPress, and the WordPress Growth Council. We learned what’s happening with the Mobile teams inside Automattic, the future of Calypso, and the role of Pressable as a testing bed. Last but not least, we find out how beneficial joining HackerOne has been for WordPress and why WordPress.com finally allowed the installation of third-party themes and plugins through its Business Plan.
WPWeekly Meta:
Next Episode: Wednesday, December 13th 3:00 P.M. Eastern
Subscribe to WordPress Weekly via Itunes
Subscribe to WordPress Weekly via RSS
Subscribe to WordPress Weekly via Stitcher Radio
Listen To Episode #296:
Source: https://managewp.org/articles/16724/gutenberg-telemetry-calypso-and-more-with-matt-mullenweg


source https://williechiu40.wordpress.com/2017/11/30/gutenberg-telemetry-calypso-and-more-with-matt-mullenweg/

Wednesday 29 November 2017

WordPress 4.9.1 Security and Maintenance Release


WordPress 4.9.1 is now available. This is a security and maintenance release for all versions since WordPress 3.7. We strongly encourage you to update your sites immediately. WordPress versions 4.9 and earlier are affected by four security issues which could potentially be exploited as part of a multi-vector attack. As part of the core team’s ongoing commitment to security hardening, the following fixes have been implemented in 4.9.1:
Use a properly generated hash for the newbloguser key instead of a determinate substring.
Add escaping to the language attributes used on html elements.
Ensure the attributes of enclosures are correctly escaped in RSS and Atom feeds.
Remove the ability to upload JavaScript files for users who do not have the unfiltered_html capability.
Thank you to the reporters of these issues for practicing responsible security disclosure: Rahul Pratap Singh and John Blackbourn.
Eleven other bugs were fixed in WordPress 4.9.1. Particularly of note were:
Issues relating to the caching of theme template files.
A MediaElement JavaScript error preventing users of certain languages from being able to upload media files.
The inability to edit theme and plugin files on Windows
Source: https://managewp.org/articles/16723/wordpress-4-9-1-security-and-maintenance-release


source https://williechiu40.wordpress.com/2017/11/29/wordpress-4-9-1-security-and-maintenance-release/

Howto: create a front-end profile edit page in WordPress


Just looking for the how-to? Scroll down to ‘How-to starts below’. One on the benefits of WordPress is it’s collection of over 40.000 plugins in the plugin repository. There is probably a plugin available for every feature you can imagine, just as long the feature is not too site specific.
However, as a professional WordPress developer I try to use as little plugins as possible. Therefor I have multiple reasons:
I want to know exacly what code is in my project.
When a error accurs in a plugin you have to rely on someone else to fix a bug.
A plugin almost always has more features than you need.
You have to rely on someone else to release a bugfix.
Less code = better!
Just recently a project I was working on needed a page where users could edit their profile. The website was a internal website for a hospital where specialists and doctors could log-in and find info on different medical publications. And as said, the doctors had te be able to edit their profile by themself.
This was a perfect use case where a plug-in could add this feature to the website. However in my opinion that was just overkill as the only thing needed was a simple form with some logic basicly :).
Source: https://managewp.org/articles/16722/howto-create-a-front-end-profile-edit-page-in-wordpress


source https://williechiu40.wordpress.com/2017/11/29/howto-create-a-front-end-profile-edit-page-in-wordpress/

Evolution of WordPress User Interface (2003 – 2017)

WordPress user interface has evolved steadily since its first release in 2003. WordPress started out as a simple blogging platform and has now matured into a full-fledged CMS platform. In this article, we will take you to back in time to show the different stages in the evolution of WordPress user interface since 2003 until now.

Evolution of WordPress user interface since 2003

The Beginnings of WordPress

WordPress started out in 2003. Mainly because the development on an already popular blogging software b2/cafelog was discontinued by their main developers.

Two passionate users of b2/cafelog, Matt Mullenweg and Mike Little, decided to build a new platform on top of b2/cafelog. This is how WordPress was first released on 27th May, 2003. Learn more about the origin story of WordPress in our article on the history of WordPress.

Since then, there has been a total of 276 WordPress releases so far (November 2017). In this article, we will highlight the ones that introduced a big change in admin panel user interface.

WordPress 0.71 – (June 2003)

The landing page of WordPress 0.71 admin panel was directly the write post page. As you can see there was no dashboard.

Features were very limited, and it was kept simple. You could only assign one category to each post. This version of WordPress had a tedious installation method where you would have to change a lot of information manually.

WordPress 1.0.1 (Miles – 2004)

WordPress 1.0.1 Miles was released January 3, 2004

Starting this version, WordPress started naming its major releases after Jazz musicians. As you can see this release was named after a famous musician, Miles Davis.

In this version, WordPress stopped using the b2 file structure and moved toward its own style of filing structure. New features included multiple category selection, SEO friendly URL structure, comment moderation, new installer, and several other improvements.

WordPress 1.2 – Mingus (May 2004)

WordPress 1.2 Mingus User Interface

Named after Charles Mingus, WordPress 1.2 was a monumental release. One of the most important upgrades in this version was the introduction of “Plugins”.

Other notable changes were Sub categories, custom fields, thumbnail creation, post preview, encrypted passwords, and the ability to ping more than one service at a time.

WordPress 1.5 – Strayhorn (Feb 2005)

This version of WordPress was named after Billy Strayhorn. It showed the first glimpse of a new dashboard style. It didn’t use Ajax and was way slower than the WordPress we use today.

Another significant feature was the introduction of pages along side posts, allowing users to create static pages that were not part of their blog. This release also added support for installing multiple themes in a single WordPress installation.

WordPress 2.0 – Duke (Dec 2005)

WordPress 2.0 Duke

WordPress 2.0 brought a major uphaul to the WordPress admin interface. It had a large blue header on top a complete overhaul of the admin area. It was way faster than previous releases as it utilized Ajax to perform certain tasks.

This release also included a full WYSIWIG editor. Akismet was introduced as a plugin to combat with the growing comment spam problem. Some other notable features were image/file uploading, theme preview via thumbnail (screenshot.png), improved posting speed, new hooks for developers, and more.

WordPress 2.1 – Ella (Jan 2007)

WordPress 2.1

WordPress 2.1 Ella was the first release to introduce a new admin screen to manage comments. The comment management process was significantly improved as users were able to delete or approve comments without reloading admin screens.

WordPress 2.3 – Dexter (Sep 2007)

WordPress 2.3

This release didn’t drastically change WordPress user interface but added several significant improvements. For the first time WordPress improved native support to add tags to your posts.

It also introduced update notifications allowing WordPress core and plugins to show notifications when there is a new version available. This release also started auto-redirecting users to correct WordPress URL as defined in the settings.

WordPress 2.5 – Brecker (Mar 2008)

WordPress 2.5

For WordPress 2.5, the WordPress team collaborated with Happy Cog, a leading web design consultancy firm, to overhaul WordPress user interface. It was a major re-design or rather reimagining of WordPress how we use it today.

WordPress 2.5 Editor

The dashboard got much better as they added more useful information there. This was the first version where we saw one click upgrade for plugins which were in WordPress plugin directory. Much better visual editor and a built-in gallery was also included in this release.

Many of the core components of this redesign are still a major part of the software. However, its appearance quickly changed just 10 months later.

WordPress 2.7 – Coltrane (Dec 2008)

WordPress 2.7

WordPress 2.7 brought another major upgrade to the WordPress admin user interface. Users were now able to readjust WordPress dashboard elements. Screen options were introduced so that users can show and hide elements to meet their requirements.

Other notable features included automated installation for plugins through the WordPress admin panel. Reply to comments from the admin panel, threaded comments, sticky posts, keyboard shortcuts, comment paging, and more.

WordPress 2.9 – Carmen (Dec 2009)

WordPress 2.9 Image editing

WordPress 2.9 Plugin update screen

WordPress 2.9 didn’t change user interface but added several new features that integrated beautifully in the WordPress interface. One of these changes was a plugin update system, that allowed users to update their plugins to the newer version with a single click.

Another major change in the release was image editing features, which allowed users to crop, resize, rotate, scale, and flip images in WordPress.

WordPress 3.0 – Thelonious (2010)

WordPress 3.0

WordPress 3.0 Thelonious was a major WordPress upgrade which truly transformed WordPress from a blogging platform to a full fledged CMS. It introduced post types, taxonomies, custom backgrounds, headers, shortlinks, and navigation menus. It also started the tradition of introducing a new default theme each year, this new default theme was called Twenty Ten.

This release merged a WordPress sister project called WordPress MU into core WordPress itself. This feature is now known as WordPress multisite. The basic style of the admin interface was capable of adapting all these major changes without a significant overhaul of the admin area.

WordPress 3.1 – Django Reinhardt (2011)

WordPress 3.1

WordPress 3.1 continued adding feature to the robust WordPress user interface. With this new release, WordPress introduced the admin bar, post formats, and a better internal linking feature.

WordPress 3.3 – Sonny (2011)

WordPress 3.3 UI

Released in December of 2011, WordPress 3.3 came packed with features and improvements to existing WordPress UI. It added fly out menus for better navigation in the admin area, a revamped admin bar, drag and drop to upload media, and tool tips. See more features and screenshots of WordPress 3.3.

WordPress 3.5 – Elvin (2012)

WordPress 3.5

Mobile and high resolution devices were already becoming accessible to all users. WordPress 3.5 streamlined the user interface for modern retina display devices. This included upgraded icons and adaptive styles that looked great on any screen resolution. See more features and screenshots of WordPress 3.5.

WordPress 3.8 – Parker (2013)

WordPress 3.8 Admin UI

The appearance and basic style of WordPress UI wasn’t changed since 2008 and was way overdue for a major upgrade. The goal for this upgrade was to handle mobile devices more elegantly and make WordPress more accessible. After a ton of work, the new WordPress user interface was released with WordPress 3.8.

The new user interface which is still used (with minor enhancements) was mobile responsive, had more color schemes, used icon fonts, and Open Sans for typography.

WordPress 3.8 mobile

WordPress 3.9 – Smith (2014)

WordPress 3.9

WordPress kept improving the UI to handle new features. WordPress 3.9 made several enhancements it started using flat buttons in the post editor, drag and drop image uploads, gallery previews, and more. It also added live previews when adding widgets in theme customizer. See more features and screenshots of WordPress 3.9.

WordPress 4.0 – Benny (2014)

WordPress 4.0

The same year WordPress 4.0 was released. There was no major change in the UI. However, there were some cool changes that fit right into the existing WordPress admin look.

A new grid view for Media gallery was introduced with infinite scroll and smooth editing. See screenshots and features of WordPress 4.0.

WordPress 4.2 – Powell (2015)

WordPress 4.2

WordPress 4.2 came with a tiny but significant improvement in the admin area color scheme. The grays were given a slight blue hue and the blues were changed to pure blue with no red channel. See more features and screenshots of WordPress 4.2.

WordPress 4.5 – Coleman (2016)

Inline link editing in WordPress 4.5

WordPress 4.5 brough some improvements in the default WordPress visual post editor. A new inline link editing feature was introduced along with some new inline text shortcuts.

Responsive previews were added in theme customizer which allowed users to preview their theme desktop, tablet, and mobile without changing devices. For more features see our article on the release of WordPress 4.5 with screenshots.

WordPress 4.6 – Pepper (2016)

Shiny updates in WordPress 4.6

In WordPress 4.6, the core team decided to start using native fonts instead of loading Open Sans from Google servers. This release also streamlined updates, which allowed users to install, update, and delete plugins/themes without leaving a page.

WordPress 4.8 – Vaughan (2017)

Media Widgets introduced in WordPress 4.8

WordPress 4.8 introduced a new set of widgets to add media like images, audio, video, and rich text. It also added a new dashboard widget that displayed WordPress news and events. For more features and screenshots, see our overview of WordPress 4.8.

WordPress 4.9 – Tipton (2017)

New Theme browsing experience in WordPress 4.9

The last major release of WordPress for 2017 added more features to Theme Customizer. It added a new theme browsing and preview experience in customizer.

It also made code editing in custom CSS and theme/plugin editors much easier by adding syntax highlighting and auto-completion features.

The Future of WordPress User Interface

As you may have noticed that WordPress user interface hasn’t changed much since 2013. However WordPress itself has improved a lot since then with tons of new features, better performance, and improved security.

Today, the user interface feels a bit out-dated compared to the many other top website builders in the market.

But this is about to change.

Core WordPress developers are working on a project codenamed Gutenberg. This project will add drag and drop functionality to WordPress post and page editor. It will allow new users to drag and drop blocks into their website like they do in a page builder plugin.

Gutenberg

We are very excited about this new upcoming release, and will keep you updated through out the process.

We hope this article helped you see the evolution of WordPress user interface since its first release in 2003. You may also want to see our list of the top WordPress companies and businesses.

If you liked this article, then please subscribe to our YouTube Channel for WordPress video tutorials. You can also find us on Twitter and Facebook.

The post Evolution of WordPress User Interface (2003 – 2017) appeared first on WPBeginner.


source http://www.wpbeginner.com/showcase/evolution-of-wordpress-user-interface-2003-2009/