Bounce rate is the percentage of site visitors that land on your website and leave before viewing a second page. You can easily determine your website’s bounce rate by setting up Google Analytics.
Now, if you’re thinking this isn’t such a big deal and that as long as they visit your website, irrespective of how long they spend on it or how many pages they view, they at least know your business exists, that’s not good enough. The longer visitors stay on your site, the more time you have to turn them into subscribers and customers. But how can you convince users to stick around longer and visit more pages?
Luckily, there are a number of easy and free ways to improve your website’s bounce rate and grow your business.
Here are five ways to improve your website’s bounce rate
1. Create content consistently
Creating content consistently is one of the best ways to keep users around longer and get them to view multiple pages. Useful, engaging content will drive traffic to your website. Once that traffic is there, they’ll stick around, keep reading, and eventually become a subscriber or customer if you have a wide array of informative blog posts for them to read. In fact, according to HubSpot, companies that published 16+ blog posts per month got about 4.5 times more leads than companies that published zero to four monthly posts.
So, create a content plan that’s consistent and offers something for everyone. Not everyone prefers written content, so include a mixture of formats such as written, video, infographics, audio recordings, and more.
Another important tip for your content: Practice effective internal linking. Relevant and useful internal links sprinkled throughout your content can guide users to more of your awesome content and keep them reading.
2. Add images and videos
Speaking of a mixture of formats, to improve your website’s bounce rate, be sure you add eye-catching images and videos to your website. Many users won’t spend a lot of time reading your website content, so you need to grab their attention with images and videos.
Add a large high-quality image or video to your homepage to grab the attention of viewers as soon as they see your site. Most websites do this while keeping everything else on the page simple, like the Panera website for example.
If you don’t have the means to hire a photographer, you can find a ton of stunning, free stock images on a site like Unsplash.
3. Speed up your site
You may not have realized it before but your website speed is important for improving your website’s bounce rate. In fact, according to Google, 53 percent of mobile site visitors leave a page that takes longer than three seconds to load. And for every extra second that your page takes to load, the probability of users bouncing dramatically increases. So, don’t make your website visitors wait.
You can use a site like GTmetrix to test the speed of your site. Not only will it tell you what your site speed is, but it’ll also give you advice for improving it. If you’re running your website on WordPress, it would also be wise to download and install some free plugins like WP Smush and W3 Total Cache to help boost the speediness of your site.
4. A/B test
As you’re attempting to improve your website’s bounce rate, don’t leave it up to chance. You should be A/B testing everything in order to determine what’s working and what’s not. You might be surprised by the small things that can cause users to abandon your website. It might even be something as simple as the color of your call-to-action button.
So, perform A/B tests, or split tests, of every aspect of your website. Does your bounce rate improve with a popup on your homepage or does it get a bigger boost on another page? Does one font convert more visitors over another? Does showing or hiding a progress bar help or hurt your bounce rate? When we say A/B test everything, we mean everything.
5. Target abandoning visitors
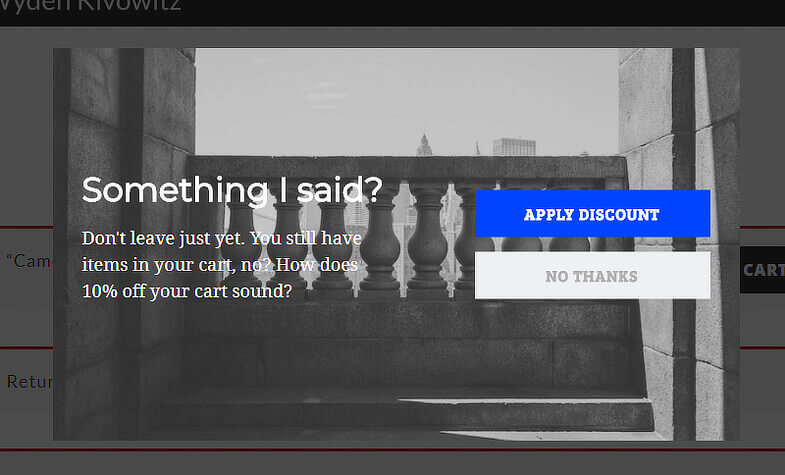
Did you know that over 70% of people who leave your website will never return? If you don’t start to improve your bounce rate now, that’s a lot of potential leads and customers your business is missing out on. One effective way to stop those users in their tracks and get them to stay on your website longer, and eventually convert them into subscribers or customers is by utilizing exit-intent popups.
Exit-intent popups are able to track when a user is about to leave your website and send them a targeted message at exactly the right time. Your popup can encourage website visitors to subscribe to your email list, download your lead magnet, or even offer a discount if they purchase. So, not only can exit-intent popups improve your bounce rate, but they can also boost your sales in an instant.
Got more points to share on improving bounce rates? Share them in the comments.
Syed Balkhi is an entrepreneur, marketer, and CEO of Awesome Motive. He’s also the founder of WPBeginner, OptinMonster, WPForms, and MonsterInsights. Syed can be found on Twitter @syedbalkhi.
The Form Token Field Gutenberg Component is used for creating an input field from which you get a list of suggestions (autocomplete) from which you select values. This is also used in the Tags field when you’re writing a post (or any similar taxonomy). This component is a bit complex. If you’re going to read the source code, you might find yourself going deeper and deeper into other various components and classes. I’ll try to make it a bit easier for you to understand it with this tutorial.
Before we look into how this components is used or how we can use it as well, let’s learn about the properties that it accepts. I am going to take the Tags field here as a reference.
value – this is the property that accepts the tags that are going to be shown as selected. It can be an array of strings or an array of objects. If it’s an array of objects, the objects need to have the attribute value as well,
displayTransform – this property is a function that will transform the tags. By default, it uses the function identity from lodash,
saveTransform – this is also a function that is called when the tags are saved or when we need to match the suggestions
Source: https://managewp.org/articles/18495/gutenberg-components-form-token-field-tags-field
Are you looking for the best real estate WordPress themes? WordPress is the most popular website builder among real estate companies, realtors, and property management companies to showcase their listings.
By default, most WordPress themes are either made for blogs or business websites. This makes it a bit harder to find a suitable real estate theme.
In this article, we will show you some of the best WordPress real estate themes that will help you manage your listings and grow your business.
Building a Real Estate Website for Realtors
The first thing you need to know that all themes on this website are for self-hosted WordPress.org site, and they will not work on most WordPress.com plans. Please see our comparison of WordPress.com vs WordPress.org for more details.
You will need the following items to make a real estate website using WordPress:
AgentPress Pro is a premium WordPress real estate theme for realtors. It comes with AgrentPress listings plugin which allows you to add a listings management system to your WordPress site.
AgentPress comes with 4 color schemes, custom widgets, backgrounds, headers, and theme options panel. It is developed by StudioPress and runs on top of the powerful Genesis theme framework. Genesis follows all the best practices and that’s why we built WPBeginner website theme on top of it as well.
Astra is a beautiful WordPress theme, which is designed to be used for any kind of websites including real estate businesses. This flexible theme comes with dozens of ready-made websites that can be installed with a single click.
It is compatible with all essential WordPress plugins and can be used with any real estate plugin of your choice. Beginners would find it easy to customize with simpler theme settings.
OceanWP is a popular free WordPress theme with tons of premium-like features and incredible flexibility. This multi-purpose WordPress theme also comes with a pro version, which gives you access to dozens of ready-made website demos that you can quickly install.
It is highly customizable and works with all popular page builders and real estate plugins. It comes with built-in page templates, custom widgets, multiple navigation menus, multiple layouts, widget areas, customizable header, and backgrounds.
Divi is the ultimate multi-purpose WordPress theme. It comes with the Divi builder, a popular drag and drop page builder plugin and several ready-made website layouts for different kind of websites.
Altitude Pro is an elegant WordPress business theme made on top of the Genesis theme framework. It is suitable for real-estate agents, brokers, coaching and training websites. Its homepage features a fullscreen background with your welcome message and call to action.
It comes with multiple page templates, page builder support, custom widgets, and a widgetized homepage layout. It is optimized for the Gutenberg block editor and comes with full WooCommerce support.
Presence is an all-purpose WordPress theme made specifically for small business websites. It includes 10 ready-made website designs, including one for a real estate website. All website demos can be easily installed with a single-click.
The real estate website comes with listings template, agent page, search widget, and IDX support. It also includes 6 color schemes, sliders, photo galleries, and custom widgets for social media integration.
Ultra is another excellent multi-purpose WordPress theme that can be easily used to make a real estate website. It comes with Themify page builder plugin, several ready-made websites, and over 60 layouts.
Its simple drag and drop capabilities make it super easy to use and customize for your needs. It works with all popular real estate WordPress plugins, allowing you to easily add listings, property search, and agent profile features.
Realtor is a premium theme for realtors, agencies, and real estate listing websites. It comes with full-featured listings area that can be displayed in grid or list view.
It also features an advanced property filter and search, properties map (built using Google maps API), realtor profile page, multiple listing templates. It has various shortcodes, custom widgets, and all the options you would want to see in a premium theme.
Estate Engine is can convert any website into its own real estate engine. You can monetize your real estate website by allowing users to add their own listings for a fee.
It has a powerful listing search filter with Google Maps support, galleries, sliders, and custom widgets. Estate Engine also comes with a mobile theme that your mobile users will see, it looks equally beautiful without compromising the functionality.
Academy Pro is a WordPress theme designed for training, online courses, and learning communities. It is ideal for realtors, real estate training, consultancy, and similar businesses.
This powerful WordPress theme is developed by StudioPress. It runs on the Genesis theme framework, which ensures the best performance and higher coding standards. It is super-easy to customize and comes with flexible header, drag and drop homepage layout, multiple page templates, and full Gutenberg support.
Built on WPCasa, a framework designed specifically for real estate websites. Eliviria is an elegant WordPress theme with powerful real estate features baked in.
It has listings widgets, listings slider, and listings carousel. There are multiple homepage layouts with unlimited color choices.
Residence is a classy mobile friendly real estate theme. It has Google Maps powered listings and IDX-MLS search filter, which makes it easier for users to find listings.
This beautiful theme comes with custom widgets, multiple page layouts, gallery carousel, and a currency and unit converter.
WP Real Estate is a free WordPress theme made specifically for real estate agents, brokers, and agencies. Upon activation, the theme recommends a real estate plugin which adds property listings features including a filterable search bar.
It includes a featured posts section, social media icons, customizable header, custom background, and Google Fonts. All theme options are neatly organized under theme customizer making it easy to set up.
WPCasa’s Bahia theme for realtors features large background image on the homepage with a very prominent search feature for listings. This beautiful real estate theme comes with multiple homepage layouts, custom widgets, templates, and much more.
Main Street is a classy WordPress real estate theme with IDX-MLS integration and mobile-ready Layout. It has built-in support for Google maps, feature property slideshow, gorgeous property galleries, lightning-fast search with a professional look for agents and realtors.
London is another WordPress theme designed on top of WPCasa framework. It is sleek and modern featuring large background images and a prominently displayed listings search.
It is easily customizable with multiple color choices, custom templates, shortcodes, and IDX support. It has widgetized listings page, multiple homepage layout options, and one-click demo importer.
Real Estater is a free WordPress real estate theme with a professional design. It comes with a fully customizable homepage layout with sections for property listings, about us, features, services, rentals, and gallery.
It supports popular real estate plugins to manage property listings and add a listings search feature. It includes custom headers, backgrounds, social media menu, and layout choices for individual posts and pages.
Oikia WordPress theme for realtors and agencies is a powerful feature rich theme. It features an advanced map and location filter integrated into listings management. It has custom post types, widgets, shortcodes, and multiple color choices.
That’s all for now.
We hope this article helped you find the best WordPress real estate theme for realtors. You may also want to see our ultimate step by step WordPress SEO guide for beginners.
If you liked this article, then please subscribe to our YouTube Channel for WordPress video tutorials. You can also find us on Twitter and Facebook.
When more than one person is working on a WordPress website, things can get messy very quickly. Someone might make a change without consulting the right person, an editor may tinker with a draft they weren’t assigned to, and so on. The easiest way to avoid becoming overwhelmed by all this activity is to keep a record of all changes in an audit log, also known as WordPress activity log. With a WordPress activity log, you’ll be able to keep track of everything that goes on with your website. Just as importantly, you can filter out the events you don’t care about, so you can focus on what does matter.
In this article, we’ll discuss some of the most important ways an activity log can improve your website. Then we’ll explain how to use the WP Security Audit Log plugin to keep an activity log, since WordPress doesn’t keep a log of changes. Let’s get right to it!
3 Ways a WordPress Activity Log Can Improve Your Website
To illustrate why activity logs are so beneficial, we’re going to go over three examples of situations where they can come in handy. All three of these advantages are valuable to just about any website.
1. An Activity Log Makes
Source: https://managewp.org/articles/18494/why-you-need-an-activity-log-on-your-wordpress-site
Every business that relies heavily on appointments has faced the challenge of finding the right front desk manager to manage their appointments. Or, even worse, their employees have been working their jobs, taking bookings and receiving payments. It’s a recipe for disaster. From private clinics to gyms, beauty or spa salons, to repair shops, dealing with multiple customers throughout the day can be difficult. And in specific branches, five minutes delay with one customer usually means that it will cause additional delays with other customers during the day.
Let’s not add to that mess sick days, employees not showing up, having to accept only cash, and having someone just picking the phone and creating appointments at all times. This person is likely to quit anytime soon or create another trouble every now and then which could cost you a returning customer. After all, they are only human.
You need to avoid this, at all costs. As a business owner, you want to be as approachable as possible to your customers. You also want to show them that you value their time by making sure that each and every one of their appointment goes smoothly and by accommodating their preferred payment
Source: https://managewp.org/articles/18493/amelia-the-best-front-desk-manager-you-could-hire
Did you know that there are about 1.7 billion active websites in the world? If you want to improve your website, there are a lot of web development tools at your disposal. You can use these tools to ensure your website looks modern and attractive. It’s especially important when you stay in touch with current web development trends.
Are you ready to learn the latest web development trends this year? Read on and find out more today.
1. Artificial Intelligence Will Play a Bigger Role
In recent times, artificial intelligence (AI) gained a lot of support in the web and IT industry. A lot of web designers deploy AI to do the laborious parts of the development. They only let the human developers do the fine-tuning and revisions to fit the website’s specific set of needs.
With AI, web development became much easier, more efficient, and cost-effective. But this year, AI will most likely step up higher in their role. The main reason is the fact that both administrators and developers will use technology for ROI and conversion boosts.
Most retail websites will start using chatbots more for improved customer service. The chatbots will use machine learning to achieve efficiency as shopping
Source: https://managewp.org/articles/18492/7-web-development-trends-you-need-to-follow-in-2019
Almost anyone running a B2B or B2C business knows that Google and other search engines like quality links, and could consider them as one of the top ranking factors.
So, if you want your website to rank higher than your competition on search engines, a proper link building strategy is not debatable.
However, if you’re going to implement link building in your 2019 digital marketing strategy, you have to do it the right way.
Search engines shroud their algorithms in secrecy, so the SEO and link building industry is flooded with many myths that will never get you results but can get you into a lot of trouble.
To avoid investing resources into wasted link building efforts, pay attention to these nine link building myths that won’t get you anywhere in 2019.
1. Guest posting is dead
This myth started to get really popular in 2014 when Google’s Matt Cutt said,
“Okay, I’m calling it: if you’re using guest blogging as a way to gain links in 2014, you should probably stop. Why? Because over time it’s become a more and more spammy practice, and if you’re doing a lot of guest blogging then you’re hanging out with really bad company. So stick a fork in it: guest blogging is done; it’s just gotten too spammy.”
Because of how direct and stern this warning by Cutt was, it’s understandable that many people believe that guest blogging is genuinely dead.
However, Cutt later clarified this statement by saying that what he meant was spammy blog posts for the sake of SEO purposes was dead.
This means that publishing relevant and resourceful blog posts on authoritative sites for building links, exposure, branding, increased reach, and building a community is still very relevant in 2019.
2. Links not relevant to your niche are low-quality links
This is a prevalent myth that contradicts the fundamental idea of link building in 2019. To rank high, you need to get top authority sites to link back to your site. To get these sites to feature your link, you need to provide relevant content for them. Moreover, whether or not that content is related to your niche or not, it still improves your ranking.
So, when your site receives a non-relevant backlink from a non-relevant niche, Google will not frown upon these links.
3. Building tons of links to a single piece of content is spammy
Many people still think that building tons of links to a single piece of content could negatively impact their keyword rank. Again, this link building myth contradicts itself because it goes against the idea of organic link building.
If search engines do not penalize highly original and valuable webpage that other websites link to because of how helpful and informative their content is, why would they consider a piece of content with tonnes of backlinks spammy?
However, if your links are low quality (from spammy content networks and directories), you could be slapped with a manual penalty or significant link profile devaluation.
4. Link building is irrelevant if you already rank high in search queries
It’s sad, but many marketers still believe this. Link building, like other digital marketing strategies for social media marketing, blogging, and others should be consistent. Not only because it helps you maintain your position above your competition in search queries, but also because it helps you with the following:
Increase your brand’s visibility across the web
Increase traffic to your domain
Showcase your brand’s authority and value
Link building is not just about increasing the volume of links to your site; it also exposes your business to new customers.
5. Google will always prioritize sites with higher backlinks over others in search queries
The truth is there isn’t a “one size fits all” for search engine ranking. There are about 200 ranking factors related to UX, mobile usability, technical performance, query intent, and many more.
Google’s ranking factors are very dynamic. According to Google Webmaster John Mueller, the search engine focuses on a particular query intent to select its ranking factors.
So, while link building is a valuable ranking factor, Google algorithms find a balance between its 200 ranking factors before displaying results to a search query.
6. All pages/posts/links on your site have an equal ranking value
When people talk about this myth, they usually mean either of these two things:
Every post on your site has the same authority or
All links on a page are of equal ranking value
Both statements are wrong. In the first instance, a post that has been linked back to by high authority sites will rank higher than others which have not. There are tools like website auditor which can be used to check the individual ranking value of your site’s posts.
As for the second statement, Google’s John Muller confirmed that their search algorithms take into account the position of a link on a webpage it appears.
So take advantage of link positioning. SEO experts like Bill Slawski and Rand Fishkin recommend positioning your links higher on the page because the higher a link is placed on the page, the more it weighs, and the more value it passes to the pages it links to.
7. Internal links don’t help you rank higher
While high-quality external links are one of the most important ranking factors, internal links also play a huge roll in helping you rank higher. This is because linking from higher to lower ranking pages can give a massive boost to weak pages. Interlinking related content on your website also creates what search engine experts call a “topic cluster”.
In 2019, topic clusters are significant because when a search query is made for a particular topic and search engines find relevant topic clusters on your website, your site will be considered an authority in this field and will automatically rank higher than other sites with relevant single pages.
8. Stuffing your image alt texts with relevant keywords helps you rank higher
Image links are not bad for SEO. However, too much of anything is never a good idea. And this applies to image link building. While there are no penalties for using image links, stuffing your image alt tags with keywords to manipulate rankings is against Google’s guidelines.
Before Google started using AI and machine learning to understand images, people had to stuff their alt tags with text to ensure the pictures appeared in relevant search queries. However, in 2019, both text and image are translated into the same language in coding.
9. Wikipedia and Wiki-like pages are the Gods of domain authority building
Many people are convinced that getting a link back from pages like Wikipedia will automatically give them a higher ranking authority because of the exceptionally high domain authority Wikipedia has. But sadly, digital marketing has as many facts as it does fallacies.
Information directly from Google’s Garry Illyes tells us that Google ranks Wikipedia just like any other website.
Don’t allow the fear of spamming keep you from harnessing the many fantastic benefits of implementing a link building strategy.
Also, although Google’s dynamic algorithms are usually hidden, SEO and link building agencies like seopow study them every day to let you know what’s a fact and what’s a fable.
Segun Onibalusi is the Founder and CEO at SEO POW, an organic link building agency. He can be found on Twitter @iamsegun_oni.
A pretty basic security measure you can take with WordPress is to not use the default admin username on your site. The default administrator username is the subject of most brute force attacks, because as a default, it is known to everyone. If it exists the attacker only has to guess the password to gain access to your site, instead of having to guess both of them, this makes their job significantly easier. If your site has this account it is wise to remove it as soon as possible. This article will explain how you can do so. To accomplish our goal we will create a new administrator account with a different username and then delete the default admin account.
Before we begin
The procedure is very simple, but just to err on the side of caution it is highly recommended to create a backup of the database before proceeding any further.
Create a new administrator
If we navigate to Users > All Users we will see a list of existing users on our site, if admin is not in the list, our job is done, if it is however, read on on how to fix this.
Click the Add New button and proceed to fill in the required information for the new user.
TIPS: use a different email for the new user, WordPress won’t
Source: https://managewp.org/articles/18491/how-to-remove-the-default-admin-username-in-wordpress-cssigniter
Imagine this scenario: You find out — as it’s happening — that one of your clients is on The Ellen DeGeneres Show. Their site is hammered with traffic and it goes down, crashing the server and bringing down other client sites with it. What do you do? Panic? Fire off an angry email to your hosting company and wait hours for a reply? Try calling and get angrier while waiting on hold?
The truth is, you’re screwed. Your client is upset because they’ve lost tens of thousands of potential customers (and dollars), and in the process you’ve lost their trust, business, and money because you’re going to have to fix this mess.
Talk about a nightmare — a nightmare I don’t miss one bit. When I ran my own agency a few years back, I came up against the same problems time and time again. It was frustrating and damaged our relationships with clients.
On paper, upselling hosting to clients makes perfect sense. When you’ve designed and developed a site for a client, they’re going to need hosting. And once you get them to sign up for hosting, that’s recurring monthly revenue with minimal overhead. A perfect way to expand your agency’s
Source: https://managewp.org/articles/18490/get-managed-wordpress-hosting-that-understands-agencies
Do you want to remove the author name from your WordPress blog posts? Normally, blog posts are supposed to show author name with other meta-data like date and category.
However, some blog owners may not want to display the author name next to their blog posts.
By default, WordPress does not have an option to remove author name, and you must select an author to publish a post.
In this article, we will show you two ways to easily remove author name from your WordPress posts. We will also discuss the pros and cons of each approach.
Why Would You Want to Remove Author Name?
Author name is an important type of metadata added to your WordPress posts by default. It allows your readers to learn about authors who create content on your blog.
However, there are times when you may want to hide the author name.
For example: if multiple staff members in your team collaborate on each blog post, then it may seem unfair to credit a single staff member for the work.
In another scenario, you may have several contributors/freelance writers who occasionally write articles, but you want to keep a consistent style and voice for your blog.
With that said, let’s take a look at solutions for easily removing author name from WordPress posts while still allowing multiple authors to work in the background.
Method 1: Manually Remove Author Name from WordPress Posts
Your WordPress theme decides when and how to display the author name in your blog posts. Themes use multiple approaches to do that which makes it harder for a plugin to provide a generic solution for removing author names.
You will need to edit some code to prevent your theme from displaying the author name. If you are uncomfortable editing code, then try the second method instead.
The first method requires you to edit WordPress theme files. If you haven’t done this before, then please take a look at our guide on how to copy and paste the code in WordPress.
Note: Make sure that you create backup of your theme or child theme before making any changes. If something goes wrong, then this will help you easily revert changes.
WordPress themes use different variations of code to display the author name. You will need to locate the code responsible for showing the author’s name in your theme files and delete it.
Most common locations to find this code are single.php, content.php, archive.php, and index.php files.
In many cases, you will not be able to find the code that outputs author name. Instead, you will find a template tag defined in the functions.php file or template-tags.php file.
For example, the default Twenty Nineteen theme uses the function twentynineteen_posted_by to display author name. This function is defined in template-tags.php file and uses the following code:
Once you have located the code that outputs the author name, you need to delete it.
For example, you have to delete the code from the second line to the ninth line in the above code. After that, the remaining code will look like below.
function twentynineteen_posted_by() {
}
endif;
Don’t forget to save your changes after deleting the author name code. Then, upload the files back to your website.
You can now visit your website to see your changes in action:
This method hides the author name on all your posts; however, the author archive pages will remain intact. An author archive page is where WordPress creates a list of all articles written by a specific user.
You can find author archive page on a URL like this:
https://example.com/author/samsmith/
This URL is discoverable by search engines, which means you may still get traffic to those pages.
You can disable the author archives easily using the Yoast SEO plugin. Once you install and activate the plugin, go to SEO » Search Appearance your dashboard and then click the ‘Archives’ tab.
Now you can see the author archive settings. You can toggle Author Archives switch and disable author archives on your site.
Doing so will disable author archives and hide author-sitemap.xml file created by the Yoast SEO plugin.
Method 2: Create a Generic Author Name for Publishing WordPress Posts
This method does not remove the author name, but it can be used as a workaround.
You will create a generic author name and use it for all your past and future articles. You will need to change the author name before publishing each post.
Note: This method is irreversible. If you do this and want to revert, then you will have to edit each post and assign it to the original author manually.
That being said, let’s get started.
First add a new author to your WordPress site and give it a generic username such as editorialteam.
Next, you need to visit Users » All Users page and click on the ‘Edit’ link below the username you just added.
On the user profile screen, scroll down to the ‘Nickname’ option and enter the name you want to be displayed (for example, Editorial Team).
After that, click on the drop down menu next to ‘Display name publicly as’ option and select the nickname you just entered.
You can also add a generic bio and even create a gravatar for that user account.
Now go to Posts » All Posts page and click on the screen options menu at the top. Enter 999 for number of items to display.
This will allow you to quickly edit and change author name for a large number of posts.
You need to select all posts using the checkbox and then select edit under the bulk actions drop down menu. After that click on the ‘Apply’ button to continue.
WordPress will now show you the bulk editing options. You need to change the author to the generic author name you added earlier and then click on the Update button.
WordPress will now update all selected posts and change author name. Remember, this process may take some time depending on how fast your WordPress hosting is.
If you have more than 999 posts, then you will need to go to page 2 and repeat the process.
That’s all. You can now visit your website to see it in action.
Our Recommendation
Removing author name using the coding method gets the job done, but it is not the best solution. For example, if you are not using a child theme, then a theme update will override your changes.
This is why we recommend the second method to create a generic author name.
Doing so allows you to use the built-in WordPress functionality and does not require you to edit any code. It will not remove author name or archives but will make them generic. It will also help to ensure consistency of authorship on your site.
If you are good with coding, then you can also use a combination of both approaches. You can create a generic author name to publish all your blog posts, and then hard-code author profile in a WordPress child-theme.
We use a similar approach at WPBeginner. You can see ‘Editorial Staff’ as the author for all blog posts including this one you are reading right now.
You can also see that in the author info box at the bottom of the article.
Are you facing the “Elementor Widgets Not Loading” error on your site? If yes, you are one of the several users who has been troubled by this issue. We have been continuously receiving similar reports from our customers as well. After fixing the issue on several sites, we decided to write to share the possible solutions.
How to Fix Elementor Not Loading Error
“Elementor not Loading,” or “Elementor Widgets Panel not Loading” can be caused due to several factors. It could be due to limited server resources, plugin conflicts, third-party addons, etc. Most of the time, we noticed that using several Elementor addons lead to high resource usage. With Elementor’s increasing popularity, there are a lot of add-ons coming out every day. But, a lot of these are not following the right coding practices or borrowing code from each other.
What is Elementor not Loading Error?
Elementor not Loading error leads to the following situations:
An inactive Widgets panel when Elementor is active on any page.
Blank Screen when trying to load Elementor
Since the widgets don’t get loaded and activated, the page builder becomes unusable. However, we have noticed
Source: https://managewp.org/articles/18489/fix-elementor-not-loading-or-elementor-widgets-not-loading-error
Summary These docs will guide you through step by step on how to convert your GDv1 site to GDv2.
There are some manual steps that must be taken before your directory functionality will be restored so it is important to follow each step. A simple conversion may take 10 minutes but a complex design could take much longer.
Somethings that may require some manual steps are:
Sidebars: GDv2 (except some of our own themes) does not add its own sidebars anymore and instead uses the built in theme sidebars, every GD widget has an option to only show on specific pages. The setup wizard can help insert basic info back for the details page, though you can add widgets back manually via the widget settings page.
Top and bottom full width sections: As mentioned above we no longer add our own widget areas so these sections may be removed on your site. You do now have almost unlimited flexibility on what info you can show and where, page builders can also replicate almost any layout.
Google Analytics: if you used our analytics section then this functionality has now moved to a separate free plugin, this can be installed direct from your dashboard under GD > Extensions.
WPML: If you are using WPML
Source: https://managewp.org/articles/18487/upgrading-to-v2-a-practical-step-by-step-checklist-with-video
And we as marketers have to try to be more unique than the other 79,999,999 marketers. Yeah, probably that sounds something impossible. Well, instead of being different, let’s try to give the best value we can to our audience.
Eight effective tips to help you as a marketer to get the most from your Facebook business page for 2019
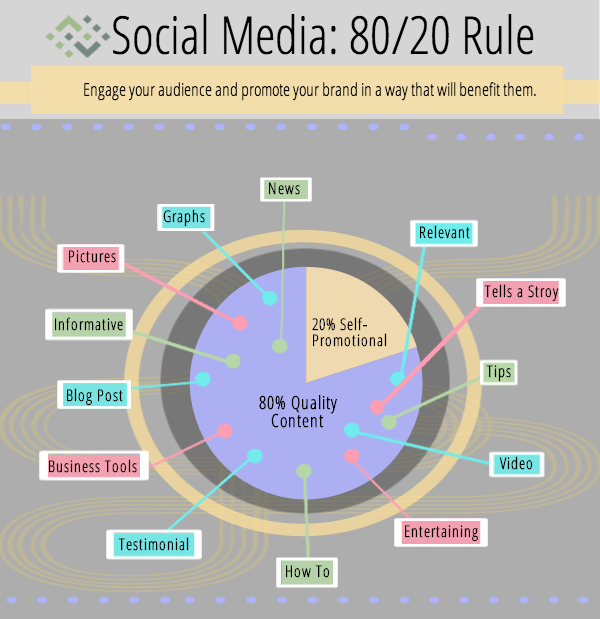
1. Get rid of promotional content and make more educational, fun content
When people start complaining that their page posts are not getting enough engagement, I just take my phone, search their business name on Facebook and start analyzing their latest posts.
Post number 1: Promotional
Post number 2: Promotional
Post number 3: Promotional
And I’m like, well, you really think, that the people who’ve liked your page are interested in seeing only promotional and sales oriented posts from your page? And they’re like, “Hmm, what else should we post, if we just want to get new sales for our business by using Facebook?”
In such cases, I start explaining to people that users really don’t like seeing such kinds of posts because their feed is already filled with so many ads, that advertisers put on Facebook for promoting their products or services.
Promotional content isn’t something, that will engage your customers and make them hit the “Like” or “Share” buttons. It’s something, that will make them scroll down through their news feed or even browse your page and unlike it.
And the reason why so many pages on Facebook fail, is the fact, that we want to get value from someone without giving it. Not fair, is it?
Promotional/sales oriented content isn’t valuable in most cases. The good thing is you can promote your product or service and at the same time provide valuable content for your audience.
They love to hear your company story more than what you are trying to sell to them. So, get rid of the promotional material from your page. Instead, start educating them with valuable and entertaining content.
Renderforest reports, that 86% of marketers are satisfied with their video marketing results and consider them successful. This means that you can use lots of videos in your content marketing strategy and have success in it. What about starting to produce videos right away?
2. Only use Facebook ads for selling your product or service
You read it correctly.
We’ve already talked on the first point, that you shouldn’t put any promotional content in your organic posts. People hate that.
Instead of it, you can run engaging ads on Facebook and get new users/sales for your product or service.
Of course, I agree that lots of small businesses might not have budgets for Facebook. But well, if you’ve started a company, then you should have at least $100 for testing Facebook ads.
And you may want to read carefully as I’m going to tell you an easy trick on the next line for not wasting that $100 on Facebook ads.
Let’s split the $100 into two $50. What’s your business about? Do a little research or analyze what ads your competitors currently run, if you can’t come up with an idea.
Think of that content and create content for two ad campaigns. Once you’re finished, start running the promotion at least for a week for each campaign.
Seems easy, right? Wait, you’re not done. Instead of sitting and smoking a cigar, while your ads run, start analyzing how they perform.
After your ad has been in the process of running for several hours, you may start optimizing it. By optimizing and measuring your ads every 24 hours, you can at least get your invested money back after the campaign ends. You can do this several times while you find out which ad type works the best for your product or service.
And this whole idea means that you don’t have to invest thousands of dollars to start Facebook ads. All you need to kick off is $100.
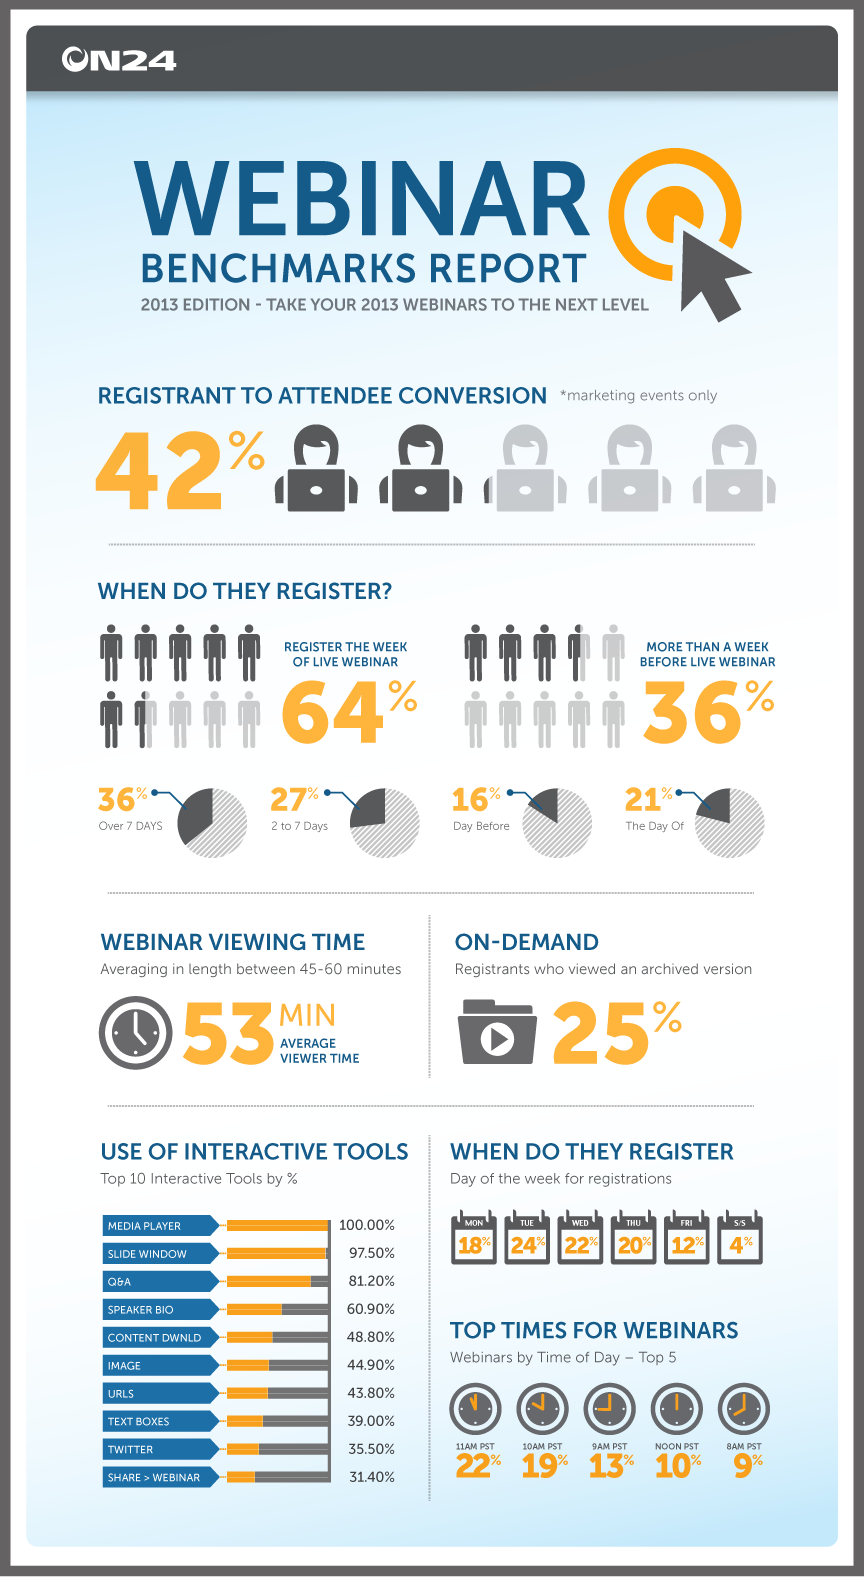
3. Conduct webinars and provide valuable information to your audience
Webinars can help you to:
– Stay connected with your current customers
– Make announcements about your products or services
– Talk about niche related topics
– Connect with a wider/new audience and tell them about your services
Webinars are a little bit underrated among Facebook marketing, but they can become a huge weapon for increasing your engagement and driving more sales.
And here comes a question. How to start conducting webinars? Well, the first step is to choose a topic, that can bring value to your audience.
Let me tell you some interesting webinars topics that might be interesting for any audience:
Invite experts in your industry and conduct QA sessions with them
Do a QA session by yourself during which the viewers can ask questions
Announce new product updates and introduce why you made it and how it can help your customers
Pick interesting news in your industry and go deep with it
These are really basic ideas that you can start with, and then you can make your webinars a big part of your digital marketing strategies.
After deciding what topic to choose, you have to think about the environment and the time you are going to shoot it. Be sure to make everything in high quality: Setup lights, camera, and voice.
There are lots of tools, which will help you stream your webinar in a professional way on your Facebook page.
After setting all these things up, it’s time to go and create an event for your webinar. Write an engaging description, pick an eye-catching title, create a beautiful cover pic or cover video for your event. Don’t forget to choose the right time. You have to understand your audiences’ timezone and pick a time that will be convenient for them to participate in your webinar.
4. Use Facebook insights wisely and make decisions based on your data
Make the most of the data that Facebook Insights provides about your right audience for targeting and marketing. Here is a short list:
Page views, reviews, likes, reach, recommendations, post engagements, and followers.
Audience behavior, buying patterns, demographic, and geographic locations.
Posts reach for both organic and paid strategy. Here you can also add custom timing, to better understand post reactions.
Traffic source like Google or your website.
Activity details such as “get direction clicks”, “website clicks”, and “action button clicks”.
Post engagements and shares.
If you often hold events, it will show “people reached”, “event page views” and more.
Videos’ performance and engagements.
There are also other statistics that you can find when going through Facebook Insights in order to make better marketing decisions.
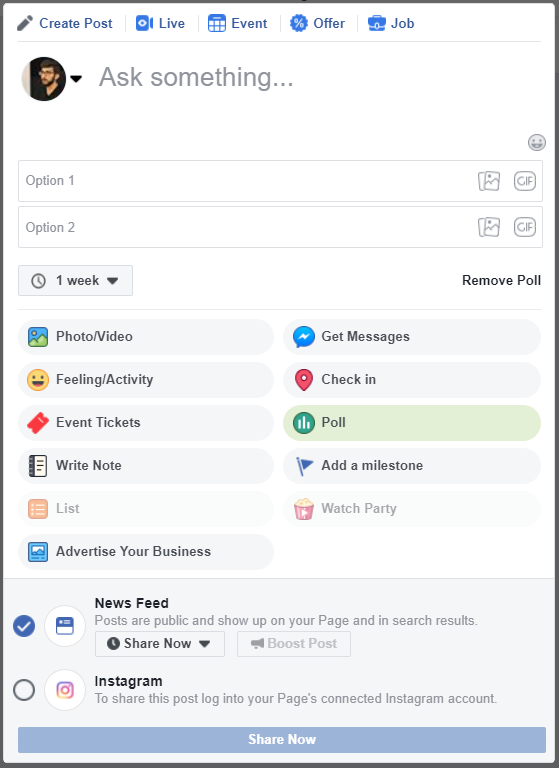
5. Use Facebook polls and get feedback from your audience
Conducting polls is a very interesting way of engaging your audience. Why?
Let me give you a quick example. People love playing games everywhere. And why not think about a game idea and give your customers something each week?
Why will it work?
It’s fun. People like to have fun on social media, and you can give them that opportunity by conducting one for them.
They’ll get something in return if they win the game. You have to think of interesting rules of your game.
Engagement rate for polls is really high. And if you make the content of your polls interesting, you really have chances for getting good results from it.
Facebook gives you the opportunity to create polls with texts, photos or GIFs. You can publish them in your story or news feed. They’re a really cool way to increase your page engagement rate.
6. Build a Facebook group in your niche and discuss interesting topics there
Facebook groups are a little bit underrated nowadays. But I can’t really find the reason why.
WordStream reports that more than 100 million Facebook users belong to meaningful Facebook communities. Why not build another great community on Facebook who can ask questions, discuss some topics, and gather an active community around your brand name?
People love communities. They love to meet new people on social media and discuss their problems, ideas with others. And also they love to hear what other people talk about their minds.
And you can build that emotional relationship between them. And when your community will become a little bit bigger, you can do other cool things, including the following:
Conducting meetups with your community and sharing information with them
Gathering them and discussing how your product could be better
Doing an event and giving awards to the most active members of your community
This list can last long. I just want to give you the idea of how you can use the community for making a stronger emotional connection with your brand. It will also help you to get your brand name more popular on Facebook.
7. Reply to any activity on your page positively
Whatever happens on your page you must react promptly before any other person․ Any activity should be under your control.
In the past, where bots or automatic answers weren’t available in Facebook, it was a little bit harder to react to all the activity happening on your Facebook page in a short time.
But now you can set chat-bots and automate the whole messaging process of your page.
We have to realize that people who live in the 21st century, don’t like to wait even a minute more. They want their issues to be solved ASAP. If you can’t give the best experience to your users, then the chances are high that you’ll lose your customers. Just be with your customer whenever they need you.
You can set an auto-reply for any recommendation you’ll get for your product. If it’s a positive recommendation and your customer is happy, thank him/her and tell them something awesome.
If the recommendation was negative, don’t mess up. You have to find out the reason why the customer is angry with you and left a negative review on your page. When getting negative feedback for your company, you must dig very deep for finding out the real reason why your customer isn’t satisfied. Maybe someone from your employees did something bad to him/her? You should know about it.
Even if it is the worst feedback about your company (in a professional way), don’t remove or ignore it. If someone else comes and sees bad and unanswered feedback from someone, that can hurt your business a lot. Also, you can’t remove negative feedback, so you have to answer as clear as possible, for not negatively impressing others.
8. Always analyze your competitors and keep an eye on them
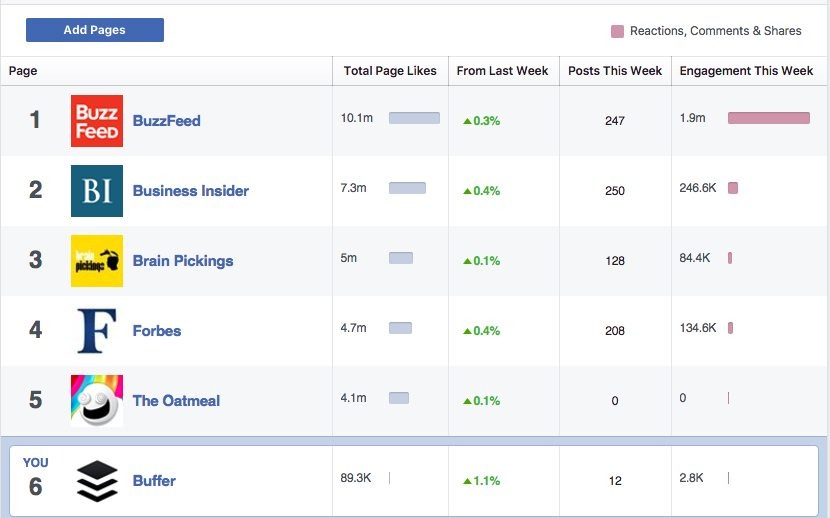
Do you know what’s the ranking of your page among your Facebook competitors? There are several tools and ways that you can use to analyze your competitors for generating new ideas for your page.
If we start from the beginning, the first thing to analyze is the kind of posts your competitors making on their page.
You can use the Facebook “pages to watch” report and add your competitors there.
What about the ads they are running? You can see that information publicly by checking their ads and info section. By doing this, you’ll know where and how your competitors target their ads. And it can give you lots of ideas for your next marketing campaigns.
If you do this analysis twice per month, it will be complete enough for knowing everything about your competitors.
Conclusion
Facebook marketing tips haven’t changed a lot since the last year. Usually, marketers underrate some tools Facebook provides, such as groups and polls. If you understand how you can bring value to your audience by using these tools, they’ll be effective for you.
Roman Daneghyan is the Chief Marketing Officer at Renderforest. He can be found on Twitter @roman_daneghyan.
Unlike with hardware or consumer products, people who purchase your WordPress software product don’t actually have to go back to your store and physically return it to get a refund. For digital WordPress products, it’s usually a simple email or a click of a button to ask for a refund, involving no extra cost for neither the customer nor the seller. Offering a refund policy has it’s cons to it as well, but ultimately, it helps reduce friction, making the decision to go ahead and purchase a license much easier. Why Is A Refund Policy Good Both For Shoppers And Sellers?
A refund policy is first and foremost a credibility signal and a confidence booster, which many shoppers are actively looking for on the interwebs in general, and specifically when they consider making a purchase of your WordPress product. Having one available makes them feel more relaxed about purchasing a product from you. This, in turn, can potentially have a direct impact on your sales.
Having a refund policy in place makes shoppers feel more relaxed about purchasing a product from you, which, in turn, can have a direct impact on your sales.Tweet
In a sense, certain types of refund policies, especially
Source: https://managewp.org/articles/18486/refund-policy-best-practices-in-the-prism-of-commercial-wordpress-plugins-and-themes
Are you seeing the ‘Briefly unavailable for scheduled maintenance’ error in WordPress? This error usually appears while updating WordPress core, plugins, or themes.
Basically, your WordPress site fails to finish the update which leaves you stuck in the maintenance mode.
In this article, we will show you how to easily fix the “Briefly unavailable for scheduled maintenance” error in WordPress. We will also show you why this error occurs and how you can avoid it in the future.
Why Does The WordPress Maintenance Mode Error Occur?
Maintenance mode page is technically not an error. It is a notification page.
During the update process, WordPress downloads necessary update files to your server, extract them and then install the update.
WordPress also puts your site on maintenance mode and displays the “Briefly unavailable for scheduled maintenance. Check back in a minute.” notice during the process.
To trigger the maintenance mode notification, WordPress creates a temporary .maintenance file in your website’s root folder.
If everything works normally, then this notice will probably be displayed for only a few seconds. After the successful update, WordPress will automatically delete the maintenance file to disable maintenance mode.
However, sometimes due to a slow WordPress hosting server response or low memory issue, the update script will timeout thus interrupting the process. When this happens, WordPress does not get a chance to take your site out of maintenance mode.
In other words, your site will continue showing the maintenance mode notice, and you will need to manually fix it.
How to Fix WordPress Maintenance Mode Error?
To get your website out of maintenance mode, all you really need to do is delete the .maintenance file from your site’s root folder using FTP.
If you can’t find the .maintenance file in your WordPress root directory, then make sure you checked your FTP client to show hidden files.
In Filezilla, you can force it to show hidden files by clicking on Server » Force showing hidden files from the menu bar.
Once the .maintenance file is removed, your site will come out of maintenance mode, and the error should be fixed.
If you don’t know how to use FTP, then you can also remove the files by going to the file manager in your WordPress hosting control panel, and then deleting the .maintenance file inside the file manager.
How to Avoid WordPress Maintenance Mode in the Future?
We already know that the “Briefly unavailable for scheduled maintenance” error is caused by slow server response or low memory issue on your web hosting server.
The easiest way to avoid this error is by upgrading to a higher hosting plan. We recommend going with one of these managed WordPress hosting companies that offer superior hosting performance.
If upgrading to a higher hosting plan is not an option, then we recommend doing plugin and theme updates one at a time.
Often users have a tendency of quickly clicking on the update link underneath each plugin. WordPress then staggers the update order, but even a millisecond of delay in connection could cause a conflict leading your site to be stuck in maintenance mode.
Instead of quickly clicking on the Update link, we recommend patiently updating one plugin at a time.
How to Customize Maintenance Mode Notification
An easier solution to avoid showing the default maintenance mode notification is by manually putting your WordPress site on maintenance mode before installing any updates.
The best way to do this is by installing and activating the SeedProd plugin. It is the most popular maintenance mode plugin for WordPress. For more details, see our step by step guide on how to install a WordPress plugin.
Upon activation, go to Settings » Coming Soon Pro page and check the box next to ‘Enable maintenance mode’ option.
After that, you need to click on ‘Edit Coming Soon/Maintenance Page’ button. This will open the SeedProd theme customizer. From here you can choose a theme and then customize it to create a beautiful maintenance mode page for your website.
Now, if you don’t want to manually put your website in maintenance mode every time you update, then you can create a maintenance page in WordPress without using a plugin.
Simply create a new file called maintenance.php on your desktop and paste this code inside it:
<?php
$protocol = $_SERVER["SERVER_PROTOCOL"];
if ( 'HTTP/1.1' != $protocol && 'HTTP/1.0' != $protocol )
    $protocol = 'HTTP/1.0';
header( "$protocol 503 Service Unavailable", true, 503 );
header( 'Content-Type: text/html; charset=utf-8' );
?>
<html xmlns="http://www.w3.org/1999/xhtml">
<body>
    <h1>We are updating the site, please check back in 30 minutes.</h1>
</body>
</html>
<?php die(); ?>
Next, you need to upload this file to your WordPress site’s wp-content directory.
Now whenever you are updating your website, WordPress will show this page during the maintenance mode. You can use CSS to style this page anyway you want.
Troubleshooting WordPress Maintenance Mode Error
Since we have helped thousands of users fix the “Briefly unavailable for scheduled maintenance” error in WordPress, we have helped users solve several unseen issues that can come up.
Below are some additional steps you might have to take if the above solution does not work.
WordPress still stuck in maintenance mode after the update and fix above?
If this is the case, then you need to update the wp-activate.php file located in your main WordPress folder. This is the same place where you found and deleted the .maintenance file.
You will need to either open the file using your hosting company’s file manager or download it on your computer using FTP.
Next, you need to find the code: define ('WP_INSTALLING', true) and change the true to false.
So your code will look like this:
define ('WP_INSTALLING', false)
After that you need to save the changes and upload the file to your hosting server using FTP. If you’re using the hosting company’s file manager, then simply saving the file should get you out of maintenance mode.
My site is broken after I fixed the WordPress maintenance mode error. How do I fix it?
An unfinished or interrupted update may cause issues when your site comes out of maintenance mode.
If this error occurred when you were updating WordPress core software, then you will need to follow our guide to manually update WordPress using FTP.
If the error occurred when you were updating a WordPress plugin, then you will need to temporarily deactivate all WordPress plugins using FTP. This step will ensure that the corrupt plugin is disabled, and your website will come back.
Next, you will need to login to your WordPress dashboard and activate one plugin at a time, to see which plugin caused the issue. After that you need to manually install the plugin update, so it’s working properly.
We hope this article helped you fix ‘Briefly unavailable for scheduled maintenance’ error in WordPress. You may also want to bookmark our ultimate guide on fixing the most common WordPress errors.
If you liked this article, then please subscribe to our YouTube Channel for WordPress video tutorials. You can also find us on Twitter and Facebook.