Friday 30 March 2018

9 Best Testimonial Plugins for WordPress

Are you looking for the best testimonial plugins for your WordPress site? Testimonials add social proof to your website and help build trust among your users. In this article, we have hand-picked the best WordPress testimonial plugins that you can use on your website.

Best testimonial plugins for WordPress

1. Testimonial Rotator

Testimonial Rotator

Testimonial Rotator is an easy to use WordPress testimonials plugin. It allows you create a testimonial carousel and add rotating testimonials anywhere on your website.

You can also create multiple rotators and manually enter customer information such as feedback, job title, and photo. For detailed step by step instructions, see our article on how to add rotating testimonials in WordPress.

2. Easy Testimonials

Easy Testimonials

Want to allow customers to submit reviews and display them on your website? Easy Testimonials allows you to add a customer feedback form on your website, so you can collect testimonials. You can also manually enter testimonials from your WordPress admin area.

After that, you can easily display testimonials using a simple shortcode. For detailed instructions, see our guide on how to add a customer reviews page in WordPress.

3. Testimonials Widget

Testimonials widget

Testimonials Widget is another flexible WordPress testimonials plugin. Despite the name, it allows you to add testimonials anywhere on your website.

It comes with a sidebar widget allowing you to easily display testimonials in sidebars. Testimonials are displayed in a carousel with a beautiful slide-in and fade effects.

4. Strong Testimonials

Strong testimonials

Strong Testimonials is one of the most customizable WordPress testimonial plugins. It comes with multiple display options including testimonial slider, grid layout, masonry layout, single column layout, and more.

It also includes a custom form allowing your customers to easily add their reviews and testimonials. If you have been getting customer reviews on social media, then this plugin can also embed Facebook, Twitter, YouTube, and more.

5. Testimonial Basics

Testimonial Basics

Testimonial Basics is a complete testimonial management solution for your WordPress website. It includes multiple display styles, sidebar widget, and a feedback form to collect user testimonials.

User-submitted testimonials use Gravatar to fetch client photo. However, you can also manually upload photos directly from your WordPress admin area.

6. WP Testimonials with rotator widget

WP Testimonials

WP Testimonials is a simple yet highly customizable testimonials plugin. It allows you to easily add testimonials and sort them into categories and tags.

After creating testimonials, you can display them using a shortcode. This shortcode comes with many parameters that you can use to customize the appearance of testimonials. The plugin also comes with a widget with the same options as the shortcode offer.

7. BNE Testimonials

BNE Testimonials

BNE Testimonials is another easy to use option for adding testimonials to your WordPress site. It comes with a shortcode and a sidebar widget to easily display testimonials.

It has a slider and plain list layout for testimonials, which inherits your theme’s style for display.

8. Testimonial

Testimonial

Testimonial is a straight-forward WordPress testimonials plugin with simple options and the ability to choose your own colors.

It has draggable box items and allows you to choose different fonts, font-sizes, text color, and featured photo. The plugin does not have a slider or rotator, so testimonials will be displayed in grid or list style.

9. Testimonial Slider

Testimonial Slider

Testimonial Slider offers a modern WordPress testimonial slider with an improved user experience. It comes with a slider as well as plain list layout. You can also add a front-end contact form to collect customer testimonials.

You can add testimonials anywhere using the shortcode or sidebar widget. The testimonial slider is touch / mobile friendly and works great on all screen sizes.

We hope this article helped you find the best testimonial plugin for your WordPress website. You may also want to see our complete list of must have WordPress plugins for business websites.

If you liked this article, then please subscribe to our YouTube Channel for WordPress video tutorials. You can also find us on Twitter and Facebook.

The post 9 Best Testimonial Plugins for WordPress appeared first on WPBeginner.


source http://www.wpbeginner.com/plugins/9-best-testimonial-plugins-for-wordpress/

GeoDirectory V2 meets Ninja Forms


GeoDirectory V2 and Ninja Forms integration we decided to integrate GeoDirectory V2 with Ninja Forms, here’s why:
While GeoDirectory V1 comes with a built in contact form, GeoDirectory V2 will not have one out of the box.
We removed our contact form, because:
It is limited.
You can’t customize it easily.
It doesn’t keep track of submissions (Lead Management).
You could use it only once per listing page.
In addition, if you wanted to add a general contact form to your directory website, you needed a 3rd party plugin, which would make its code redundant.
If you install GeoDirectory V2 today and you add an email address to a listing, the email address will appear instead of the “Send Inquiry” link that used to be there on V1.
However we added a section in the setup wizard to install Ninja Forms.
Why Ninja Forms?
We considered and tested only free plugins and it’s the one we liked the most.
The free version does everything a directory owner may want. If he wants more than the average directory owner, there are plenty of premium extension to choose from.
Ninja Forms is by far the most user friendly, intuitive and well coded of all the plugins that we tested.
Source: https://managewp.org/articles/17296/geodirectory-v2-meets-ninja-forms


source https://williechiu40.wordpress.com/2018/03/30/geodirectory-v2-meets-ninja-forms/

Auditing Your WordPress Plugin for Gutenberg – GiveWP


With its growing list of features and blocks, it’s difficult to know where to begin in preparing an existing WordPress plugin for Gutenberg. That’s why we’re going back to the start to focus on the one change that has kept us most excited about Gutenberg since day one—the block and its ability to unify the content creation interface. Unifying Content Creation in WordPress
Before reimagining how our Give plugin will integrate with Gutenberg, it’s important to first understand the focus of the new editor and the problems it aims to solve. Like most of the WordPress community, we got our first glimpse of the Gutenberg vision through Matt Mullenweg’s early description of the project:
“The editor will create a new page- and post-building experience that makes writing rich posts effortless, and has ‘blocks’ to make it easy what today might take shortcodes, custom HTML, or ‘mystery meat’ embed discovery.” —Matt Mullenweg
For all of their quirks, the shortcodes and “mystery meat” that Mullenweg mentions represent some of the most powerful and relied upon functionality of Give and thousands of other plugins
Source: https://managewp.org/articles/17294/auditing-your-wordpress-plugin-for-gutenberg-givewp


source https://williechiu40.wordpress.com/2018/03/30/auditing-your-wordpress-plugin-for-gutenberg-givewp/

Two Options for Replacing text throughout a WordPress Website, by Jim Walker


We’ve all had web design situations where we’ve needed to replace a snippet of text throughout our website. The task of learning how to replace text is a literal right of passage for most new WordPress designers. And I use the term “right of passage” in regard to Googling the term, “how to replace text within WordPress.” In running that search, you’ll likely find yourself going down so many knowledge rabbit holes that you may forget what you were searching for in the first place. Been there!
Nowadays, I use the uber awesome plugin, Better Search Replace. I mean it simply does the job so elegantly I sometimes forget there were alternatives.
Back in the day, before search and replace plugins were a thing, I recall using a simple bit of text that was all the rage back in 2013. I was a big fan of The Web Taylor Hampshire blog back then and recall geeking out on his blog on numerous occasions. One of the blog posts discussed WordPress: Replace string in content of all pages, gave the following functions.php ready snippet:
function replace_content($content)
{
$content = str_replace(‘##Replace Me##’, ‘##With Something Else##’,$content);
return $content;
Source: https://managewp.org/articles/17293/two-options-for-replacing-text-throughout-a-wordpress-website-by-jim-walker


source https://williechiu40.wordpress.com/2018/03/30/two-options-for-replacing-text-throughout-a-wordpress-website-by-jim-walker/

All wp.org designers now can get access to Invision


As was posted a few weeks ago and covered in the weekly design meeting, @johnmaeda working with Invision, has arranged for us all to have access! This is really cool and a great opportunity for this community. I am sure I reflect everyone’s feelings in saying a big thank you to everyone that helped make this happen This is such an amazing thing for an open source project to have this kind of tool for everyone to use. Invision is a shared tool that can really help us all working on .org projects. It is a powerful prototyping system and you can learn more about it here.
To get access, first you must be a member of the design Trello board. You can join that board using this handy link. Once there, one of the board maintainers will give you access to the board. If you don’t find you are given it please ask on chat.wordpress.org, using Slack and in #design. New and existing members can then follow these steps to get access to wp.invisionapp.com:
Once in, go to the Trello section titled: “Invision access”.
Add a ‘new card’, make the title ‘Please give me access’.
Click into the new card you made, in the description add your name, wp.org username
Source: https://managewp.org/articles/17292/all-wp-org-designers-now-can-get-access-to-invision


source https://williechiu40.wordpress.com/2018/03/30/all-wp-org-designers-now-can-get-access-to-invision/

The 5 Biggest Issues Modern Web Designers Have to Face


As the importance of the web has grown over the past couple of decades, so have the responsibilities of web designers. It used to be that we had relatively little to worry about, save for making sure our creations looked good and worked properly. But those days appear to be just a distant memory. These days, it seems like our worry list has grown exponentially. From major software upgrades to privacy battles – we’re in the thick of it. While designers aren’t always directly involved in these issues, we certainly are affected by them in one way or another.
Let’s take a look at the five biggest issues (in no particular order) that give us a case of the night sweats.
1. The WordPress Gutenberg Editor
I’ve written extensively about Gutenberg, which is slated to be released as part of WordPress 5.0. It’s generated a lot of buzz and a whole lot of debate in the developer community. And with WordPress powering about 30% of all websites, it’s going to have an effect on a whole lot of website owners and web professionals.
There is some understandable panic about what this completely new editing experience will do to existing websites. The paranoid thoughts
Source: https://managewp.org/articles/17291/the-5-biggest-issues-modern-web-designers-have-to-face


source https://williechiu40.wordpress.com/2018/03/30/the-5-biggest-issues-modern-web-designers-have-to-face/

Thursday 29 March 2018

How to migrate your WordPress website domain name

Are you looking for a guide to migrate your WordPress website domain name? If the answer is “yes”, then you’ve come to the right place.

Migrating a WordPress domain name is not an overly common occurrence. However, there are many instances where a website might be required to change its domain name.

For example, your website might be penalized heavily by Google, and you want a new domain, or you might want to rebrand your business to a new name. Everything is fine until you have a proper reason to do so.

In this article, we will focus on the tools and techniques that will allow you to migrate WordPress website domain name. Before we start, however, let’s try to understand the impact of migrating your website domain on your SEO.

What is the impact of changing domain name on SEO?

One of the most common questions that a website owner has is: what will be the impact of moving the domain name on SEO?

As you might expect, Google will not respond quickly to the change in domain, and initially your search engine traffic will be impacted. With time and effort, however, your traffic will get back to normal after the switch.

To ensure that you get your traffic back, you need to follow a few simple steps. Don’t worry – we will go through them in this article. In short, you need to not only to buy a new domain, but also carry out proper 301 redirects to ensure that your SEO doesn’t get impacted any more than you can help.

Things to do before you start

Before we start, you need to do some pre-steps. These pre-steps will ensure that you don’t lose any of your work, and will also prepare the website for migration.

For the sake of an example, we will name the old site as “www.example.com” and the new site as the “www.newexample.com.” We will use these throughout the article for reference purposes.

How to migrate your WordPress website domain name

1. Creating a full backup

The first step is to always create a backup of your website, including files and database. As you are using WordPress, you will find a lot of backup plugins to do the task. We recommend using BackupBuddy, VaultPressBackWPup or  Duplicator. You can also use other backup plugins or services of your choice.

Last but not least, you can also back up your website using the Cpanel or use phpMyAdmin. Only try out these manual methods if you are sure what you are doing. For the most part, it’s a good idea to stick with backup plugins unless you’re 100% confident.

Once the backup is created, you can download it to your computer, or simply store it in the cloud.

2. Setting up the new site

To simplify things, we’ll use Duplicator as the example plugin for walking you through these steps.

To get started, you need to install the Duplicator plugin on your old site, www.example.com. Once done, you need to navigate to the plugin page from the WordPress side menu.

After you open the plugin, all you need to do is click on the “create” button to start the process of duplicating your website. After you provide the name of the package, it shouldn’t take more than 2-3 minutes for the backup to be complete.

Once done, you can download the package and secure it for the next step. For the sake of the tutorial, we will name the package “thekey.php”.

3. Connecting through FTP

The next step is to connect to your new site (www.newexample.com). You can use FileZilla to connect. After connection, just copy the the backup file, “thekey.php” into the root directory of the new website. You should be able to now access the website by typing the URL in your browser.

http://www.newexample.com/thekey.php

You need to change the URL and the file name accordingly for the above URL to work. Once done, you will now see a Duplicator Installer screen where it will ask for basic information such as the database.

Ensure that you check the “Table Removal” option and also ensure that the database on the new website is empty.

Next, you need to click on the “I have read all the warning and notices.” By clicking the “Run Deployment” option, the deployment process will now start.

After the initial installation process is completed, you will see another screen which is the “Update” screen. In this screen, you need to enter the old domain name and the new domain name. The plugin will try to guess the old and new URLs, but you should double-check to ensure that both values are correct.

The final step is to wait for the process to complete. After the completion, you can now log in to the WordPress admin panel using the old credentials and check if everything is working fine. The plugin also tries to prompt you to create a new backup which you should consider that you can always revert to the first instance if something goes wrong from here onwards.

You can also delete the installer file and clear your directory for any unnecessary files. You also need to re-initiate the permalinks by going to “Settings” -> “Permalinks.”

4. Final step: Implementing 301 redirects and notifying Google

With all the backups loaded into the new website, it is now time to tell Google that your new site is ready. To do so, you need to set up permanent 301 redirects using a simple .htaccess file hack. This hack is also used when switching a website from HTTP to HTTPS in WordPress.

You can find the .htaccess file in your wp-admin or wp-includes folder. It is a hidden file, and you might to search for hidden files if you are not able to locate it. After you locate the file, copy and paste the below code to make the magic happen.

#Options +FollowSymLinks
RewriteEngine on
RewriteRule ^(.*)$ http://www.newexample.COM/$1 [R=301,L]

Don’t forget to replace newexample with your new domain name.

With redirection complete, it is now time to tell Google about your new domain.

You need to use Google Search Console to let Google know about the change. Go to the left-hand menu and click on “Change of Address.” You can follow this simple guide by Google for step-by-step instructions.

Conclusion

Migration a website domain name is not a simple task. You need to carry out the steps with caution and concentration.

We hope you found this guide useful. If you are not sure how to proceed with the whole process, it is always advisable to hire a professional to do it for you. Also, don’t forget to share your opinions in the comments section below.


source https://searchenginewatch.com/2018/03/29/how-to-migrate-your-wordpress-website-domain-name/

How to Embed a Facebook Video in WordPress

Do you want to embed a Facebook video in WordPress? With the recent popularity of Facebook Live and Facebook videos platform, several of our users asked if it was possible to embed Facebook videos in WordPress. In this article, we will show you how to easily embed a Facebook video and Facebook live video in WordPress.

How to embed Facebook video in WordPress

Why Add Facebook Videos in WordPress?

We tell our users that they should never upload videos to WordPress. Instead, we recommend using a video sharing site like YouTube.

While YouTube is currently the world’s largest video hosting platform, Facebook is the biggest social network, and their videos are growing fast.

Recently, Facebook introduced auto-play and Facebook live video features. Marketers all over the world are raving about these features because they increase user engagement and overall reach.

You can also use Facebook videos to increase likes on your Facebook page. For a more immersive social experience, you can add Facebook page plugin, install Facebook comments, and add Facebook like button on your WordPress site.

Having said that, let’s take a look at how to embed Facebook videos on a WordPress site.

Embedding Facebook Videos in WordPress

First, you need to locate the video that you want to embed on your WordPress site.

Next, you need to right click on the video name or date, and then select copy link address.

Copy the Facebook video URL

After that, you need to visit the Facebook embedded video player website and scroll down to the code generator section.

You will need to paste the URL you copied earlier in the ‘URL of video’ field.

Facebook video embed code generator

Next, you need to click on the get code button which will bring up a popup showing you two boxes of code.

Embed code generator

The first part of the code needs to go in your website’s header section. There are multiple ways to add this code to your website.

If you are comfortable editing theme files, then you can add it to your theme or a child theme by simply editing the header.php file and paste it right after the <body> tag.

Alternatively, you can install and activate the Insert Headers and Footers plugin. For more details, see our step by step guide on how to install a WordPress plugin.

Upon activation, you need to go to the Settings » Insert Headers and Footers page in your WordPress admin and paste the code into the footer box. Click on the save button to store your changes.

Important: You only need to add the first part of the code once. Next time you add a Facebook video, you will only need to copy and paste the second part of the code.

Now return to the Facebook video embedder page and copy the second part of the code.

You can add this code in your WordPress posts, pages, or even a sidebar widget. When adding the code to your posts and pages, you need to make sure to switch to the Text editor, otherwise WordPress visual editor will mess up the code.

Switch to text editor to paste video embed code

You can now visit your website to see the Facebook video in action.

Facebook video embed preview

How to Embed Facebook Live Video in WordPress

You can embed the Facebook Live video just like you would embed a regular Facebook video. The only difference here is how to get the URL of your Facebook live video.

Facebook doesn’t allow you to get a URL for your live video before you go live. If you want to simultaneously broadcast the Facebook Live video on your website, then you will need to first go live.

Once you are live, right click on the date and select copy link address to get the live video URL.

Getting your Facebook Live video URL

Once you have the URL, you can go to the Facebook embedded video player website and paste the link in the ‘URL of video’ field.

Facebook Live video embed code generator

The video embed code generator will now fetch and display a preview of your Facebook live video. You need to click on the Get Code button to continue and follow the instructions described above to add these codes to your website.

Once you have added the Facebook live video code to your site, your users will be able to view the Facebook live video directly from your website as well as their Facebook feeds.

Facebook live video preview

We hope this article helped you learn how to embed Facebook videos in WordPress. You may also want to see our guide on how to get more visitors to your new WordPres website.

If you liked this article, then please subscribe to our YouTube Channel for WordPress video tutorials. You can also find us on Twitter and Facebook.

The post How to Embed a Facebook Video in WordPress appeared first on WPBeginner.


source http://www.wpbeginner.com/wp-tutorials/how-to-embed-a-facebook-video-in-wordpress/

A guide to the standard reports in Google Analytics: Audience reports

Google Analytics is a tool that can provide invaluable insights into what’s happening on your website, your levels of traffic and engagement, and the success of your campaigns.

If you’re a newcomer to Google Analytics, however, the array of different reports available to you can be a little overwhelming. Where should you begin? Where can you find the most useful data about your website?

Google Analytics standard reports are the preset reports listed down the left-hand side of your dashboard, divided into the segments Real-Time, Audience, Acquisition, Behavior and Conversions.

The information that appears in these is preset by Google Analytics, and gives an insight into the data on every part of your site, from your audience demographics to the channels through which they find your website.

In this series, we’ve set out to tackle the ambitious task of explaining each segment of Google Analytics and the standard reports they contain. Last time, we looked at Real-Time Reports and how they can be used in your marketing and SEO campaigns.

In this instalment, we’re going to look at Audience Reports: what you can learn from them, and how you can get the most out of the data that they offer.

What are Audience Reports?

As with Real-Time Reports, the secret to what these reports do is in the name: they tell you more about your audience, the people who are coming to your site.

The Audience section of Google Analytics is an extensive one, with no fewer than fifteen sub-sections sitting within it, most of those with several different reports.

We won’t cover each one in exhaustive detail in this guide, but will give a quick whistle-stop tour of the main sections and look at some ways that you can use these reports to maximum effect in your marketing campaigns.

Overview

The Overview section shows you your website’s current audience at a glance. It’s not in real-time – you need Real-Time Reports for that – but nevertheless presents a useful snapshot of the current audience metrics on your site, with information on users, unique users, sessions, page views, bounce rate and more.

The default time period is set to a week, but you can use the calendar drop-down in the top right corner to adjust it and view metrics over a longer or shorter period. You can also use the buttons just below that to view hour-by-hour, day-by-day, week-by-week or month-by-month stats (note that the last two of these will only work if the time span you’ve selected is more than a week/month).

Active Users

This report gives you an insight into the number of unique users who have visited your site over various time periods – 1 day, 7 days, 14 days and 28 days.

This report is most useful for understanding the success of a promotional campaign while it’s running. As Google’s Analytics Help text for the Active Users report advises:

“If the numbers are consistently in line with your expectations, you’ve found your sweet spot.

“If the numbers are below expectations, reevaluate your marketing efforts to see whether you’re targeting the appropriate audiences, and whether your ads are winning auctions.

“In cases where you have a lot of 1-Day Active Users but the numbers drop off for longer term users, that can signal things like problems with a new release, or that initial enthusiasm isn’t translating into long-term engagement. For example, lots of users might be downloading an app but are finding that it doesn’t really meet a need they have or that it doesn’t capture their interest.”

Lifetime Value

The Lifetime Value report for Google Analytics was first tested in the first quarter of 2016 (as reported by Search Engine Roundtable at the time) and was rolled out fully in early 2017, although as I write this, the report is still in beta.

The report is geared towards Google Analytics users who have an ecommerce website, and is only available if you have activated ecommerce tracking on Google Analytics.

The Lifetime Value report allows you to filter by the date on which a certain user was acquired, making it possible to analyze users acquired during the most recent day-long, week-long or month-long campaign. It also allows you to compare various different Lifetime Value (LTV) metrics, including:

  • Appviews per user (applies only to mobile app users)
  • Pageviews per user (applies only to website users)
  • Goal completions per user
  • Revenue per user
  • Session duration per user
  • Sessions per user
  • Transactions per user

For a more in-depth examination of how these metrics are calculated, have a read of Optimize Smart’s ‘Measuring customers’ lifetime value in Google Analytics for mobile app and website users‘.

Cohort Analysis

A cohort of users is any group of users that is segmented based on a date. For example, a cohort could be a group of users with the same acquisition date (technically in GA this would be the Date of First Session), or a group of users who completed their first transaction during a specific time period.

To configure a cohort report, there are four main selections you need to make:

Cohort type: This is the date that you want to base your cohort on. A little frustratingly, GA currently only gives one option for this section – Acquisition Date. However, it is possible to use report segmentation to get some additional insights, such as segmenting by traffic source or campaign.

Cohort size: This is the time window that you want to use for your cohort type: e.g. by day, by week, by month.

Metric: This is the actual data you will see presented in the report. You can choose from aggregated metrics such as pageviews or revenue, or per-user metrics such as sessions per user or transactions per user.

Date range: This is the date range used to construct the cohort; you can choose from the last 7 days, last 14 days, last 21 days or last 30 days.

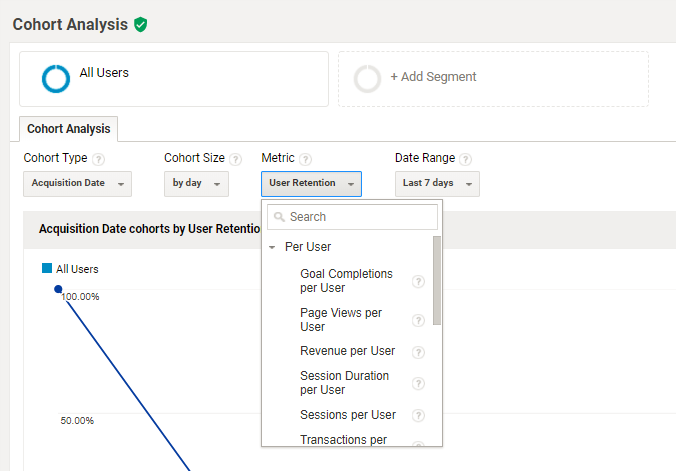
For a much more detailed guide to using cohorts in Google Analytics, check out ‘Understanding the Google Analytics cohort report‘ by Analytics Talk.

Audiences

To populate this report with data, you first need to define an audience within Analytics. To do that, you should enable Demographics and Interests reports, then create an audience.

You can use one of the preconfigured audiences available within Analytics, or create one from scratch. An audience might be as general as “current shoppers” (including users who have >0 product views, and excluding those who have >0 purchases) or as specific as users who have viewed the detailed page for [Product x], and then returned within 7 days to purchase.

Finally, publish your audience to Analytics by adding Analytics as a destination for that audience. The Audiences report will display data for your audience(s) from the point at which you create the report onwards – it isn’t available retroactively.

Once this is all set up, you can view Acquisition, Behavior and Conversions metrics for the audiences you have defined, and respond to their performance with actions like:

  • Devoting more of your marketing budget to bidding on ads for those users
  • Expanding on the hours during which you bid on ads shown to those users
  • Expanding the number of sites on which you bid for ads shown to those users.

User Explorer

To populate this report with data, you need to first enable the User-ID feature in your property settings. Once set up, this report allows you to isolate and examine individual, rather than aggregate, user behavior.

For each client or user ID, you can view the following initial data:

  • Sessions
  • Avg. Session Duration
  • Bounce Rate
  • Revenue
  • Transactions
  • Goal Conversion Rate

Then after drilling into the ID, you can see the acquisition date and channel for that user, along with an activity log detailing which actions that user took on your site during each session. You can use the Filter by menu to add and remove data types, and expand and collapse individual sessions as necessary.

You can use the User Explorer report to more closely examine any noteworthy behavior that you spot within a particular segment, to get a more detailed understanding of what might be going on.

By examining individual session behavior, you can also see when your users fall short of completing certain goals, and remarket to those users with specific information related to their experiences. Additionally, you can personalize your customer service and offer informed guidance based on the context provided by the User Explore report. Just remember to tread the line between “helpful” and “creepy”!

Demographics

The Demographics section in Google Analytics gives an insight into the age and gender of your website audience, and how different age and gender groups behave differently on your site.

Google cautions that, “Demographics and interests data may only be available for a subset of your users, and may not represent the overall composition of your traffic” – so bear in mind that this data may not be present for the whole of your audience, depending on whether or not it can track them via a DoubleClick cookie or Device Advertising ID.

The Overview report shows you the age and gender breakdown of your audience at a glance, with age divided into 18-24, 25-34, 35-44, 45-54, 55-64 and 65+ bands. In the top right corner of each graph, you can see which percentage of users on the site this data represents.

The Age report gives a breakdown of how those different groups interact with your website – their average bounce rate, pages per session, session duration, and completion rate of any goals and conversions you’ve set – and the Gender report does the same for gender.

The graph at the top of the report allows you to view how many of each type of user accessed your site on any given day – so if you’ve been executing campaigns to drive a specific demographic (e.g. women aged 18-24) to your website, you can assess how successful that has been over time.

Interests

They say psychographic data, rather than demographic data, is where it’s at these days. If so, the Interests section of GA Audience Reports is where you’ll find your most valuable information. Google uses a variety of data points taken from places like Gmail, app messages, internet browsing habits and YouTube history to make a guess at each user’s personal interests.

GA splits up interest data into three categories, each with its own report: Affinity, In-Market and Other.

Affinity Categories: Users who have a general interest in the topic in question – Google describes the interest level of these users as “Lifestyles similar to TV audiences, for example: Technophiles, Sports Fans, and Cooking Enthusiasts”.

In-Market Segments: Users who have “product-purchase interests” in the topic in question, akin to a buyer who is at the bottom of a purchase funnel and ready to convert.

Other Categories: This category provides the most granular view of your users’ interests. For example, says Google, “Affinity Categories includes Foodies, while Other Categories includes Recipes/Cuisines/East Asian”.

These reports display similar data to the Demographics reports, with users segmented by interest area instead of by age group or gender.

So what is interest data good for? If you’re an advertiser, you can use it to more effectively target ads based on specific interests. If you’re a publisher or otherwise publish content marketing to your site, you can get ideas for content topics based on what your users are most interested in.

You can also segment your report to get an insight into how these interest categories align with other demographics or behaviors. For example, below I’ve segmented the Other report by the 18-24 age group, revealing which interests are most prevalent among the youngest age group on Search Engine Watch.

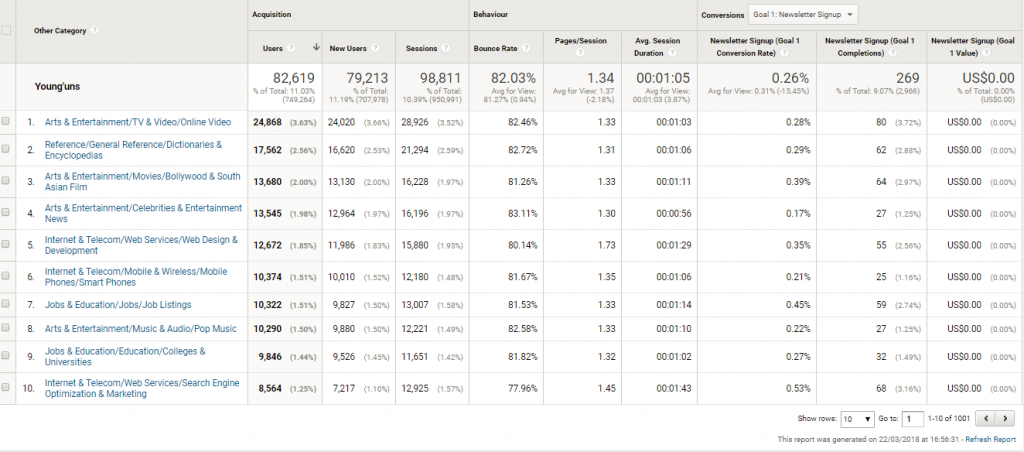
Apparently SEW’s younger readers are more into Bollywood than SEO…

Geo

The Geo section contains reports on the language and location of your website visitors.

In the Language report, you can view Acquisition, Behavior and Conversions for site users who speak different languages – particularly useful if you run an international business, or have been thinking about diversifying into international markets, as you can get an idea of which language markets it would be most worthwhile expanding into.

The Location report features a virtual map of your users’ locations, which is useful for targeting search and social ads. You can zoom in on data at the city level, which allows local businesses to know if their marketing efforts are driving traffic and conversions from the right regions, and is also useful for publishers who want to create locally-focused content.

Behavior

The Behavior section allows you to break down your audience by how often they visit your site, and the duration of that visit. You can learn how many times on average a visitor comes to your website, how many days tend to elapse between sessions for repeat visitors, how long visitors remain on your site and how many pages they visit whilst there.

If you’re a publisher, this is valuable data on how ‘sticky’ your website is and how successfully you’re managing to retain visitors. If you’re aiming to create more engaging content, you can track these metrics to gauge the success of your efforts, keeping an eye out for an increase in returning visitors or the duration of an average visit.

If you’re in ecommerce or sales, you can use this data in conjunction with Goals in order to learn what visitor behavior typically leads to a conversion.

Do you score the most conversions on the user’s first visit, or on subsequent visits? If the latter, what can you do to make your visitors more likely to return and convert?

Technology

The Technology section of GA Audience reports reveals which browsers, operating systems and even network providers your audience is using to access your site.

This information can be useful if your business creates online extensions, software or applications, and you want to know which browsers and operating systems to make them compatible with.

You can also use it to work out where you should be allocating your technical resources – if only a small fraction of your audience uses Opera, for example, it’s probably not worth putting a lot of time and effort into making sure that your website is optimized for that browser.

Mobile

If you’ve been in two minds about whether to optimize for mobile (though by now we hope we’ve persuaded you that it is worthwhile!) or want the data to back up an argument for a mobile site/app, head to Google Analytics’ Audience => Mobile section.

In the Overview report you can see Acquisition, Behavior and Conversions data for desktop, mobile and tablet users – which can also allow you to learn, for example, if your bounce rate is significantly higher on mobile (which might indicate a poor mobile experience) or whether more users are completing purchases on a desktop device.

The Devices report then provides you with incredibly specific insights into the devices your audience is using to access your website, down to the make and model of the device.

If you’re developing a mobile app and are unsure about whether to produce it for Apple or Android, or want to test your mobile site using the most common devices wielded by your users, this is the report to look at.

Custom

In this section, you can create a custom Audience report using your own chosen variables, metrics and dimensions.

As the scope of this series is standard Google Analytics reports (not custom), I won’t go into detail here about how to get the most out of this report, but Econsultancy has a solid beginner’s guide to creating a custom report in Google Analytics if you want to get to grips with the basics.

Benchmarking

Benchmarking reports are only available if you have benchmarking enabled on Google Analytics, but once you do, it gives an extremely useful insight into how your website audience and performance compare with other companies in your industry.

Google allows you to get extremely granular with the industry categories, providing a list of more than 1,600 to choose from. You can further refine the data by geographic location and traffic volume, allowing you to compare like for like with other websites of the same size and location.

Users Flow

The Users Flow report is a fairly unique-looking report that doesn’t immediately resemble any of the other standard reports in Google Analytics.

As the name implies, it is useful for studying and trying to understand the “flow” of users through your website – the path that they typically take from page to page. It also highlights where users drop off – so you can isolate where exactly users might be getting stuck or losing interest, and take steps to remedy it.

A drop-down menu in the top left allows you to view user flow by location, language, browser, mobile device, and other custom data dimensions.

This view can be particularly useful for ecommerce marketers to understand the path that users typically take to conversion, as well as for publishers seeking to understand which articles bring the most users to the site, and where users typically navigate after reading them.


How do you make use of Google Analytics’ many different Audience Reports? Do you have any novel applications to share? Leave a comment, and stay tuned for our next instalment on Acquisition Reports!


source https://searchenginewatch.com/2018/03/29/a-guide-to-the-standard-reports-in-google-analytics-audience-reports/

Wednesday 28 March 2018

From Humble Beginnings to Internet Dominance: The Rise of WordPress


WordPress has officially taken over the internet. Actually, that happened a while ago, but with W3Techs reporting that WordPress is powering 30% of the Internet, there can be no doubt.
The report goes on to indicate that WordPress owns a whopping 60.3% market share, almost 10 times more than their closest competitor, Joomla, which came in at 3.1% usage and 6.3% market share.
And they just keep growing.
In November of 2015, VentureBeat reported that WordPress was powering 25% of the web, hitting 30% this month.
In order to exclude spam websites, W3Techs only includes the top 10 million websites in their survey, which means that that WordPress went from powering 2.5 million of the internet’s top websites grew to 3 million top websites in just a little over 2 years.
And we’re not just talking little bloggers.
The list of websites using WordPress is nearly a “Who’s Who” of the internet. World recognized brands like Disney, UNICEF, TIME Magazine, Sony, and BBC America use it.
Facebook uses it.
Superstars like Beyonce use it.
Even Snoop Dogg uses it.
But how did they get here? How such an internet behemoth?
Let us give you a fast and furious tour of WordPress
Source: https://managewp.org/articles/17285/from-humble-beginnings-to-internet-dominance-the-rise-of-wordpress


source https://williechiu40.wordpress.com/2018/03/28/from-humble-beginnings-to-internet-dominance-the-rise-of-wordpress/

The WordPress Philosophy: The Four Freedoms – Media Temple


This is the second post in a series on the WordPress Philosophy. Last month I described why WordPress has a Philosophy and why WordPress users should care about that and understand it. This article is the first of 8 that will explore the tenants of the WordPress Philosophy. We’re going to start at the end. The most foundational tenant of the WordPress Philosophy is the last one: “Our Bill of Rights”. I believe this is foundational to understanding all the previous tenants of the philosophy.
Similarly to the United States of America’s Bill of Rights, this Bill of Rights is all about freedom. This is often called “The Four Freedoms”:
The freedom to run the program, for any purpose.
The freedom to study how the program works, and change it to make it do what you wish.
The freedom to redistribute.
The freedom to distribute copies of your modified versions to others.
The Four Freedom’s come from what is often called the GNU Manifesto by Richard Stallman. This is one of the foundational documents that launched the Open Source movement. It’s a valuable and insightful read that I highly recommend everyone read.
The WP Bill of Rights opens by acknowledging
Source: https://managewp.org/articles/17282/the-wordpress-philosophy-the-four-freedoms-media-temple


source https://williechiu40.wordpress.com/2018/03/28/the-wordpress-philosophy-the-four-freedoms-media-temple/

How Moomoo agency builds powerful relationships with WP plugin buyers


Vitalii Kiiko is a passionate and experienced WordPress plugin and theme developer, who recently provided us some great feedback and kindly agreed to share his story. He is a co-founder and works as a back-end developer at both HighSea Studio and MooMoo Web Studio. Vitalii, thank you so much for agreeing to tell us about your experience! Let’s start by getting to know you better. Can you please tell us a bit about yourself, like where you are from and what’s your background?
Thanks for this opportunity. It is a great pleasure!
Computer Science is not my major. In fact, Accounting is. However, I really have this passion for web development. I am a self-taught developer, and I’ve read many books/articles about CS and specific programming languages/libs.
Now I have over six years of professional experience. Although I am especially keen on doing back-end stuff, I am also interested in the front-end stack, game dev direction in particular. I have written a small web game in ReactJS. I really love all those things!
How did you get into WordPress Development?
My story as a WordPress developer started with a personal blog on WordPress, a long long time ago. After maybe a
Source: https://managewp.org/articles/17284/how-moomoo-agency-builds-powerful-relationships-with-wp-plugin-buyers


source https://williechiu40.wordpress.com/2018/03/28/how-moomoo-agency-builds-powerful-relationships-with-wp-plugin-buyers/

How to convert a GMT/UTC timestamp to local time in WordPress


WordPress goes to great lengths in order to provide us with a localized environment, displaying dates and times in the correct format and even language. However, since it uses its own timezone setting, some native PHP functions are no longer applicable (or don’t return correct results), such as the date() function which returns a date/time string depending on the timezone configuration of PHP itself, ignoring the WordPress setting. Recently, I retrieved from a third-party API a timestamp, which I needed to convert to a WordPress-correct timestamp. WordPress already provides a great function, date_i18n() (i18n stands for internationalization, as there are 18 letters between the beginning i and the ending n), which seemingly supports GMT/UTC timestamps, but once I tried it I quickly realized its $gmt parameter only applies if you don’t provide your own timestamp.
There is however, a little known function called get_gmt_from_date() which almost does what I needed, but not quite. The problem is that it won’t accept a timestamp, but a string in the format Y-m-d H:i:s (e.g. 2018-03-19 23:59:59). No problem! Let’s create our own little function that will wrap get_gmt_from_date()
Source: https://managewp.org/articles/17283/how-to-convert-a-gmt-utc-timestamp-to-local-time-in-wordpress


source https://williechiu40.wordpress.com/2018/03/28/how-to-convert-a-gmt-utc-timestamp-to-local-time-in-wordpress/

How to Fix the HTTP Image Upload Error in WordPress

Are you seeing the HTTP error while uploading media in WordPress? This error usually occurs when you are uploading an image or other files to WordPress using the built-in media uploader. In this article, we will show you how to easily fix the HTTP image upload error in WordPress.

How to fix http error when uploading images in WordPress

What Causes HTTP Error During Media Upload in WordPress?

There are a number of things that could lead to a HTTP error when you are trying to upload files using the WordPress media uploader. Basically, WordPress is unable to figure out the cause and that’s why it displays the generic ‘HTTP error’ message.

HTTP Error

The frustrating part is that this error message doesn’t give you any clue as to what may have caused it. This means that you will have to try different solutions to find the cause and fix the error.

That being said, let’s take a look at how to troubleshoot and fix the HTTP error during media upload in WordPress.

1. Make Sure The HTTP Error is Not Temporary

First, you should wait a few minutes and then try uploading your image file again. This error is sometimes caused by unusual traffic and low server resources, which are automatically fixed on most WordPress hosting servers.

If that doesn’t work, then you may want to try uploading a different image file. If the other file uploads successfully, then try saving your original image file to a smaller size and retry uploading.

Lastly, you may want to try saving the file to a different format. For example, change jpeg to png using an image editing software. After that, retry uploading the file.

If all these steps result in the HTTP error, then this means that the error is not caused by a temporary glitch and definitely needs your immediate attention.

2. Increase WordPress Memory Limit

The most common cause of this error is lack of memory available for WordPress to use. To fix this, you need to increase the amount of memory PHP can use on your server.

You can do this by adding the following code to your wp-config.php file.

define( 'WP_MEMORY_LIMIT', '256M' );

This code increases the WordPress memory limit to 256MB, which would be enough to fix any memory limit issues.

File uploaded successfully

3. Change Image Editor Library Used by WordPress

WordPress runs on PHP which uses two modules to handle images. These modules are called GD Library and Imagick. WordPress may use either one of them depending on which one is available.

However, Imagick is known to often run into memory issues causing the http error during image uploads. To fix this, you can make the GD Library your default image editor.

You can do this by simply adding this code to your theme’s functions.php file or a site-specific plugin.

function wpb_image_editor_default_to_gd( $editors ) {
        $gd_editor = 'WP_Image_Editor_GD';
        $editors = array_diff( $editors, array( $gd_editor ) );
        array_unshift( $editors, $gd_editor );
        return $editors;
}
add_filter( 'wp_image_editors', 'wpb_image_editor_default_to_gd' );

After adding this code, you can retry uploading files using the media uploader. If this doesn’t solve the issue, then you can remove this code and try other methods described in this article.

4. Using The .htaccess Method

This method allows you to control how Imagick uses server resources. Many shared hosting providers limit Imagick’s ability to use multiple threads for faster image processing. However, this would result in you seeing the http error when uploading images.

An easy fix is be to add the following code in your .htaccess file:

SetEnv MAGICK_THREAD_LIMIT 1

This code simply limits Imagick to use a single thread to process images.

We hope this article helped you fix the HTTP error during media upload in WordPress. You may also want to see our WordPress troubleshooting guide as well as the ultimate list of most common WordPress errors and how to fix them.

If you liked this article, then please subscribe to our YouTube Channel for WordPress video tutorials. You can also find us on Twitter and Facebook.

The post How to Fix the HTTP Image Upload Error in WordPress appeared first on WPBeginner.


source http://www.wpbeginner.com/wp-tutorials/how-to-fix-the-http-image-upload-error-in-wordpress/

12 tips to improve your reputation strategy

To grow and stay ahead of your competitors, you need to take a hard look at your reputation strategy.

The online reputation of your business hinges on a variety of elements. It’s an ever-evolving digital mix-up of comments, reviews, blogs, and more.

It’s time to take a proactive approach to improve your online reputation. Not sure where to start? Here are 12 tips to make your business shine under any consumer microscope.

1. Upgrade your Trustpilot account

Trustpilot continues to sway consumers, and you probably have built up a few Trustpilot reviews for your business. But are you making the most of your Trustpilot account?

By upgrading your Trustpilot account from free to paid, you get more personalized features to net more ratings and reviews.

Paid Trustpilot features include:

  • Personalized email address from sender
  • Customizable review invitations to your customers
  • Rich snippet star rating in TrustBox
  • TrustBox optimization
  • Imported product reviews

Trustpilot paid features can make a big impact on your brand reputation. After all, reviews and ratings play a big role in consumer confidence to buy.

2. Get backlinks from high authority sites

A backlink from a high authority publication is a recommendation signal to consumers.

For example, people reading a Forbes article on “Best Health Apps” will assume that the Forbes journalist did his or her due diligence in finding the very best apps. This is a trust signal for consumers.

To get those high authority backlinks you can implement a link building strategy that allows you to be top of mind for journalists. Creating very shareable content on your blog or site is also a powerful way to earn those reputation building backlinks as well.

3. Have a “featured in” logo section

To amplify confidence to buy and boost your brand reputation, you can showcase the high authority publications your products or services have been featured in. This makes a Featured In section on your home page valuable, like this one from Your Doctors Online.

This reputation strategy tip is also a very easy one to implement once you have three or more high authority publications to list.

You can also use the press release strategy to develop a few high authority “Featured In” publications. Using PRNewswire iReach WebReach, you can launch a press release about your brand.

The press release will get picked up by a number of high authority publications, like Yahoo Finance. You can create a press release about a new product or service, new employee position, charity work, and more.

4. Get quoted everywhere!

Having a CEO, director, or manager quote in several publications can be another fantastic reputation strategy. This will compliment your link building strategy as well, since most quotes are accompanied by a link back to the experts business.

How do you get quoted everywhere? Well, it is actually easier than you may think. Using Help A Reporter Out (HARO) can accomplish this.

Simply sign up for a free account as a “Source,” fill in the information, and choose the industries you can add insights for.

This is a great way to boost your reputation as an authority in your industry. You will also get quality backlinks to your website, and use articles on social media to boost awareness and trust among your followers.

5. Facebook video ads

Video ads are trending in a big way for brands, and users want more videos than ever before. In fact, 90 percent of users said that videos are a big part of the decision process. Social media videos net 1,200 percent more shares than the average text social posts.

“It is indeed one of the best tactics to bring more exposure to your brand while helping you achieve your bottom-line,” Mike Templeman of Forbes explained.

Facebook video ads are among the best performers. Why video? Video is great for engagement and can also add that personal touch consumers want.

Like this video from Backlinko’s Facebook page with nearly 3,500 shares:

You can show your social audience that you are indeed real, knowledgeable, and highlight your brand’s value and benefits.

6. YouTube videos

Your social media videos will often come from YouTube, making this is another reputation strategy worth pursuing. YouTube is the second largest search engine in the world and you can highlight your authority and expertise via YouTube videos quite easily.

Going back to the previous Backlinko example, Brian Dean uses YouTube videos to showcase his expertise on digital marketing in an engaging and actionable way.

If you want to increase your reputation and become a thought leader in your industry, YouTube can be valuable. You can also build up a subscriber base to remarket to.

7. Collaborate with social media influencers

There is nothing like boosting your reputation through the recommendations of influencers your customers already trust. This makes social media influencers an important asset to add to your reputation strategy.

Did you know that 74 percent of people turn to social media for help with buying decisions? And 40 percent of people have made an online purchase after seeing an influencer use a product on social media.

Where can you find social media influencers to help improve your brand reputation? There are a few online platforms like FameBit, TapInfluence, and Traackr. FameBit is a free platform that allows you to connect with influencers in a variety of industries.

Since it is free, it’s a good way to test the social media influencer waters across social channels like YouTube, Facebook, Twitter, and Instagram.

8. Get more blogger reviews

Social media is not the only place to utilize the power of influencers. If your brand sells products, getting more reviews from bloggers people follow and trust can boost your brand reputation.

To get your products reviewed by influential bloggers, you will need to send them a quick pitch. This can be via a social media message, or through their email or contact form from their website.

Here are a few pitch tips for outreach:

  • Keep your pitch short and sweet
  • Highlight your product’s benefits
  • Explain why the blogger’s audience will like your product
  • Let the blogger have your product for free
  • Let them know you have an influencer marketing budget

9. Start a podcast

Another great way to improve your reputation strategy is to start a podcast. Podcasts help showcase your knowledge and can cover a lot of trending topics your customers want information about.

“If you’re not already engaging your target market with podcasts, prepare to launch your first piece of audio content,” Tyler Basu explained in an Entrepreneur article.

Podcasts are a great way to feed information to your audience. They can easily listen to your podcast while driving, at the gym, on the bus or subway, and even at work.

Your audience doesn’t need to focus all their attention on written content. Creating a podcast is also easier than spending hours developing a blog post. A few podcast types include:

  • Interviews
  • Solo podcasts
  • Two or more hosts
  • Narrative podcasts
  • Or a combination of the above

You will also need a separate hosting platform for your podcasts. LibSyn and Blubrry are two hosting platforms that are affordable and easy to use.

10. List your product on Amazon

Getting your product listed on Amazon is an exceptional way to boost your online reputation. Did you know that 80 percent of Amazon users make an average of one purchase per month? Given that there are around 300 million Amazon users in total, that’s a lot of potential customers – and reviewers.

This makes Amazon a big trust builder for consumers and should be part of your reputation strategy. Amazon also has a product review and star rating. This can make a big impact on your brand’s reputation.

Amazon listing guidelines are actually not as difficult as you may think. You will need to follow the step-by-step process and you could have your product on Amazon within a few weeks.

11. Create Quality Content

One tried and true method for improving your reputation strategy is to create quality content. Those 300 word blog posts will simply not do anymore. You want your audience to be engaged and learn something from your articles.

Develop actionable blog posts that show step-by-step ways to solve issues consumers in your industry and niche may be experiencing.

For example, if you are catering content to small businesses, you can have a post about email marketing. In the post you can list the exact steps to set up an email marketing campaign and tips on how to make it successful.

This, of course, will be time-consuming. Your blog post may turn into a 2,000-word masterpiece. But long-form content is good!

Research has shown that 2,000+ word posts get more organic traffic:

Long form content also gets more social shares and linking domains:

This will increase brand reach and awareness, increase authority, and thus improve your reputation strategy.

12. Increase your Google ranking

Many consumers often begin looking for a product or service via Google search. Unfortunately, most searchers don’t go past page one of Google search results.

According to a Chitika report, only 4.8 percent of traffic will land on page two of search results.

Why? Well, one reason may be that Google is satisfying searcher intent better. But many consumers may not trust the content after Google page one. Are all page one listings reputable? Not at all, but the consumer may not know that.

A quick search for “running shoes” will return some questionable results:

Note that Nike and Reebok aren’t even in the above the fold content listed!

This makes getting the best Google rankings possible essential. Luckily, all the above reputation strategy tips will help you achieve better rankings. Page one Google ranking serves up a lot of benefits, including a powerful online reputation.

What’s your reputation strategy?

Your online reputation is essential to the growth and success of your brand. Without a reputable online presence, consumers will turn to your competitors.

The above 12 tips to improve your reputation strategy can make your brand shine when consumers start doing their due diligence before buying from you.

What is your reputation strategy?


source https://searchenginewatch.com/2018/03/28/12-tips-to-improve-your-reputation-strategy/

Tuesday 27 March 2018

Google’s core algorithm update: Who benefited, who lost out, and what can we learn?

There’s been much talk recently about Google implementing a broad core algorithm update.

A couple of weeks ago, webmasters started to notice changes to their search rankings which many suspected were due to an update to Google’s core algorithm. Google subsequently confirmed this via a tweet to its Search Liaison account, manned by former Search Engine Land editor and Search Engine Watch founder Danny Sullivan.

Google has suggested that this update has nothing to do with the quality of content, and instead focuses on improving the quality of the SERPs. At SMX West, Nathan Johns, a search quality analyst at Google, stated in an AMA session that the core update was designed to “reward under-rewarded sites” rather than award penalties.

At Pi Datametrics, our data on organic search rankings would tend to confirm this, as the only real losses we’ve seen – while dramatic – were generally short-lived, and occurred in the run-up to the update itself.

However, if Google wasn’t testing quality, what exactly were they testing?

I turned to the SERPs to have a look, going back in time to the period just before, during and after the recent update. I asked Google a relatively simple question, then analyzed the results to detect any rumblings or suspicious flux.

Testing the Google broad core algorithm update

Google Query: What’s the best toothpaste?

Google’s Broad Core Algorithm Update - Pi Datametrics test 1


Google’s Broad Core Algorithm Update - Pi Datametrics test key 1

I’ve focused primarily on content that was visible on page 1 or 2 at the start of this year.

We can clearly see that all these pages dropped out of the top 100 then reappeared on the same day. This occurred multiple times over a five week period.

Seven websites all performed pretty well (visible on page 1 and 2), with a further two sites appearing mid-way through the shake-up, that had no previous visibility (Expertreviews [dark pink] and Clevelandclinic [dark blue]).

The obvious shake-up started on 24 January, roughly five weeks before the algorithm was said to have fully rolled out (Sunday 4th March).

What we have here is a pattern we’ve seen many times before, something that is only visible with access to daily data on the entire SERPs landscape. It looks like a period of testing pre-full rollout, which is only to be expected.

Here’s the same chart, zoomed in from 01 February:

Google’s Broad Core Algorithm Update - Pi Datametrics test 2

In the chart above we can see the flux continuing from February 5 onwards. Every site involved experienced almost the exact same pattern of visibility loss.

Things finally settled down on March 8. At first glance, it looks like all sites regained their original positions.

However, on closer inspection we can see that all came out slightly worse off, by an average of just over two positions; the smallest drop being one position (which can be painful on page one) and the largest being six.

Knowing when to act and when to sit tight

If this chart says one thing, it is DON’T PANIC if you drop out of the top 100 for a term you care about!

Just keep monitoring the SERPs every day. If you’ve ruled out content cannibalization, it could well be a period of algorithm testing – as with the broad core update.

If you’ve put the searcher first and created the kind of rich content that will satisfy them, then the chances are you will recover from these testing times.

Or maybe, like the Expertreviews site above (following the injection of a long-form, socially popular and recently updated piece of content into their ecosystem), you could even move from nowhere to position three, nudging all others down a peg.

Content that matched user intent was safe

The only two websites entirely unaffected by all of this were Reviews.com and Which.co.uk, proving that the combination of first mover advantage, relevance and fantastic authority ensures high visibility and algorithmic stability:

Google’s Broad Core Algorithm Update - Pi Datametrics test 3

Google’s Broad Core Algorithm Update - Pi Datametrics test 3

So, the immediate questions are – who has benefited from this shake-up? What happened in the gaps between the spikes? Who’s lost out and why? Are we now seeing a SERP more aligned with the intent of the searcher?

Who benefited from the early shake-up?

It wasn’t Expertreviews or Clevelandclinic. They benefited later.

Let’s introduce some of the the momentary winners who gained visibility during the downtime of all either sites:

Google’s Broad Core Algorithm Update - Pi Datametrics test 4

Google’s Broad Core Algorithm Update - Pi Datametrics test key 4

Wins for Business Insider, Colgate and Amazon

  • Businessinsider.com benefited from the initial shake-up. It has some great content, but it’s not been updated since October 2017. It has been indexed all this time, but only really became visible when Google pushed the previously well positioned sites out. Result? It survived the shake-up and ended on page one.
  • The same happened to the Colgate page. Note its /en-us/ TLD. Arguably, it shouldn’t be visible in the UK anyway. This page only provided a list of toothpaste types e.g. ‘Fluoride’ or ‘Tartar control’ etc. This didn’t answer my question or match my intent. Result? Ended up dropping back to page five after the shake-up.
  • The Amazon page simply displays a list of its bestsellers in toothpaste. From a content perspective, it’s not that inspiring. Result? Ended up dropping back to page three.

So the question is – if I were searching for “What’s the best toothpaste?” which of these new pages would I prefer?

All pages are mobile friendly, but if I really wanted to know what the best toothpaste was, I’d definitely prefer to read the Businessinsider.com page – coincidentally the only page that moved up to page one following the shake-up and stayed there.

In other words, the only one to satisfy my intent was in fact the only page that remained visible post shake-up. This page, to me answers my question perfectly.

What do these insights tell us about the core update?

Based on our testing, we can deduce that this algorithm is concerned with optimizing search results to support user intent, rather than to audit quality.

Why?

  1. Losses were not drastic, meaning we can rule out a penalty of any kind.
  2. Of all winners, none appeared to rise as a result of content updates.
  3. Some sites with strong, relevant content seemingly lost rankings in Google UK, as they were intended for the US market. This suggests that Google was auditing relevancy factors beyond just content (i.e. location / tld), to serve the best results and satisfy user intent.

In this respect, Google’s core update was concerned with the nature rather than the quality of content.

What better way to test the match of nature with intent than by shaking up the SERPs for a couple of weeks to determine user reaction?

Should you panic when your content visibility nosedives?

If your content visibility drops, it’s always necessary to carry out checks to ensure you have done everything within your power to mitigate the issue.

In the face of an algorithm update (like the recent broad core update), however, the best advice is to do nothing but monitor the SERPs closely.

If it is algorithmic testing, you most certainly won’t be the only one involved. Other sites will follow the exact same pattern down to the day. That’s a big clue that it’s algorithmic rather than isolated. Talking to others within the SEO and webmaster communities can help you to affirm that yours isn’t an isolated incident, and that you aren’t on the receiving end of a penalty from Google.

Google has confirmed that sites that experienced ranking drops as a result of the broad core update aren’t necessarily doing anything wrong. As I stated at the beginning of this article, the losses that we did observe were short-lived and not drastic.

If you want to make sure that your content is insulated against future updates of this kind, focus on creating content that puts the searcher first and will satisfy user intent. But above all: don’t panic.

A version of this article was originally published to the Pi Datametrics blog.


source https://searchenginewatch.com/2018/03/27/googles-core-algorithm-update-who-benefited-who-lost-out-and-what-can-we-learn/