Generally speaking, cloning is considered an unethical practice. However, when you think of cloning in terms of making a duplicate WordPress site, a whole new world of completely ethical possibilities can open up for your business. In this article, we will show you how to easily clone a WordPress site in 7 easy steps.

What is Cloning, and Why Use It?
The idea behind cloning a WordPress site is simple: you make an exact copy or duplicate of one WordPress site and apply it to another site.
You might be wondering, are there any good reasons to actually do this? Absolutely!
One practical scenario is when you are moving a WordPress site to a new web host or a new domain name. Cloning a site will save you hours of work.
Another possible use is when you are developing a site for a client on your local server. Once the project is done, you can duplicate the WordPress site and move it to your client’s live server.
Lastly, you can clone a live WordPress site to your local server for testing and development purposes.
Cloning a WordPress site is not that difficult at all. If you can point and click, then you can create a duplicate site in minutes.
Here’s a 7 step guide on how to easily clone a WordPress site, even if you’re a beginner!
Step 1. Cloning WordPress using Duplicator Plugin
For this article, we will be using the Duplicator plugin. It is a powerful WordPress backup and migration plugin built for beginners and professionals alike.
The first thing you need to do is install and activate the Duplicator plugin. For more details, see our step by step guide on how to install a WordPress plugin.
The plugin works out of the box, and you can start using it without configuring any settings.
Step 2. Creating a WordPress Backup Using Duplicator
Duplicator allows you to clone your WordPress site by creating a backup and then unpacking it on a new location.
Let’s go ahead and create a WordPress backup package.
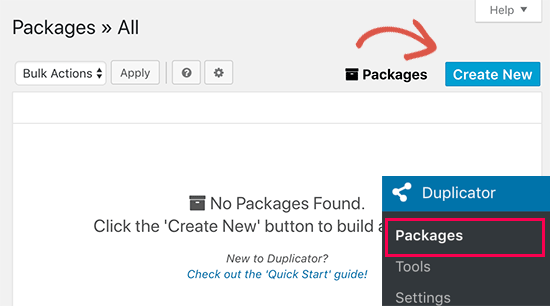
First, you need to visit the Duplicator » Packages page and click on the ‘Create New’ button at the top.
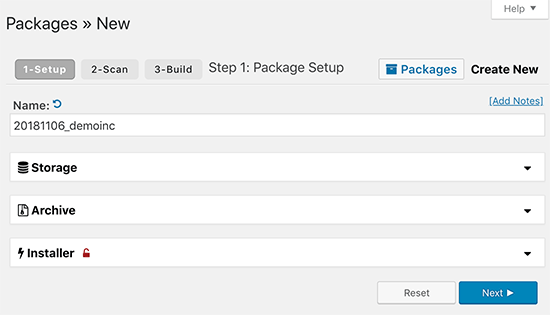
This will begin the Duplicator wizard where you need to click on the next button to continue.
Duplicator will now scan your website to check if everything is in order to run the plugin. If the plugin finds an issue, then you will see a warning here.
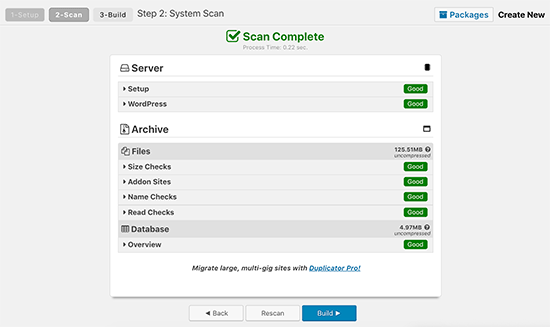
If everything is marked good, then you can go ahead and click on the ‘Build’ button to continue. Duplicator will now backup your WordPress database, images, templates, plugins, and all other files in a single downloadable package.
Step 3. Preparing to Clone Your WordPress Site
Once Duplicator has finished the backup process, you will see a link to download the archive which contains backup files and an installer script.
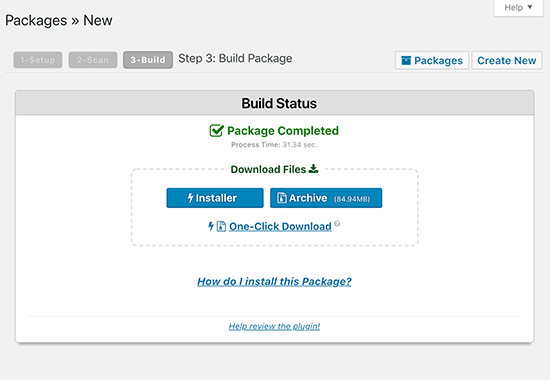
You need to click on the ‘One-click Download’ link to download both files to your computer.
Both of these files are extremely important to properly clone your WordPress site on the new location.
Step 4. Upload Archive and Installer to the New Location
Now that you have a complete backup of your site along with the Duplicator installer file, the next step is to upload them to the new location.
This new location can be a live website, or a site on your local server. If it is a site on your local server, then you just need to copy and paste the files into a subfolder inside your htdocs or www folder, like this:
C:\wamp\www\mynewsite\
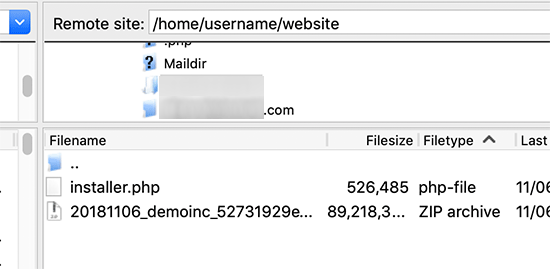
If it is a live site on a different WordPress host, then you need to upload these files to the root directory using an FTP client.
No matter where you are copying the files, you need to make sure that the folder is completely empty and has no other files or folders inside it except installer.php file and your backup zip file.
Step 5. Running The Import Script
Now that all your files are in place, you need to run the Duplicator installer script.
Simply visit the new website in a web browser and add installer.php at the end of the URL.
http://example.com/installer.php
Don’t forget to replace example.com with your own domain name or the localhost address of your new site.
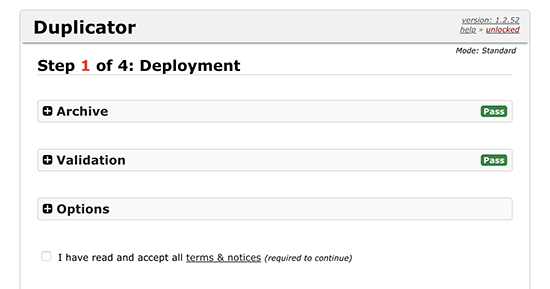
You will now see the Duplicator installer script on the screen. It will automatically look for the backup files and basic configuration settings. If everything looks good, then go ahead and check the terms and notices checkbox. After that, you can click on the next button to continue.
On the next screen, Duplicator will ask you to enter database information. This is the database you want to use for your new cloned WordPress site.
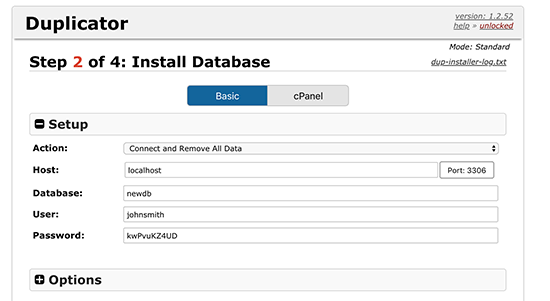
Don’t forget to click on the ‘Test Database’ button to make sure that the database information you entered is correct.
After that, click on the next button to continue.
Duplicator will now import your database and files. Next, it will ask you to update settings for the new site.
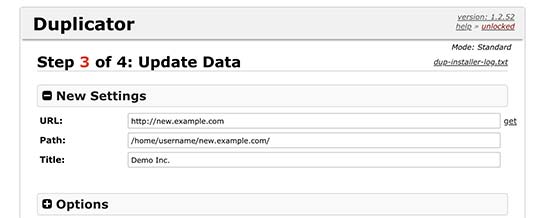
It will automatically detect the changes and fill in the URL, Path, and Title fields for you. You can just click on the ‘Next’ button to continue.
Duplicator will now finish the installation, and you will see the admin login button. Clicking on it will take you to the new cloned site’s WordPress admin area.
Step 6. Test Your Cloned Site
You can now go ahead and test your cloned WordPress site. We recommend testing both the admin area and front end of your website to make sure that all your data is there, and the website is working as intended.
If you run across any issues, then take a look at our guide on how to fix common WordPress errors.
Step 7. Delete Temporary Files
Once you are satisfied that everything is imported correctly, you can go ahead and delete the installation files created by the Duplicator plugin.
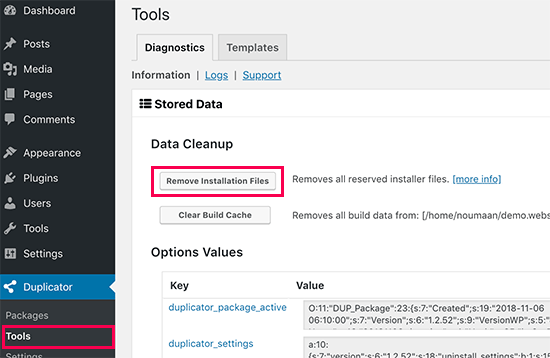
On your cloned WordPress site, go to Duplicator » Tools page and then click on ‘Remove Installation Files’ button.
That’s it, you have successfully cloned a WordPress site.
Final Thoughts
As you can see, cloning a WordPress site is not very hard as long as you are duplicating your own website. If you want to copy someone else’s WordPress site, then that’s actually illegal unless you have their explicit written permission.
There are definitely other ways to clone a WordPress site such as doing it manually which doesn’t even require WordPress admin access, but we believe there are no benefits to that unless you’re dealing with a really large website.
For majority of use-cases where you have to duplicate a WordPress site, we recommend using the above method because it’s the easiest and most comprehensive.
We hope this article helped you easily clone your WordPress site. You may also want to see our ultimate step by step guide to improve WordPress speed and performance.
If you liked this article, then please subscribe to our YouTube Channel for WordPress video tutorials. You can also find us on Twitter and Facebook.
The post How to Clone a WordPress Site in 7 Easy Steps appeared first on WPBeginner.
source https://www.wpbeginner.com/wp-tutorials/how-to-clone-a-wordpress-site-in-7-easy-steps/
No comments:
Post a Comment