Recently one of our readers asked us for tips on how to optimize the robots.txt file to improve SEO. Robots.txt file tells search engines how to crawl your website which makes it an incredibly powerful SEO tool. In this article, we will show you how to create a perfect robots.txt file for SEO.

What is robots.txt file?
Robots.txt is a text file that website owners can create to tell search engine bots how to crawl and index pages on their site.
It is typically stored in the root directory also known as the main folder of your website. The basic format for a robots.txt file looks like this:
User-agent: [user-agent name]
Disallow: [URL string not to be crawled]

User-agent: [user-agent name]
Allow: [URL string to be crawled]


Sitemap: [URL of your XML Sitemap]
You can have multiple lines of instructions to allow or disallow specific URLs and add multiple sitemaps. If you do not disallow a URL, then search engine bots assume that they are allowed to crawl it.
Here is what a robots.txt example file can look like:
User-Agent: *
Allow: /wp-content/uploads/
Disallow: /wp-content/plugins/
Disallow: /wp-admin/

Sitemap: https://example.com/sitemap_index.xml
In the above robots.txt example, we have allowed search engines to crawl and index files in our WordPress uploads folder.
After that, we have disallowed search bots from crawling and indexing plugins and WordPress admin folders.
Lastly, we have provided the URL of our XML sitemap.
Do You Need a Robots.txt File for Your WordPress Site?
If you don’t have a robots.txt file, then search engines will still crawl and index your website. However, you will not be able to tell search engines which pages or folders they should not crawl.
This will not have much of an impact when you’re first starting a blog and do not have a lot of content.
However as your website grows and you have a lot of content, then you would likely want to have better control over how your website is crawled and indexed.
Here is why.
Search bots have a crawl quota for each website.
This means that they crawl a certain number of pages during a crawl session. If they don’t finish crawling all pages on your site, then they will come back and resume crawl in the next session.
This can slow down your website indexing rate.
You can fix this by disallowing search bots from attempting to crawl unnecessary pages like your WordPress admin pages, plugin files, and themes folder.
By disallowing unnecessary pages, you save your crawl quota. This helps search engines crawl even more pages on your site and index them as quickly as possible.
Another good reason to use robots.txt file is when you want to stop search engines from indexing a post or page on your website.
It is not the safest way to hide content from the general public, but it will help you prevent them from appearing in search results.
What Does an Ideal Robots.txt File Should Look Like?
Many popular blogs use a very simple robots.txt file. Their content may vary, depending on the needs of the specific site:
User-agent: *
Disallow:

Sitemap: http://www.example.com/post-sitemap.xml
Sitemap: http://www.example.com/page-sitemap.xml
This robots.txt file allows all bots to index all content and provides them a link to the website’s XML sitemaps.
For WordPress sites, we recommend the following rules in the robots.txt file:
User-Agent: *
Allow: /wp-content/uploads/
Disallow: /wp-content/plugins/
Disallow: /wp-admin/
Disallow: /readme.html
Disallow: /refer/

Sitemap: http://www.example.com/post-sitemap.xml
Sitemap: http://www.example.com/page-sitemap.xml
This tell search bots to index all WordPress images and files. It disallows search bots from indexing WordPress plugin files, WordPress admin area, the WordPress readme file, and affiliate links.
By adding sitemaps to robots.txt file, you make it easy for Google bots to find all the pages on your site.
Now that you know what an ideal robots.txt file look like, let’s take a look at how you can create a robots.txt file in WordPress.
How to Create a Robots.txt File in WordPress?
There are two ways to create a robots.txt file in WordPress. You can choose the method that works best for you.
Method 1: Editing Robots.txt File Using Yoast SEO
If you are using the Yoast SEO plugin, then it comes with a robots.txt file generator.
You can use it to create and edit a robots.txt file directly from your WordPress admin area.
Simply go to SEO » Tools page in your WordPress admin and click on the File Editor link.
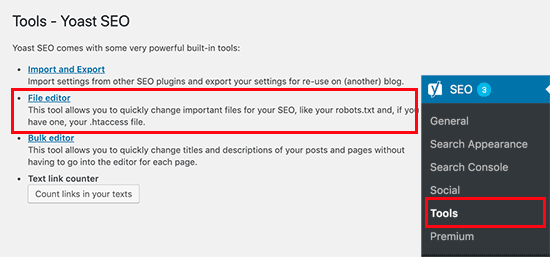
On the next page, Yoast SEO page will show your existing robots.txt file.
If you don’t have a robots.txt file, then Yoast SEO will generate a robots.txt file for you.
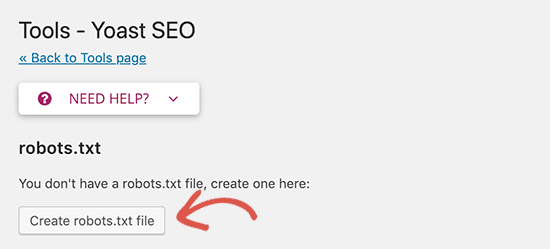
By default, Yoast SEO’s robots.txt file generator will add the following rules to your robots.txt file:
User-agent: *
Disallow: /
It is important that you delete this text because it blocks all search engines from crawling your website.
After deleting the default text, you can go ahead and add your own robots.txt rules. We recommend using the ideal robots.txt format we shared above.
Once you’re done, don’t forget to click on the ‘Save robots.txt file’ button to store your changes.
Method 2. Edit Robots.txt file Manually Using FTP
For this method, you will need to use an FTP client to edit robots.txt file.
Simply connect to your WordPress hosting account using an FTP client.
Once inside, you will be able to see the robots.txt file in your website’s root folder.
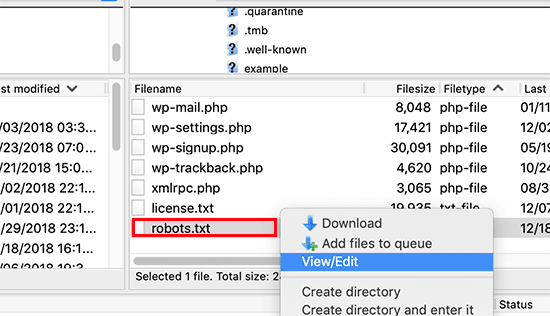
If you don’t see one, then you likely don’t have a robots.txt file. In that case, you can just go ahead and create one.
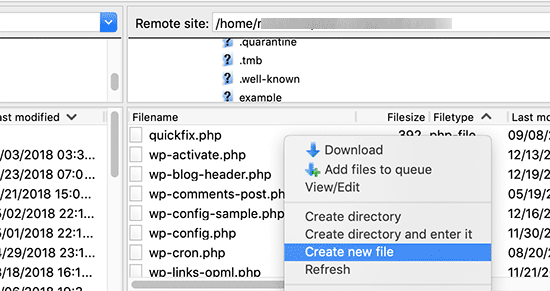
Robots.txt is a plain text file, which means you can download it to your computer and edit it using any plain text editor like Notepad or TextEdit.
After saving your changes, you can upload it back to your website’s root folder.
How to Test Your Robots.txt File?
Once you have created your robots.txt file, it’s always a good idea to test it using a robots.txt tester tool.
There are many robots.txt tester tools out there, but we recommend using the one inside Google Search Console.
Simply login to your Google Search Console account, and then switch to the old Google search console website.
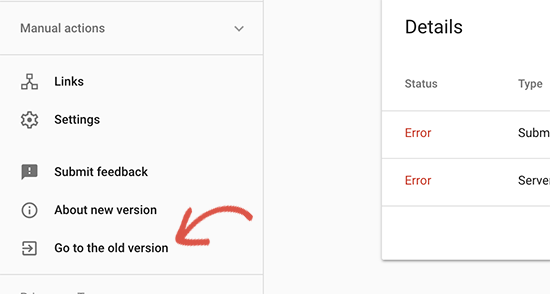
This will take you to the old Google Search Console interface. From here you need to launch the robots.txt tester tool located under ‘Crawl’ menu.
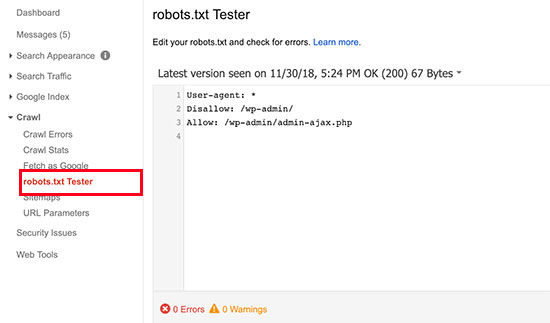
The tool will automatically fetch your website’s robots.txt file and highlight the errors and warnings if it found any.
Final Thoughts
The goal of optimizing your robots.txt file is to prevent search engines from crawling pages that are not publicly available. For example, pages in your wp-plugins folder or pages in your WordPress admin folder.
A common myth among SEO experts is that blocking WordPress category, tags, and archive pages will improve crawl rate and result in faster indexing and higher rankings.
This is not true. It’s also against Google’s webmaster guidelines.
We recommend that you follow the above robots.txt format to create a robots.txt file for your website.
We hope this article helped you learn how to optimize your WordPress robots.txt file for SEO. You may also want to see our ultimate WordPress SEO guide and the best WordPress SEO tools to grow your website.
If you liked this article, then please subscribe to our YouTube Channel for WordPress video tutorials. You can also find us on Twitter and Facebook.
The post How to Optimize Your WordPress Robots.txt for SEO appeared first on WPBeginner.
source https://www.wpbeginner.com/wp-tutorials/how-to-optimize-your-wordpress-robots-txt-for-seo/
No comments:
Post a Comment