Recently, one of our readers asked if it was possible to view and control the WordPress cron job system in the dashboard. Cron is a technology to run scheduled tasks on web server. WordPress comes with its own built-in cron that allows it to perform scheduled tasks such as checking for updates, publishing schedule posts, etc. In this article, we will show you how to view and control WordPress cron jobs.

What is WordPress Cron? How it Works?
Cron is a technical term used for commands to run on scheduled time or at regular intervals. Most web servers use it to maintain the server and run scheduled tasks.
WordPress comes with its own cron system which allows it to perform scheduled tasks. For example, checking for updates, deleting old comments from trash, etc.
Plugins can also use it to perform tasks specified by you.
For example, your WordPress backup plugin can use WordPress cron to automatically create backups at given schedule.
Irresponsible use of WordPress cron by plugins can slow down your website. Specially, if you are on shared hosting.
If a plugin frequently performs resource intensive tasks, then you need to identify the issue and fix it.
Let’s take a look at how to view and control the WordPress cron system without writing any code.
View and Control WordPress Cron System
First thing you need to do is install and activate the WP Control plugin. For more details, see our step by step guide on how to install a WordPress plugin.
Upon activation, you need to visit Tools » Cron Events page to control cron settings.

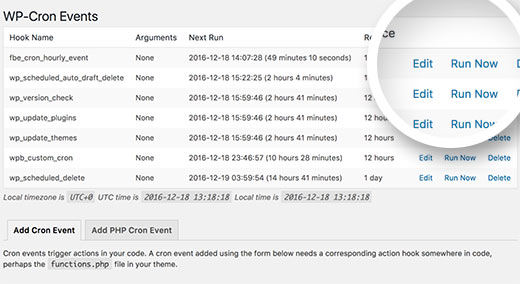
You will see a list of all cron events scheduled to run on your site using the WordPress cron system.
In the first column, you will see the name of the hook that runs the cron.
Hook names usually give you a hint at what this particular event does.
Most default WordPress hooks begin with a wp_ prefix, like wp_update_plugins, wp_update_themes, etc.
Your WordPress plugins may or may not use their own prefixes for their hooks. For example, yoast seo uses wpseo_ prefix.
You will also get to see when a cron will run next, and the time interval between next run.
The last column on the list allows you to edit, delete, or run a cron event.
Important: Be very careful about what you do with cron events and never delete a default WordPress cron event.
Now let’s suppose you see a cron event created by a WordPress plugin that is quite resource intensive.
First, you should check the plugin’s settings to see if there is an option to control it from there. If there isn’t, then you can click on the ‘Edit’ link next to the cron event to change it.

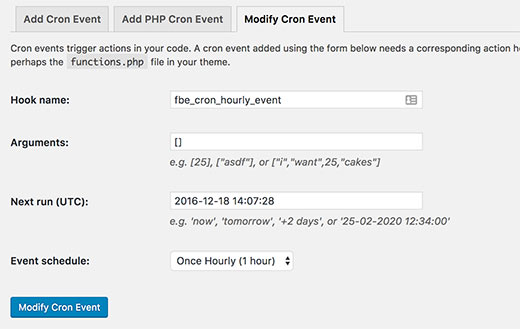
Clicking on the Edit button will open the ‘Modify cron event’ tab down below.
Here you can change how often you want the event to run.

Once you are done, click on the save changes button to store your settings.
Adding Your Own Cron Events in WordPress
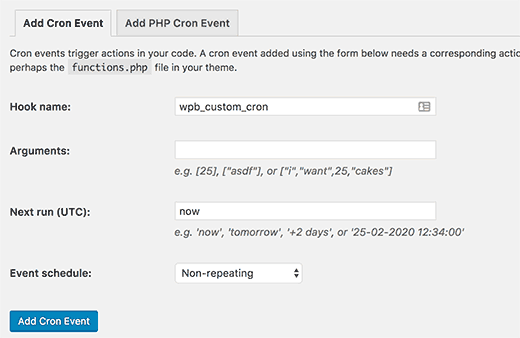
WP Control plugin makes it easy to add your own cron jobs to WordPress. Simply visit Tools » Cron Events page and scroll down to ‘Add Cron Event’ tab.

First you need to provide a hook name for your cron event. Hook names cannot have spaces or special characters.
If the function you want to execute requires arguments, then you can provide those arguments.
Next, you need to tell WordPress when to run the cron next time. You can enter ‘now’ which will trigger cron immediately, ‘tomorrow’, ‘+2 days’, or ’25-02-2020 12:34:00′.
Lastly, you need to select a schedule. You can select hourly, twice daily, daily, or once a week. You can also make it non-repeating event.
Once you are done, click on the Add Cron Event button to save your changes.
You will notice that your cron event will now appear in the events list.
However, currently it does nothing because you haven’t told WordPress what to do when this event is triggered.
You will need to add your hook and a function that runs when the cron hook is triggered.
if ( ! wp_next_scheduled( 'wpb_custom_cron' ) ) {
  wp_schedule_event( time(), 'hourly', 'my_task_hook' );
}

add_action( 'wpb_custom_cron', 'wpb_custom_cron_func' );

function wpb_custom_cron_func() {
  wp_mail( 'you@example.com', 'Automatic email', 'Automatic scheduled email from WordPress to test cron');
}
Don’t forget to use your own email address.
This function simply sends a test email to you when the cron runs. You can now scroll up the page and click on the ‘Run Now’ link next to your cron event to test it out.
Note: Using cron requires intermediate level programming and WordPress development skills.
That’s all we hope this article helped you learn how to view and control WordPress cron jobs. You may also want to see our ultimate guide to speed up WordPress and boost performance.
If you liked this article, then please subscribe to our YouTube Channel for WordPress video tutorials. You can also find us on Twitter and Facebook.
The post How to View and Control WordPress Cron Jobs appeared first on WPBeginner.
source http://www.wpbeginner.com/plugins/how-to-view-and-control-wordpress-cron-jobs/
No comments:
Post a Comment