Monday, 5 March 2018

30 ways to market your online business for free

For many people and businesses, the word ‘marketing’ conjures up visions of pricey marketing strategies and excessive expenditure.

With a high number of businesses all vying for exposure among the vast digital landscape, it can sometimes feel like fighting a losing battle, especially for those just starting out.

However, it doesn’t have to be expensive: there are plenty of free ways to market a business. In this post, we share our top tips for how to market your online business for free – 30 different ways in fact. Here goes…

1.   Capture email data

Ensure that you have a method of capturing email data from website visitors. Integrate an email sign up option onto your site and begin building a database of customer data.

You can then use this data for a range of marketing incentives, such as email marketing or creating custom audiences on Facebook for targeted advertising. (Just make sure you’re GDPR compliant…)

2.   Email marketing

You’ve got the data, now you need to do something useful with it. Start by setting up a free account with Mailchimp, and start distributing those emails.

Avoid being overly promotional and always offer something genuinely useful to the recipients. Keep the emails regular but never bombard, otherwise people will hit unsubscribe quicker than you can say ‘digital marketing’.

3.   Video marketing

You’d be mad to ignore the proliferation of video over the past few years. Jump on the bandwagon and start engaging in some video marketing.

Begin by setting up a YouTube channel. You don’t have to create Hollywood-esque movies – just a simple video blog will do. If you’ve got something useful to say, then say it on video. It also makes for highly shareable, marketable content – plonk it on your website, push it out on social, and include in your emails.

4.   Post to Facebook

It goes without saying that social media is one of the most valuable marketing tools out there. And it’s free. FREE. It’s best not to go signing up for every social media platform under the sun, just focus on those most suitable to your business.

Facebook is a viable option for almost all businesses. Unfortunately, the latest algorithm updates have made it harder than ever for businesses to gain visibility in the news feed without paying. But, you’ve got nothing to lose. Post regular updates – be engaging and exciting, don’t be too promotional, and be genuinely interesting.

5.   Interact with industry experts on Twitter

Twitter isn’t for everyone, but it does carry a whole array of benefits. It’s a great platform for engaging with industry experts and customers, as it’s a place where anyone can talk to anyone.

Respond to customer feedback, retweet the best user-generated content, and offer genuine input to industry discussions.

6.   Create an Instagram

A popular contender among social media platforms, Instagram has an ever-increasing user base.

If your business would benefit from a visual presence, then make sure you are dedicating time to building a strong Instagram account. Remember that it’s a visual platform, so carefully curated content that looks amazing is key.

7.   Generate website traffic with Pinterest

Pinterest isn’t suitable for a lot of businesses, but can work really well for some. The platform has one of the highest conversion rates in terms of converting browsers into buyers.

You can also generate significant website traffic and find out more about what your target users love.

8.   Build your network on LinkedIn

If your business is a B2B company, be sure to have a strong presence on LinkedIn. It’s also a great place for building your network. The same rules apply to LinkedIn as other social platforms – engage with relevant people and offer genuine insight.

9.   Publish to Google Plus – yes, really!

Google Plus, that strange little platform that never quite hit the big time. Yet it’s still plodding along hoping that one day, something, anything will happen that propels it into social media stardom (not likely).

Still, despite the failings of Google Plus, it is still worth getting into the habit of pushing out any new content via Google Plus. After all, it’s a product of Google and if you want to climb those rankings, we suggest keeping Google sweet.

10.   Start using Google Posts

Aim to publish regular updates via Google Posts for greater visibility in the search engine results pages. Posting to Google allows businesses to share content with people that is relevant to the search queries being inputted. It’s a great way of gaining a little extra exposure.

11.   Encourage UGC

User-generated content (UGC) is content that has been created and published by unpaid fans of your business. It’s when someone loves your product or service so much that they take it upon themselves to share their experience with friends and family, usually via social media.

UGC typically occurs naturally, but there is no harm in encouraging it – if you don’t ask you don’t get! You can highlight the best posts every week on your social media channels, and even offer prizes to customers who get featured.

And speaking of prizes…

12.   Run social media giveaways

Running social media giveaways is a sure-fire way of increasing engagement and generating new followers. Not only can it be a nice way of saying thank you to existing customers and fans, it’s also a handy way of reaching potential new customers.

Okay, so it’s not entirely cost free, as you’ll need to give away a product, but there’s no need to spend any money on top of that. Just be sure to follow all the best practices of running a giveaway.

13.   Engage with social influencers

Influencer marketing is a huge industry. For those unfamiliar with how it all works, a business pays or offers free products to a blogger or influencer who has a high following on social media. In return, the influencer shares your product on their social media channels. It’s extremely effective.

The more popular influencers can charge astronomical rates, but those with smaller followings (sometimes called “micro-influencers”) have high engagement rates and are often willing to post something in return for a free product or trial.

14.   Set up Google Search Console and Bing Webmaster Tools

If you haven’t already, then make sure you set up Google Search Console (and also Bing Webmaster Tools). Using these tools, you can view valuable information about the search terms people are using to find your website.

You can also index new pages, meaning they will show up in the search engine results pages quicker. Plus, be sure to submit an XML sitemap – it helps the search engines crawl your site.

15.   Update your Google My Business listing

Update your Google My Business listing and check that all information is accurate. Reorganize the images to ensure that only your best side is showing.

Do the same with your local listings for Bing and Yahoo. It’s also worth working on building your Google reviews, as they will help boost your rankings.

16.   Ask your customers for testimonials

On the topic of reviews, be sure to generate as many testimonials and (positive) reviews as possible.

Whether it’s via Google, TrustPilot or for a dedicated testimonials section on your website, people trust other people. You’ll have to ask your customers for these, as people don’t very often give them naturally. Just a gentle prompt will do the trick.

17.   Google Analytics

Make sure that you have Google Analytics linked up to your site. It’s a treasure trove of handy data and be sure to spend some time getting your head around it all.

See how people interact with your site, identify the pain points and discover the most popular pages. With this information you can make considered and informed changes and improvements to your site.

18.   Review Google AdWords

Google AdWords is not free. In fact, it’s incredibly expensive. But if you are already running a PPC campaign then it’s worth taking some time to review your strategy. Try rewriting some of the ads and improving your quality score to generate better results.

Sparing a little time reviewing your campaign could save you lots of money. For most of us AdWords will cost, but if you are a charity you can apply for a Google Grant of up to £10,000 to spend on AdWords!

19.   Use PR

PR is still a very powerful weapon in a marketer’s arsenal. Without hiring a dedicated PR agency, there are some steps you can take to implement a bit of PR. Following any substantial news or updates, it’s worth distributing a press release as you never know who may pick it up.

Sign up to platforms like HARO (help a reporter out) and look out for hashtags like #journorequest on Twitter, as you may be able to wrangle a mention. PR, of course, goes hand-in-hand with link-building for SEO.

20.   Contribute to forums, blogs and discussions

Part of marketing your business online is to establish yourself as a reliable industry expert and a voice of authority. In order to build this authority, take the time to contribute to relevant forums, blogs and social media discussions.

Offer genuinely helpful insight and answer questions that are being asked. People will appreciate your input and, with any luck, will convert into a customer.

21.   Speak at industry conferences

Another excellent way of building your authority and reputation as an expert within your industry, is to volunteer to speak at relevant industry conferences. It’s a great way of getting your personal and business name out there. If you’re trusted to speak at conferences, then you’ll be trusted to offer a good product or service.

22.   Content creation

It goes without saying that content creation should be central to any digital marketing strategy. If you haven’t already got a blog on your website then don’t wait a second longer. Do it. Right now.

You’ll probably have noticed that there are a disconcerting amount of blogs on the web. So don’t do what everyone else is doing; be different, be helpful and be relevant.

23.   Guest post

As well as creating content for your own site, be sure to integrate guest blogging into your marketing strategy. Only aim for relevant and high quality sites, preferably with a high domain authority and nonexistent spam score.

It’s a great way of ramping up brand exposure, but also securing links back to your website (hello better SEO rankings).

24.   Use blogging platforms

As beautiful as your website’s blog might be, it can be frustrating if your lovingly crafted content is not getting the exposure you think it deserves. Especially if you are only just starting out, it can be crushing to spend hours working on a stellar article, only for two people to read it (probably your mum and your best mate).

This is where blogging platforms, like Medium, can help increase your exposure. Just make sure that you follow the best practices for republishing content on these platforms.

25.   Carry out keyword research

If you are undertaking a full blown SEO campaign, the chances are that you are paying someone to do it, or you are already an SEO whiz, in which case you’ll (hopefully) know what you’re doing.

For the newbies, keyword research is the initial stage of any SEO campaign and can help you identify user intent and figure out what your target audience is searching for. It would take several blog posts to cover this in enough detail, but a good place to start is with this complete guide to keyword research for SEO.

26.   Optimize your metadata

Get into the habit of writing an SEO title and meta description for every page and post you publish. This is the information that will be displayed in the search engine results pages, so you need to make it as enticing and relevant as possible.

27.   Mark up your website with Schema.org structured data

In a nutshell, schema markup allows you to label the content on your site for the benefit of the search engine. It helps the search engines provide more detailed search engine results pages.

Although there is no evidence that schema markup directly improves your rankings, it will make your listing more attractive, therefore encouraging more click-throughs. And that can only be a good thing!

28.   List your business in online directories

Ensure that your business is listed in relevant online directories. There are the most popular ones, such as Yell, Yelp and Thomson Local, but there are a whole host of other industry or location-specific directories.

Make sure you add your business listing to only the directories which are relevant to your business, and ensure they aren’t spammy.

29.   Make sure your NAP are consistent

That sounds complicated but it’s really very simple. NAP stands for name, address and phone number. NAP consistency refers to the process of ensuring that all mentions of your business feature the correct information.

Do a quick search and make sure that the name, address, phone number, and any other information about your business listed online are all completely accurate and formatted consistently.

30.   Test your website with Google’s PageSpeed Insights and Mobile-Friendly Test

Finally, if you want your website to rank well and offer a fantastic user experience then it needs to be fast and mobile-friendly. Utilize Google’s free tools to check the speed of your website and whether or not it is mobile-friendly. Any red flags should be resolved as quickly as possible.

So there you have it. There’s definitely enough information here to keep you occupied for quite some time. It always helps to have a marketing budget, but these free steps are the best place to start. Good luck!

If you enjoyed this article, check out our other roundups of marketing tools and techniques you can use completely free of charge:


source https://searchenginewatch.com/2018/03/05/30-ways-to-market-your-online-business-for-free/

Friday, 2 March 2018

5 Best WordPress Image Compression Plugins Compared

Are you looking for the best WordPress image compression plugin for your website? Image compression plugins allow you to easily optimize images in WordPress for better speed and performance. In this article, we have compared the best image compression plugins for WordPress.

Best WordPress image compression plugins

When Do You Need a WordPress Image Compression Plugin?

Images are larger in size than plain text which means they take longer to load and can slow down your website.

However you’ve probably heard the saying: “a picture is worth a thousand words”. Images make your content more engaging and interactive.

To improve your WordPress website speed, you need to optimize your images for the web. The best way to do this is by using Photoshop or another image editing software before you upload the image to WordPress. This gives you a lot more control on the quality of images on your website.

However, not all users are comfortable working with image editing program. For some optimizing every single image they upload sounds like a lot of work.

Luckily, there are several WordPress image compression plugins that can help you with that. These plugins optimize your images by automatically compressing them and using the smaller sized version on your website.

That being said, let’s take a look at the best WordPress image compression plugins, and how they stack up in terms of image optimization, performance, and quality.

1. reSmush.it

reSmush.it

reSmush.it is the best WordPress image compression plugin. It allows you to automatically optimize images on upload as well as offer a bulk optimization option for older images.

It uses the reSmush API to optimize images and allows you to choose the optimization level for your uploads. The downside is that it doesn’t have different compression levels. It also limits optimization to uploads lower than 5MB in size. You can exclude individual images from compression in case you need to add an image in full size.

2. EWWW Image Optimizer

EWWW Image Optimizer

EWWW Image Optimizer is a great option for WordPress image compression plugin. It is easy to use and can automatically optimize images you upload on the fly. It can also compress and optimize your previously uploaded images in bulk.

It performs all compression on your own servers which means you don’t need to sign up for an account to get an API key. It can also optimize images generated by other WordPress plugins and stored outside your media library folders. It doesn’t require an account to use the plugin, but you can sign up for their API to get additional features.

3. Compress JPEG & PNG images

Compress JPEG & PNG images

Compress JPEG & PNG is created by the team behind TinyPNG, and you will need to create an account to use the plugin. You can only optimize 100 images each month with the free account. It can automatically compress images upon upload, and you can also bulk optimize older images.

The plugin settings allow you to choose which image sizes you want to optimize. Additionally, you can also set a maximum size for your original uploads. Images larger than that size will be automatically resized by the plugin.

4. ShortPixel Image Optimizer

ShortPixel

ShortPixel Image Optimizer is another useful WordPress image compression plugin. It requires you to get an API key by providing your email address. The basic free account allows you to compress up to 100 images per month, and you will need to upgrade to their paid plans to increase this limit.

It starts compressing images as soon you as activate plugin and stores your original images in a separate folder. It also allows you to compare the original file with the compressed version to see the quality difference. ShortPixel is packed with advanced features and gives you the ability to choose comparison formats.

5. WP Smush

WP Smush

WP Smush is another popular WordPress image compression plugin. It automatically compresses images on upload and can also be used to compress and optimize your older image files. You can also set maximum image resolution, and your images will scale down to more reasonable sizes while being compressed.

The free version of plugin doesn’t require you to create an account to use their API key. The bulk optimization feature allows you to optimize up to 50 images at a time, and you can rerun the bulk optimizer to compress more images.

The free version of the plugin doesn’t perform that well. See our review of WP Smush with pros and cons.

Comparison Test Scores for Image Compression Plugins

Now that you know about the different WordPress image compression options, let’s take a look at how they compare against each other in terms of performance.

To measure this, we ran test by uploading the same image using each of these plugins.

Testing JPEG Image Compression

We used the following JPEG image for our tests, it is 118 KB in file size.

JPEG test image

We didn’t touch any of the plugin settings and tested the compression with out of the box settings. Here are our test results:

Plugin Compressed Size Saved (%) Method
reSmush.it 76 KB 30.59% Lossless
EWWW Image Optimizer 112 KB 5% Lossless
Compress JPEG & PNG images 114.7 KB 2.8 % Lossy
ShortPixel Image Optimizer 69.2 KB 41.94% Lossy
WP Smush 112 KB 5% Lossless

Testing PNG Image Compression

Next we wanted to test a PNG image to see how our contenders optimize it.

We used the following PNG image for the test, and it is 102 KB in file size.

PNG test image

Here are our test results:

Plugin Compressed Size Saved (%) Method
reSmush.it 36 KB 63.8% Lossless
EWWW Image Optimizer 97.5 KB 1.9% Lossless
Compress JPEG & PNG images 34.3 64% Lossy
ShortPixel Image Optimizer 37 KB 63.5% Lossy
WP Smush 99 KB 2.9% Lossless

Which is The Best Image Compression Plugin for WordPress?

If you are not looking for flexible options in your image compression plugin, then reSmush.it gives you the best results in terms of performance by making the real difference in image file size.

If you are willing to pay for image compression, then you can try ShortPixel which performed really well in our tests.

EWWW Image Optimizer is a great plugin with flexible settings, but you will need their paid API key to get access to compression levels which make the real difference.

We hope you found this comparison of best WordPress image compression plugins useful. You may also want to see our list of common image issues in WordPress and how to fix them.

If you liked this article, then please subscribe to our YouTube Channel for WordPress video tutorials. You can also find us on Twitter and Facebook.

The post 5 Best WordPress Image Compression Plugins Compared appeared first on WPBeginner.


source http://www.wpbeginner.com/plugins/best-wordpress-image-compression-plugins-compared/

5 YouTube optimization tips to improve your video rankings

Just how big is YouTube these days? According to a really cool infographic that was released earlier in 2017, there are some pretty incredible statistics:

  • YouTube is available and used in 88 countries around the world
  • It is the second largest social media platform with over 1.5 billion monthly users, second only to Facebook (2 billion) and more than twice the number of Instagram (700 million)
  • 500 hours of video are uploaded to YouTube every minute
  • Mobile viewing makes up half of the site’s streaming.

In other words, YouTube is HUGE. Not only has it been steadily growing since its initial launch in 2005, it has become the single biggest and most important video service on the web. While there are others that have come in is wake, none have reached the same level of popularity.

With that it mind, it is no wonder that so many people are looking to boost the effectiveness of their content on the platform. However, with so much use comes other struggles, like being seen in the crowd. If 720,000 hours are uploaded a day, you have to do everything possible to stand out and be noticed.

Here are five optimization tips for your YouTube channel and videos that will help you to start doing better in search, get recommended, and gain more traction.

Find the sweet spot with your video title length

There are several things to consider when coming up with the video title:

  • How engaging and catchy it is for the eye
  • How many important keywords you use within your title (those keywords are going to help you rank that video in both YouTube and Google search)
  • Which part of the title is immediately visible when people search YouTube or see your video thumbnail in YouTube-generated related videos.

Youtube suggested

Taking all of the above in the account, the sweet spot for your video title is going to be around 100 characters. That is enough to give a unique, descriptive title while still showing in search without a cut off.

Make sure that title not only describes what is happening in the video and contains key phrases you have already researched, but it is also attention grabbing enough that people will want to click on it.

When crafting a video title, consider including the following:

  • Include the important names and entities (your interviewee, event name, branded hashtag, featured brand name, etc.)
  • Location (especially if you are targeting a specific locale)
  • Your important keyword you’d like the video to show up for.

To distinguish that important keyword, use keyword clustering technique that allows you to see core phrases behind obscure keyword variations. My own trick is to use Serpstat’s clustering feature that allows you to group keywords by how many identical URLs rank in Google for each specific query:

Clustering

You can read more on how Serpstat clustering feature works in this guide.

You may also to match each keyword group to appropriate keyword intent to make sure your future video content will cover the immediate need and prompt engagement.

Make your descriptions longer

Video and channel descriptions are another valuable resource for drawing traffic to all of your content. YouTube allows up to 5,000 characters, which is between 500 and 700 words.

The rule of thumb is obvious: The more original content you have below your video, the easier for search engines it is to understand what your video is about and what search queries to rank it for.

Not every description needs to be that long, but aiming for around 2,000 characters for videos and 3,000 for channels is a good place because it gives you the space necessary to optimize your keyword use and give some context to viewers. More is fine, but make sure you aren’t filling it with a lot of pointless fluff.

Make the first 150 characters of a description count

Of the words you write, the first 150 characters are the most important. That is because YouTube cuts it off with a (More) tag after the point, so the viewer has to specifically opt in to reading the rest. Not all of them are going to do that.

You should make sure those first characters tell the viewer what they really need to know in order to connect with what they are reading. From there you can focus more on keywords and the rest of the description, as it will still count the same towards searches.

It is also a great place to link out to other channels, your website, etc. Make sure your call to action (CTA) is in the first words, such as liking, subscribing, learning more, etc.

Have a good, high-resolution thumbnail

Thumbnails are pretty standard for monetized video channels at this point. You have probably noticed that they follow a certain pattern: silly face, bright colors, something odd in the background, over the top. Sure, it seems annoying. But they follow the formula because the formula works.

Now, you don’t have to do the same thing. You just want to make sure that you have an eye catching, visually stimulating thumbnail in the recommended 1280 x 720 size. There are a few generators out there to help you make one, but my thumbnail maker of choice right now is Adobe Spark.

Adobe Spark

Keep in mind that you want a standard format across all of your thumbnails. For instance, if you do your face on one then you should do them on all. If you use some kind of animation or logo, use that.

You want to be immediately recognizable to anyone who follows your channel right from the suggested videos sidebar, or the search results. If you have old videos, go back and upload thumbnails to each one to start getting some better click results.

Furthermore, make sure your thumbnails are readable: Viewers should be able to easily see what it is about at a glance when seeing it in the right-hand column of the suggested videos or on a small mobile device.

Utilize playlists – I mean it!

Playlists are incredibly helpful. First of all, they help you group together certain videos right on your channel. So let’s say you did a series on how to increase your YouTube views and it was split into ten videos. You would create a playlist on your channel titled “Super YouTube Tips” so that people could find them all in one place. But that has an additional benefit.

Search leans towards introducing playlists right at the top of the results page. It also allows people to specifically search for playlists. That is great because it can introduce viewers to multiple videos instead of one and many will choose to pop on a playlist and watch straight through everything there.

If you do a creative series with a continued plot you will find this is a huge help and makes it a million times easier to sort it out, even if YouTube screws with the order on your channel (an issue more than one content creator has had in the past, take it from me).

To sum that up, YouTube playlists help you:

  • Increase your chances to rank your video content for a wider variety of phrases (which is also helpful for brand-focused results)
  • Improve engagement rate with your videos by giving your audience collections of videos so that they can sit back and watch endlessly. And we know that engagement is the crucial ranking factor when it comes to YouTube rankings.

To illustrate the point, here’s a quick example of how we were able to grab two spots for our show name with the playlist:

Playlist ranking

Bonus tip: Feature your videos on your site

Finally, an obvious but often missed tactic is to increase your YouTube channel performance by prominently displaying your videos on your site. It’s simple: the more people watch your videos (especially if they watch more of each of your videos), the more exposure YouTube offers to your content through suggesting your videos as related.

One of the most effective ways to generate more views for your channel is to promote your videos outside of YouTube, i.e. use your blog and social media channels. There’s a variety of WordPress themes that aim at doing exactly that: promote your YouTube channel prominently on-site.

Furthermore, promote your videos on social media as much as it makes sense for your audience to build additional exposure, links, and re-shares.

Do you have any tips for optimizing YouTube? Let us know in the comments!


source https://searchenginewatch.com/2018/03/02/5-youtube-optimization-tips-to-improve-your-video-rankings/

Thursday, 1 March 2018

How to Use Shortcodes in your WordPress Sidebar Widgets

Do you want to learn how to use shortcodes in your WordPress sidebar widgets? Shortcodes allow you to do add additional features in your WordPress post content and other areas of your website. In this article, we will show you how to use shortcodes in your WordPress sidebar widgets.

How to use shortcodes in WordPress sidebar widgets

What Are Shortcodes?

Shortcodes allow you to add dynamic items like contact form, tables, and others inside your WordPress content area.

You can also use shortcodes in your widgets to add these dynamic items in your sidebars and other widget-ready area.

Let’s take a look at how to easily add and use shortcodes in your WordPress sidebar widgets.

Method 1: Adding Shortcode in WordPress Sidebar Using Text Widget

First thing you need to do is drag & drop a Text widget to your WordPress sidebar on the Appearance » Widgets screen in your dashboard. After adding the widget, you can simply add your shortcode inside the text edit area of the widget.

Adding shortcode in Text widget

Don’t forget to click on the ‘Save’ button to store your widget settings.

You can now visit your website and see the shortcode in action.

Shortcode displayed in sidebar widget

Method 2: Adding Shortcode in WordPress Using Custom HTML Widget

Sometimes you may want to add custom HTML code around your shortcode which may not work so well in the plain text widget. In that case, you will need to add your shortcode using the ‘Custom HTML’ widget.

By default, shortcodes are not allowed to be executed in a custom HTML widget. To change this, you will need to add the following code to your theme’s functions.php file or a site-specific plugin.

add_filter( 'widget_text', 'do_shortcode' );

After that, you can simply add a ‘Custom HTML’ widget to your sidebar and add your shortcode inside it.

Adding shortcode inside Custom HTML widget in WordPress

Don’t forget to click on the save button to store your widget settings.

You can now visit your website to see your shortcode in action.

Shortcode added by Custom HTML widget

We hope this article helped you learn how to easily add shortcode to your WordPress sidebar widgets. You may also want to see these essential tips for using shortcodes in WordPress.

If you liked this article, then please subscribe to our YouTube Channel for WordPress video tutorials. You can also find us on Twitter and Facebook.

The post How to Use Shortcodes in your WordPress Sidebar Widgets appeared first on WPBeginner.


source http://www.wpbeginner.com/wp-tutorials/how-to-use-shortcodes-in-your-wordpress-sidebar-widgets/

A guide to the standard reports in Google Analytics: real-time reports

Google Analytics is a tool that can provide invaluable insights into what’s happening on your website, your levels of traffic and engagement, and the success of your campaigns.

However, to a newcomer to Google Analytics, the array of different reports available can seem a little overwhelming. Once you’ve got Google Analytics set up for your website, where do you look first? Where will you find the most useful data for your campaigns?

Reports on Google Analytics are broadly divided into two types. There are standard reports, which are the preset reports listed down the left-hand side of your dashboard, divided into the segments Real-Time, Audience, Acquisition, Behavior and Conversions.

The data that appears in these is predetermined by Google Analytics, but you also have the option to customize many of them, allowing you to use the standard reports as a base and then tweak them to your liking.

Then there are custom reports, which can either be created completely from scratch with whatever data you want to gather together in a single view, or created based on a standard report, with additional segments or filters added to tailor the report to your needs.

There are dozens of different standard reports available in Google Analytics, providing a wealth of insight into audience demographics, sources of traffic, content performance, campaign performance and much, much more.

In this series, we’re going to tackle the gargantuan task of explaining each segment of Google Analytics and the standard reports they contain. We’ll cover the data you can find within each standard report, and how it can be used in your marketing and SEO efforts.

First up are real-time reports. How do they work, and what kinds of campaigns are they useful for?

What are real-time reports?

As it says on the tin, the Real-Time Reports section in Google Analytics allows you to monitor activity on your site in real time, as it happens.

It can be a useful way of “taking the pulse” of your website in a specific moment, or tracking the response to a campaign in real-time. Just don’t get too obsessed with watching the numbers go up and down!

A visitor to your site qualifies for the Real-Time Report if they have triggered an event, or pageview, within the last five minutes. This is different from the other types of standard report, where a session is defined by a 30-minute window.

The Real-Time Reports section is broken down into:

Overview

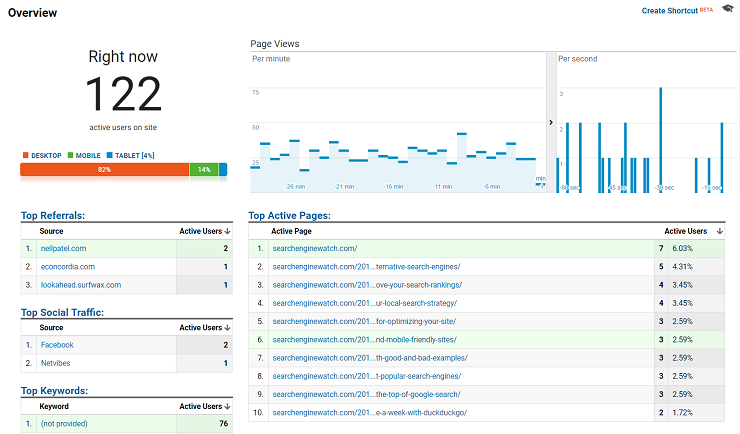
This is the big-picture view of what’s happening on your website at any given moment. The Real-Time Overview report shows how many users are currently active on your site, a list of the top active pages, top sources of referral traffic, top social traffic sources, the top locations that users are visiting from, and more.

Locations

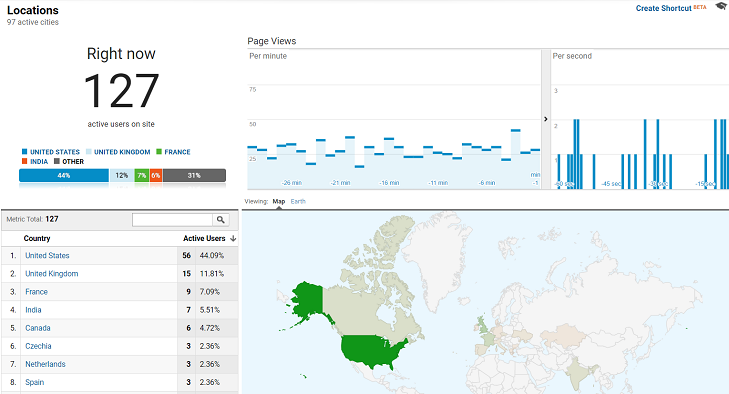
This report drills deeper into the available data on where exactly in the world your users are accessing your website from.

In the initial view, this information is broken down by country, but if you select a country name from the list or the map of active users, you can ‘zoom in’ on exactly which cities your users are logging in from. If you select a city from the list or map, you can get even more granular and filter the data by that specific city.

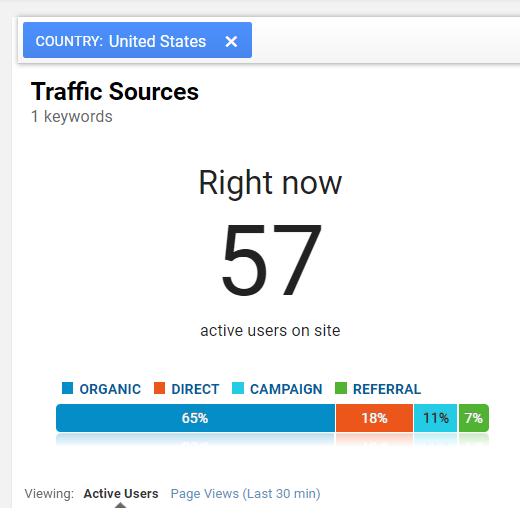
Note that if you apply a country or city filter and then navigate to another report in the section, such as Traffic Sources, the data presented to you will continue to be filtered by that region until you opt to clear the filters.

Real-time location data can be useful if you’re running a campaign targeted at a specific region of the world and want to monitor its performance, or if you want to get a sense of where your users are accessing your website from at different times of day.

Traffic Sources

As the name indicates, this real-time report shows where on the web your visitors are coming to your site from.

The data is organized by medium (how the visitors are getting to your site – organic search, direct traffic, via email, via social media, and so on), source (where visitors are coming to your site from), and the number of active users – or, if you select the Page Views filter, the number of pageviews from that traffic source in the last 30 minutes.

This real-time report can be useful if, for example, you’ve had a few different mentions in the press recently and want to gauge which one is generating more traffic to your site, or if you’re running a social campaign and want to assess how well it’s working.

Content/Screens

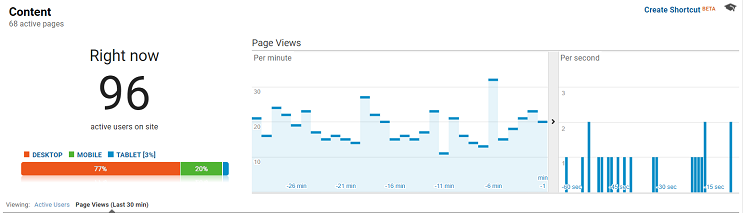
The Content report (called Screens if you’re viewing analytics for a mobile app) shows which specific pages of your site visitors are currently active on, showing the page URL, the page title, and the number and percentage of active users on that page. Again, you can switch to viewing this by pageviews (or screen views) in the last 30 minutes instead of by active users.

Another handy feature of the real-time Content report is that it breaks down your user data by device, so you can see which percentage of visitors are accessing your site on desktop, mobile, and tablet.

Events

This report is useful if you’ve used Google Analytics’ Events feature to create custom events for interactions on your site – such as button clicks, downloads, video plays, ad clicks, and so on. More detailed, non-real-time data on Events can be found in the Behavior section of your Google Analytics dashboard.

You can then use the real-time data from this report to track the top events on your site as they occur, or switch to viewing those activated in the past 30 minutes. Google sub-divides these into Event Categories and Event Actions, and as with the Content report, also shows you the breakdown of which devices your visitors are using when they trigger Events.

Conversions

The Conversions report will track the real-time completion of any Goals you’ve set up in Google Analytics.

Goals are different to Events in that they track the completion of an activity that contributes to the success of your business, rather than just an interaction with your site. This can include making a purchase, filling in a sales form, subscribing to a mailing list, and so on. More detailed, non-real-time data about Goal completions can be found in the Conversions section of GA.

As with the previous two reports, the Real-Time Conversions report breaks down which devices your visitors are using when they convert, and also allows you to view the data by active users or by Goal Hits in the last 30 minutes.

How can you use real-time reports in your campaigns?

Testing and troubleshooting campaign setup

One very handy quick use for real-time reports in Google Analytics is to test that everything is set up and working correctly. Unlike with non-real-time reports, there’s no wait for data to begin displaying, so you can immediately tell if things are in order, or if there’s an issue you need to troubleshoot.

Maybe you’ve just set up a new tracking feature in GA, such as a new Event or Goal, and you want to make sure you’re registering the form submissions properly. Or you might have created a new tracking link for your email marketing campaign, and you want to test that it’s showing up in the reports as expected.

You can test these out by having someone from your team carry out the Event or Goal that you want to track, or click the link in your campaign email, and then monitoring real-time reports to make sure that the activity shows up correctly.

Monitor campaigns unfolding in real-time

As we mentioned earlier, it’s not always a good idea to get too bogged down in watching the numbers on your site go up and down – often, the best insights from a campaign can be gleaned after the fact, as it’s not always clear what’s taking place in the moment.

However, there are some types of campaign that benefit from real-time monitoring and influencing. For example, say you’re running a social campaign, and you want to adjust your level of activity in real time based on audience interaction.

Real-time reports are the best way for you to monitor this, and will tell you useful things like when activity from a post or a tweet has dropped off (meaning it’s time to push out the next one), turn on paid promotion, or ask influencers to give your campaign a boost.

Capitalize on what’s trending

You may also need to react in the moment to something that isn’t part of a pre-planned campaign. For example, sudden activity on a specific piece of content or on one of your social channels might alert you to a big press hit, or that particular topic suddenly being in the news.

Checking up on real-time reports every so often can tip you off to when this is happening, and allow you to respond in an agile fashion. If it’s a trending piece of content, you could spotlight it on your front page, or knock out a quick update or refresh.

If it’s a big press hit, you can monitor where the traffic is coming to your website from and plan how to capitalize on the attention: are lots of people finding you on Facebook? Can you update your Facebook page or push out some paid social advertising? If people are searching for your brand all of a sudden, now might be a good time to check how you appear for those search terms and if necessary, do some on-the-spot reputation management.

How do you make use of real-time reports in Google Analytics? If you have any novel ways of integrating these into a marketing campaign, share them in the comments!


source https://searchenginewatch.com/2018/03/01/a-guide-to-the-standard-reports-in-google-analytics-real-time-reports/

The 5 SEO mistakes holding your ecommerce site back right now

Ecommerce sites are so different from other web platforms that SEO for them can almost be considered a separate branch of the industry.

While many fundamentals are the same, ecommerce, especially of the marketplace variety, introduces complications that could almost be ignored if they occurred on a smaller scale on a different type of website

Let’s talk about 5 SEO mistakes that could be holding back your ecommerce site as we speak.

1. Duplicate content

Duplicate content is the bane of the ecommerce site’s existence, and I can almost guarantee you right now, if you have an ecommerce site that you haven’t audited for duplicate content, you have duplicate content. Especially if your site is on a marketplace model.

It doesn’t matter what platform you’re using or how informed you are about SEO – if you haven’t checked for it recently, it’s probably hurting your rankings.

Consider what Ben Davis at Econsultancy noticed happened to pages on three of Sports Direct’s websites. The parent company hosted the same product with identical product descriptions and similar layouts, on three different sub-brands: Cruise, Flannels, and Van Mildert.

What he found is that none of the pages had a consistent presence in the search results. The brand’s strong authority with search engines allowed the pages to rank with some semblance of consistency on the second page, but with a very important caveat: only one page would show up at a time.

Whenever one page did well, the others fell well below position 100 in the search results, effectively impossible to find.

This type of duplicate content is common for ecommerce sites, in particular marketplaces that sell products, which can be found elsewhere. Large marketplaces generally use generic product descriptions provided by the product seller, but in doing so they are creating duplicate content and, unless they are lucky, they almost certainly will not rank consistently on the front pages of the search results.

Custom product descriptions and design templates are highly recommended in order to combat this problem. Ecommerce sites with very large marketplaces can’t necessarily hope to ever do this for every product.

But following the Pareto principle – an economic principle which states that 20% of the invested input is responsible for 80% of the results obtained – updating your highest performing and most promising product pages with unique content is well worth the effort if you do so with a strong background in both SEO and writing copy for conversions.

However, this isn’t the only type of duplicate content that plagues ecommerce sites.

Another frequent issue is duplicates on your own site. The most common cause of this form of duplicate content is placing a filter in the URL parameter, such as a URL parameter for different colors of the same product, URL parameters to filter products on a category page, and so on.

While this form of duplication doesn’t typically lead to results as extreme as duplicates across different websites, it does dilute the search engine authority dedicated to any single version of the page, and if done en masse it can result in a downgrade in your site’s overall rankings because of Google Panda.

To deal with this type of duplicate content, you need to be sure to implement the rel=canonical tag in such a way that it consistently points to only one URL for any page with nearly identical variations.

2. Too many low-performing indexed content pages

The correlation between additional content on your site and additional search engine traffic is probably the most battle-tested strategy out there. A solid content marketing strategy is essentially guaranteed to increase your search engine traffic in the long haul, and we’ve seen it happen for literally every single client who stuck with it long enough to see the results.

Even so, there are circumstances in which a poorly optimized content strategy can actually backfire, produce too many irrelevant pages, and believe it or not, drag down your entire site in the search results. In fact, this happens a lot more often than many people realize.

Consider the case of Une Belle Vie. When they came to Inflow for help, they were seeing declines in search engine traffic.

After analyzing their site and performance in the search engines, Inflow concluded that the ratio of content to products was too high. This was diluting their authority with search engines and placing too much crawl budget and PageRank in the hands of low-performing blog posts.

After carefully identifying which pages to remove and which to keep, the site saw a steady increase in search traffic, a 30.04% jump in revenue, and a 5.25% bump in conversion rates.

So, does this mean you should shut down your blog?

No! I definitely wouldn’t recommend that, certainly not as a first resort at least.

The lesson here is more nuanced. Simply adding content to your site is a strategy that can do more harm than good by diluting your authority with search engines. If I had to guess, I don’t believe that Une Belle Vie’s traffic losses were the result of bad content, but of an unfocused content strategy without consideration given to search engines.

Your content efforts need to be focused, and it’s crucial that any authority built by your content strategy is channeled to your product landing pages.

As an important point, I would always first consider optimizing existing pages over removing them. Pages that perform relatively weakly often do so because they don’t send a message clear enough to the search engines, about their purpose.

It is also often the case that several thin pages of content should be combined into a single, comprehensive resource. Keyword research and knowledge of technical SEO are a big plus here.

Only after addressing opportunities for optimization should you start cutting pages. In the process, it’s important to ensure that the pages you remove:

  • Are not a source of existing search engine traffic
  • Are not capturing inbound links from external sources
  • Are redirected to related resources to capture any inbound authority they may have already had

3. User-generated content (not enough or too much)

User-generated content is a double-edged sword. It can work wonders. Wikipedia is entirely user-generated, and it wins the search results. It’s been central to Amazon’s success, with user reviews building more trust with buyers than any branding efforts ever could.

But the dark side of user-generated content is as ugly as its upside is beautiful. When Google first released Panda, eBay fell from #6 to #25 on Moz’s list of sites with the most top ten search result listings. The low quality content produced by seller/users on eBay was definitely a factor and likely central to those losses.

So, how should you deal with user generated content?

First, I want to stress that user-reviews are almost certainly a good move. Recent studies have shown that adding user reviews to your website improves organic search traffic by approximately 30%.

It’s difficult to estimate to what extent this is due to a subsequent reduction in portions of duplicate content, to rich snippets including star ratings in the search results, to Google ranking pages with user reviews higher directly, or to user behavior, sending more positive signals to Google after user reviews were added.

However, it is that these factors add up, the end result is clear. Adding user reviews to your site will almost certainly improve your search engine traffic.

If you’re afraid of user reviews trashing your reputation, that’s less of a concern than you might think. Believe it or not, products with diverse star ratings actually perform better than products with five-star only ratings. By including some authentication into the process, you can cut down on trashing from anonymous sources, and if you respond well to criticism, it can often improve performance better than never having been criticized in the first place.

Bear in mind that most people won’t leave a review unless you ask. Research by Trustpilot indicates that people are twice as likely to leave a review if you ask them (jumping from 14 to 29%).

So, what about the dark side of user-generated content? Consider the case of eBay versus Wikipedia. Both are user-generated content sites, but Wikipedia thrives under Panda while eBay suffered after its introduction.

The key is process. Wikipedia has processes in place to ensure quality. While those processes wouldn’t satisfy a college professor, they are sufficient to create a relatively trustworthy resource with the ability to consistently meet quality expectations.

Putting moderators and other processes in place to keep the quality level high are vital if you want user-generated content to work for your ecommerce platform. Giving users the ability to rate one another’s content also helps keep quality levels high. Take Amazon’s ability to sort reviews by “most helpful” as the gold standard here.

4. Not optimizing existing pages with better keywords

This is one change that every ecommerce site should make, preferably on some sort of repeated schedule.

Keyword research is one of those factors that’s so important for SEO that it’s taken as obvious, and for that reason it also paradoxically gets ignored more often than it should. This is especially true when it comes to optimizing your existing pages.

Here is a process that I recommend using that Darren DeMatas calls the “Double Jeopardy” technique, and he shares an example of using it to boost search traffic by an unparalleled 1780%.

Here is the gist of the process:

1. Go to Google’s Keyword Planner and add your product page URL to the tool. To narrow it down to informational keywords, you can add “who,” “what,” “when,” “where,” “why,” and “how” as required terms. This is good for blog posts and similar content, but not a good fit for product landing pages.

2. Take the keywords to SEMrush or a similar tool in order to identify which keywords have competition you can beat. In addition to metrics provided by tools like this, you should also scope out the competition on the front page for those phrases in order to ensure that they have the quality levels you can beat.

3. Find your highest performing pages for the target keyword by performing a “site:domain ‘keyword’” search in Google. This will tell you which page on your site already performs best for the keyword.

4. Do an “inurl:forum” search for your keyword to see what information people have on the topic that you won’t necessarily find on the front page of search results. Forums are a great place to start the research, since they give you an idea of exactly what people want to know or are struggling with.

Whether you are using this to put together a blog post or a landing page that overcomes buyers’ objections, this research is incredibly useful. Other creative searches and sources of information are also encouraged.

5. Now update your content to ensure that it would be the most promising thing on the front page for that search phrase. That means your title should stand out and that the content on your page either solves users’ needs better than anything else on the front page, or that it overcomes buyer objections and understands their purchase intents better than any other landing page, on the front page.

We’ve developed similar processes internally and they almost never fail to increase search engine traffic, especially when applied as a strategy for your entire site, as opposed to an occasional tweak to a few pages on your site.

Using this process, you capitalize on your existing page data and authority, in order to rank for the kinds of terms that Google is already prepped to reward you for, as opposed to simply picking the highest traffic keywords off, of the list of suggestions that Google’s Keyword Planner gives you, after plugging in a generic and obvious keyword.

Keep in mind that you can also put a competitor’s URL into the keyword planner to get suggestions.

Another common issue with keywords on ecommerce sites is their hyper-focus on branded keywords. Most product pages are built around the product name and the brand name.

By no means should you remove this information or take it out of the most prominent keyword locations (like the URL, title tag, and first paragraph). However, in addition to this branded information, you should also make an effort, to include keywords related to the product that aren’t about the brand or product model.

These may be referred to as “generic” keywords, although it’s still important to make an effort to use highly specific keywords matching very specific user needs. The point is that you should step up your keyword game and indicate what the page will do for people who aren’t searching for specific brands or product names.

5. Poor internal linking

Ecommerce sites often have an enormous number of products, and as a result it can be incredibly difficult to reach any given page using the links on the site. This doesn’t just mean it’s hard for a user to navigate to a page, it also means that PageRank flow through your site can become diluted, leading to important pages receiving less authority with the search engines than they ought to.

Victorious SEO was able to help Blomdahl USA earn 440% ROI, in large part by repairing poor link architecture.

Getting your link architecture under control is an absolute necessity if you want your ecommerce site to be optimized for search engines. Issues with link architecture generally come in four different forms:

Poor semantic structure

A link architecture with this issue doesn’t organize the site, hierarchically. Pure PageRank is only one factor the search engines consider, and the relevance of the links is also a crucial consideration.

Site navigation, folder structure, and interlinking should be systematic. Some organic contextual cross-linking between categories is of course fine, even preferred, but if there is no clear hierarchy in place at all, your interlinking does very little for you.

Excessive link depth

Something is very wrong if it takes more than a few clicks to get from the homepage to any product page. Consider the six degrees of separation rumored to connect any two individuals on the planet. If it takes 10 degrees of separation to get from your homepage to a product page, even the most obscure one, you do not have an optimized site.

Too many links from one point to the next means it’s difficult for search engines to crawl your site and discover pages. It also means that those deep pages receive almost no PageRank.

No prioritization

This is the opposite of excessive link depth. It’s what happens when there are so many links on every page that the most authoritative and important pages on your site receive virtually no attention from search engines. This is a case of diluting your authority by not prioritizing what matters.

Not enough links

Related to excessive link depth, sometimes it’s the case that a page may not be reachable at all from links elsewhere on the site. The most common cause of this is using two different platforms to create separate sections of the site, then failing to interlink them.

Conclusion

I’m not sure if I’ve ever seen an ecommerce site that wasn’t suffering from SEO issues of some kind.

There is essentially always room for improvement, and these five mistakes are the typical places I find myself starting. If you run an ecommerce site, I highly recommend starting with these issues.


source https://searchenginewatch.com/2018/03/01/the-5-seo-mistakes-holding-your-ecommerce-site-back-right-now/

How to Create an Interactive Poll in WordPress (Step by Step)

Do you want to run an online poll on your WordPress site? Polls are an interactive way to engage your audience, while getting useful information from them. In this article, we will show you how to easily create and add a poll in your WordPress website.

How to create an online poll in WordPress

Which Tool to Choose for Adding a Poll in WordPress?

There are plenty of WordPress plugins and online tools that allow you to embed polls on your WordPress site. Many of them require you to create an account, some store data on their own servers, and others have terrible user experience.

If you are looking for a good user experience, with full control on poll data, then you’ll need WPForms. It is the best WordPress form builder plugin and their pro plan includes powerful surveys and polls addon.

With WPForms, you’ll be able to do the following:

  • Create polls in WordPress using a drag and drop form builder
  • Gather poll results on your own websites
  • Show votes count when user submit their vote
  • Display poll anywhere on your website
  • Show poll results anywhere on your website

Having said that, let’s take a look at how to easily create online polls in WordPress using WPForms.

Disclosure: WPForms is created by the same team behind WPBeginner. It is one of our premium WordPress plugins.

Creating Online Polls in WordPress

First thing you need to do is install and activate the WPForms plugin. For more details, see our step by step guide on how to install a WordPress plugin.

WPForms survey and polls addon is part of their Pro plan which you’ll have to purchase. WPBeginner users get an additional 10% off by using the WPForms coupon code: WPB10.

Upon activation, you need to visit the WPForms » Settings page to enter your license key. You can find this information from your WPForms account.

WPForms license key

Next, you need to visit WPForms » Addons page and scroll down to the Surveys and Polls addon. Go ahead and click on the Install addon button. Once installed, you need to click the ‘Activate’ button to start using the addon.

Survey and polls addon

Now you are ready to create an online poll.

You can start by going to WPForms » Add New page to create a new form. This will launch the WPForms’ drag and drop form builder interface.

Create a poll form

First you need to provide a title for your poll form and then click on the Poll Form template.

This will load a pre-made poll form template with example fields already added into the form.

Editing your poll form

You can just point and click to edit any field, rearrange them with drag and drop, or remove them. You can also add new form fields from the left column.

Poll results can be collected and displayed for any of the following field types:

  • Dropdown
  • Checkboxes
  • Multiple Choice

Next, you need to click on the settings button from the left menu and then click on Surveys and Polls tab. Here you can enable or disable poll results.

By default, WPForms poll template will display poll results to users after they submit their vote. If you uncheck this option, then users will not see the poll results.

Instead, you can show users a custom message or redirect them to another page or URL. You can configure the confirmation setting by clicking on the ‘Confirmation’ tab.

Select a different confirmation after poll submission

Once you have created the poll form, go ahead and click on the save button to store your form settings. You can now click on the close button to exit the form builder.

Adding The Poll to Your WordPress Website

WPForms makes it quite easy to add your online poll anywhere on your website including posts, pages, custom post types, and sidebar widgets.

Simply edit the post, page, or post type where you want to add the poll. On the post edit screen, click on the ‘Add Form’ button.

Add form button

This will bring up a popup where you can select the poll form you created earlier and click on the insert form button to continue.

You will now see the form shortcode added into the post editor.

You can save or publish your post/page and visit your website to see your poll in action.

Poll in a WordPress blog post

You can also add your poll to a sidebar or widget ready area. To do that, you need to go to Appearance » Widgets page and drag the WPForms widget to a sidebar where you want to display the poll.

Poll widget

In the widget settings, you need to select the poll form you created earlier. You can also provide a title for the widget as well as show form name and description.

Don’t forget to click on the save button to store your widget settings. You can now visit your website to see your online poll displayed in a sidebar or another widget-ready area.

Sidebar poll

Viewing Live Poll Results

If you have enabled poll results, then your users will see the results after submitting their vote.

Poll results displayed for everyone

You can also view poll results at any time without submitting a vote. Simply visit WPForms » All Forms page and click on the ‘Survey Results’ link below your poll form.

View poll results from admin area

This will take you to the poll results page where you will see poll responses in an interactive chart. You can change the charge type and export the results in JPEG, PDF, and print formats.

Poll results page

Embed Poll Results Anywhere in WordPress

WPForms also allows you to easily embed your online poll results anywhere on your website. This is particularly useful if you had disabled poll results and wanted to share them later.

Here is how to embed poll results in WordPress.

First you will need to find out your poll form’s ID. You can do this by going to WPForms » All Forms page and looking for the shortcode next to your poll form.

Find your poll ID

In the shortcode, you will find your poll’s ID number. For example, our test poll’s ID is 171 as shown in the screenshot above.

Next, you need to find out the field ID. This is the field in your form for which you want to show the results.

Simply edit your poll form and click on the poll field. You will find the field ID in the left column.

Field ID

Now that you have both required IDs, you can go ahead and add the poll results shortcode like this:

[wpforms_poll form_id="171" field_id="1" label="true" counts="true"]

Don’t forget to replace the form ID and field ID values with your own. You can use this shortcode in WordPress posts, pages, and text widget.

We hope this article helped you create online poll in WordPress. You may also want to see our guide on how to use contact form to grow your email list in WordPress.

If you liked this article, then please subscribe to our YouTube Channel for WordPress video tutorials. You can also find us on Twitter and Facebook.

The post How to Create an Interactive Poll in WordPress (Step by Step) appeared first on WPBeginner.


source http://www.wpbeginner.com/plugins/how-to-create-an-interactive-poll-in-wordpress-step-by-step/